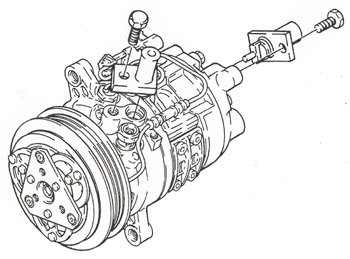
 The 1994 Saturn A/C compressor, used on vehicle models produced from 1991 to 1994, is a variable displacement rotary vane-type pump.
The rotor assembly houses five lightweight vanes that extend outward contacting the cylinder wall, creating the compression area.
The compressor has an interior control valve that allows it to change its pumping capacity or displacement, reacting to heat loads on the A/C system.
This range of displacement can vary from 10% (8 cc) to 100% (110 cc). Due to the force of the torsion spring acting on the rotating plate, the compressor’s natural or resting state is at minimum displacement.
 Mounted in the front head is a high-pressure relief valve. To protect the A/C from high pressure in the event of an electrical control system failure, the valve will begin to open at about 530 psi.
As system pressure is reduced, the valve will reseat at about 425 psi. If the valve ever opens, it must be replaced.
Also mounted in the front head is a high temperature sensor to protect the compressor from overheating. The sensor will open the clutch circuit at about 302° F (150° C).
Note: The temperature sensor can be replaced without discharging the A/C system.
Compressor Tips
The PCM will monetarily shut off the compressor under the following conditions:
– Engine Temperature
• A/C off at 244° F (118° C).
• A/C on at 234° F (113° C).
Evap Low Ambient Protection (ELAP): If ambient air temperature is between 40° and 60° F (14°-20°C) and the vehicle speed is greater than zero, the compressor cycles once every 90 seconds, depending on manifold air temperature (MAT) and vehicle speed. 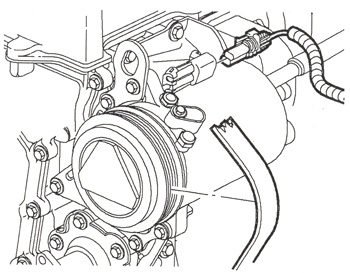
Hi/Low Pressure Cut-Out Switch: The A/C compressor is off if discharge pressure is greater than 400 psi +1 – 20 psi and comes back on at 250 psi + 1– 50 psi. Cooling will run for 180 seconds after the A/C is turned off if the pressure switch is activated.
The A/C system is off if the discharge pressure is less than 40 psi.
Cooling Fan Logic: The fan will be on with the A/C switch on, however the fan is off at speeds greater than 70 mph for 180 seconds. The fan runs for 180 seconds after the A/C system is turned off.
Compressor Removal
Should you need to remove and replace a compressor, use the following steps.
 Note: When servicing the Saturn compressor, or any vehicle model compressor for that matter, always keep dirt and foreign material from getting on or into the compressor parts or system. A/C system parts should be kept clean and any parts to be assembled should be cleaned with a non-petroleum-based solvent.
1. Disconnect the negative battery cable.
2. Recover the refrigerant using an approved refrigerant recovery system. Measure the amount of oil lost during recovery and record that amount.
Note: It is important that you add the recorded amount of new Saturn PAG compressor oil before charging the system.
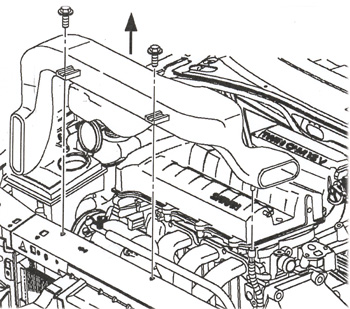
3. On the DOHC engine (1.9L 16 V LLO engine), you will need to remove the air induction ducts.
See Figure 1.
4. Remove the accessory drive belt from the compressor clutch pulley by rotating the belt tensioner clockwise.
5. Disconnect the compressor clutch CPA and electrical connector.
See Figure 2.
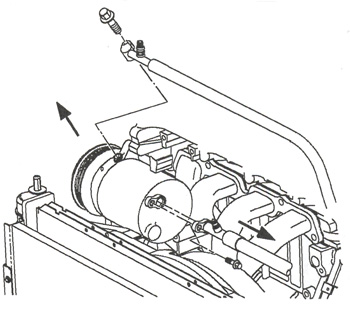
 6. Disconnect the suction and discharge hoses at the compressor.
See Figure 3.
7. Install plastic bags on the open end of the low- and high-side hoses.
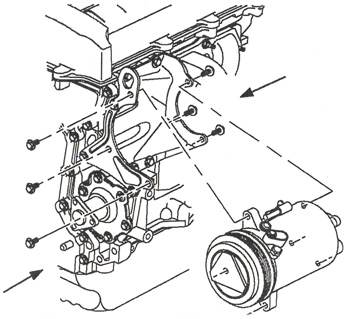
8. Remove the rear compressor bracket bolts.
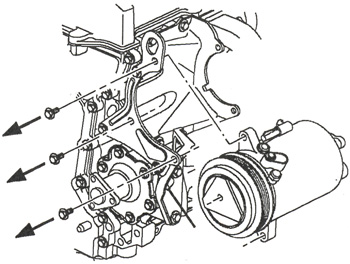
9. Remove the front compressor bracket bolts.
See Figure 4.
10. Remove the compressor.
Note: It’s important to keep the compressor level during removal to avoid any loss of oil from the low- or high-side ports.
Taking a Compressor Oil Measurement
1. With the compressor on a clean bench, install high- and low-side compressor drain adaptors SA9149AC-6 and SA9149AC-5 on the high- and low-side ports.
See Figure 5.
2. Drain the oil into a clean container from the high-side port first, then move the compressor to a different position to remove all the oil possible. Turn the compressor over to drain the oil from the low-side port and rotate the compressor drive plate in both directions to remove oil from the compressor chambers.
 3. Again, move the compressor to a different position to remove as much oil as possible. Turn the compressor back to the high-side port to re-drain and back to the low-side port to remove the maximum amount of oil.
4. Stop oil draining when the oil coming from the ports becomes only drops. Measure the oil removed and record.
5. Discard the removed oil as replacement compressors come with 150 cc of new Saturn PAG compressor oil installed.
Judging Contamination of Compressor Oil
Unlike engine oil, no cleaning agent is added to the compressor oil. Even if the compressor is run for a long period of time, the oil should not break down, as long as there are no problems with the compressor or the A/C system.
Inspect the extracted oil for any of the following conditions:
1. Color change from clear to dark brown or black.
2. The presence of foreign substances, metal filings, etc. in the oil.
If the oil extracted from the compressor is found as mentioned above, the receiver drier must be replaced.
Warning: Failure to replace the receiver drier will result in damage to a new compressor.
 New Compressor Installed Oil Change
Important: Service compressors are charged with 150 cc of Saturn PAG refrigerant oil.
1. With the compressor low- and high-side ports in an upright position, remove the high-side cap retaining bolt slowly to release the nitrogen charge from the compressor. Remove the high- and low-side caps.
Note: Take care not to let any oil escape.
2. Install the caps on the removed compressor.
3. Install oil drain adaptors on the low- and high-side ports.
4. Drain the compressor oil as described in step 3 of “Taking a Compressor Oil Measurement.”
There should be at least 100 cc or more of oil that can be drained from the new compressor, since it is charged with 150 cc of oil.
Note: Oil drained from the new compressor can be reused if drained into a clean container.
5. Add the recorded amount of oil drained from the removed compressor and also add the amount of oil lost during recovery.
This will keep the same amount of oil in the A/C system.
Compressor Installation
Note: Keep the compressor level during installation to avoid any loss of oil from the low- and high-side ports.
1. Install the compressor to front bracket with three bolts. Finger-tighten only.
2. Install the compressor to the rear bracket with three bolts.
Tighten the front and rear bolts to specifications:
Front Bolts:
Torque: 49 Nm (36 ft.-lbs.)
Rear Bolts:
Torque 25 Nm (19 ft.-lbs.)
See Figure 6.
3. Remove the plugs or plastic bags from the suction and discharge hoses. Lubricate and install the new O-rings.
4. Install the hoses to the compressor low- and high-side ports. Tighten bolts to specifications:
Suction Hose:
Torque: 25 Nm (19 ft.-lbs.)
Discharge Hose:
Torque: 25 Nm (19 ft.-lbs.)
5. Connect the compressor clutch electrical connector and the CPA.
6. Install the accessory drive belt.
7. Connect the negative battery cable.
8. Set the clock to the proper time.
9. On a DOHC engine, install the air induction duct.
10. Evacuate, charge and leak-test the A/C system.
11. Run the A/C performance test.
Source: Information and illustrations courtesy of Saturn Corp.