Applicable Vehicles:
• 2001 MDX – All;
• 2002 MDX – From VIN 2HNYD1…2H500001 through 2HNYD1…2H543293.
Diagnosis:
With the hood open and the vehicle parked, rock the vehicle from side to side, and listen for a creaking or ticking noise coming from the front damper area. Test-drive the vehicle as needed. If a creaking or ticking noise comes from the dashboard or front damper area, perform the below repair procedure.
Parts Information:
Repair Procedure for the Following Vehicles:
• 2002 MDX: From VIN 2HNYD1…2H523466 through 2HNYD1…2H532574
1. Remove the appropriate front damper/spring assembly.
2. While wearing eye protection, use an angle grinder with sandpaper to remove any spot weld burrs that are raised above the surface of the damper mounting area (See Fig. 1).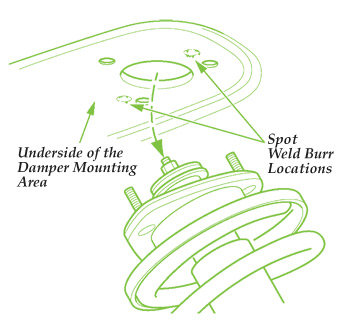
3. Grind down the burrs flush with the surrounding area. Grinding off more material than necessary may create an uneven surface and could result in additional noise.
Note: The exact location of spot weld burrs may vary. Be sure to check the damper mounting area completely.
4. Prepare and refinish the bare metal to prevent rust.
5. Clean the surface of the damper mounting base with isopropyl alcohol.
6. Install three shims to the damper mounting base as shown in Fig. 2. Position the shims so the edge of the shim is slightly rolled over the edge of the damper mounting base.
7. Reinstall the front dam-per/spring assembly.
8. Check the front wheel alignment, and adjust as necessary.
9. Test-drive the vehicle over bumps to make sure the noise is gone.
Repair Procedure for the Following Vehicles:
• 2001 MDX: All;
• 2002 MDX: From VIN 2HNYD1…2H500001 through 2HNYD1…2H523465
• 2002 MDX: From VIN 2HNYD1…2H532575 through 2HNYD1…2H543293.
1. Raise the vehicle on a hoist, and remove the front wheels.
2. Remove the wheel sensor harness bracket from the damper. Do not disconnect the wheel sensor connector.
3. Remove the brake hose bracket from the damper. Do not disconnect the brake hose.
4. Disconnect the stabilizer link from the damper (See Fig. 3).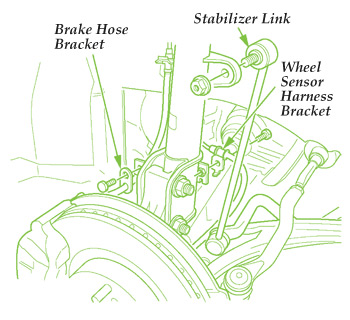
5. Position a floor jack under the front lower arm of the damper. Raise the floor jack to support the arm (See Fig. 4).
6. Remove the service caps from the upper portion of the damper cover.
7. Remove the three flange nuts from the damper, and lower the damper assembly with the floor jack.
8. Clean the surface of the upper damper mounting base with isopropyl alcohol.
9. Install three shims to the damper mounting base as shown in Fig. 4. Position the shims so the edge of the shim is slightly rolled over the edge of the damper mounting base.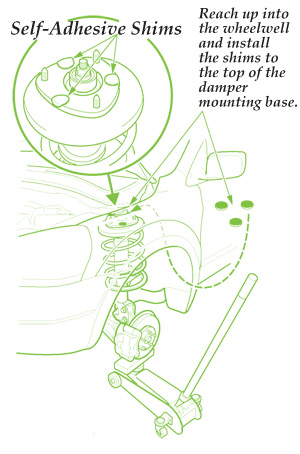
10. Reinstall the damper assembly. Torque the three flange mounting nuts to 59 Nm (43 lb.-ft.).
11. Reinstall the service caps to the upper portion of the damper cover.
12. Reconnect the stabilizer link to the damper, and torque the mounting nut to 75 Nm (55 lb.-ft.).
13. Reconnect the brake hose bracket to the damper, and torque the mounting bolt to 22 Nm (16 lb.-ft.).
14. Reconnect the wheel sensor harness bracket to the damper, and torque the mounting bolt to 9.5 Nm (7 lb.-ft.).
15. Reinstall the front wheels.
16. Test-drive the vehicle over bumps to make sure the noise is gone.
Written by Ed Dorowski, ALLDATA editor and Jeff Webster, ALLDATA technical writer.
Courtesy of ALLDATA.
For information on products offered by ALLDATA, visit www.alldata.com.