It’s Mechanical, Stupid!
Just about every student of politics remembers President Bill Clinton’s famous campaign slogan, “It’s the economy, stupid!” Allow me to paraphrase by saying, “It’s mechanical, stupid!” Yes, that’s right, mechanical failures can cause diagnostic trouble codes and, all too often, we tread the Primrose Path because we become lost in a maze of sophisticated analysis that leads us to believe otherwise.
Let me begin by saying that it’s easy to do. Most recently, a 1999 Chevy Tahoe was towed to my shop with a cranking, no-start condition accompanied by a backfire through the air intake system. The Tahoe had received the full off-road treatment including a body lift kit and engine reprogrammer. The owner had already retrieved a P1345 DTC through his reprogramming tool, but didn’t know what the code meant. The owner also noted that the engine had been backfiring intermittently the day before it had failed to start.v According to my information system, the P1345 essentially meant that the PCM detected a lack of synchronization between the camshaft position (CMP) and crankshaft position (CKP) sensors. The “diagnostic aid” section indicated that the P1345 might be caused by a loose CMP sensor, excessive play in the timing chain assembly, an incorrectly installed distributor, a loose distributor rotor or hold-down bolt, or might be caused by a poor connection, broken wire or broken wiring insulation. Given that this vehicle had been extensively modified, it made sense that a Saturday afternoon mechanic might have left one of these components loose or damaged a wire. A thorough inspection, however, proved otherwise.
Performance Chip Headaches
The aftermarket engine reprogrammer was unique because it featured a controller that plugged into the OBD II connector. With this controller, the owner could choose from a set of engine performance settings that included “performance” and “towing” adjustments. The controller also displayed engine performance trouble codes.
It’s always been my practice to approach performance chips with caution. More often than not, when the chip manufacturer “tweaks” the factory programming, he unwittingly creates an operating error that later resurfaces under a specific set of operating conditions, such as pulling a heavy load at our 8,000’ altitude. Thus it was with this reprogrammer. When accessed with a professional scan tool, the diagnostic memory contained a P1345 (incorrect crankshaft/camshaft position sensor correlation), a P0304 (camshaft position sensor circuit failure), and an array of oxygen sensor-related P0121, 137, 151 and 157 trouble codes contained in the current, fail-since-clear and history code categories. As I’ve mentioned before in this column, it’s important to understand the rationale of the code-setting process. Quite clearly, the P1345 and P0304 DTCs were related to the backfire and the cranking, no-start complaints. But, were the oxygen sensor codes relevant to the problem? Although the existence of these codes might indicate that the fuel system had been running lean at the time of failure, my priority was to get the engine running first.
Pin-Pointing the Codes
Chevy’s “R” engine is the traditional 350 cid or 5.7L small-block engine updated with a modern ignition and fuel delivery system. The engine incorporates a crankshaft sensor mounted at the harmonic balancer and a camshaft position sensor mounted in the distributor to sequence the ignition and fuel injection firing orders.
As mentioned above, the P1345 indicates that the signal from the crankshaft position sensor (CKP) signal isn’t synchronizing with the camshaft position sensor (CMP) signal. The P0304 indicates that the PCM failed to “see” a consistent signal from the CMP. Added together, the two trouble codes indicated that the engine could have, among other issues, a failed cam position sensor, timing chain or distributor drive gear.
Scope Testing
I might state from the outset that this Tahoe, with its full body lift and set of skid plates, is not an easy vehicle to work on. The distributor resides under a tangle of hoses and wires and is not the quick parts swap of its earlier 5.7L predecessors.
Consequently, I decided that the most direct diagnostic approach was to test the CMP signal at the PCM connector. Although the lab scope displayed a signal, it wasn’t the crisp, square-wave, high-amplitude pattern normally generated by the CMP’s Hall effect sensor. I concluded that the distributor was turning and that the CMP was producing a defective signal. Thus begins a sequence of events that resulted in this month’s first Diagnostic Dilemma!
Not in the Book
For the uninitiated, the 5.7’s distributor cap is held in place with two screws coated with thread-locking compound. Because the thread-locking compound fails to release, the screws may strip or the housings will break as the screws are removed. To ease removal of the screws, I hold a miniature butane soldering iron on the screw heads for a few minutes to soften the thread-locking compound.
With the cap removed, I rocked the distributor rotor by hand to ensure that it was engaged with the camshaft. Next, I cranked the engine to ensure that the timing chain was intact, which it appeared to be. Because the TDC timing mark on the crankshaft was hard to see, it made sense to remove the front skid plate to allow access to the crankshaft harmonic balancer so that I could rotate the engine to exact top dead center. 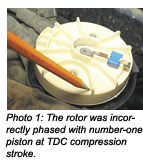 It was a good thing I did, because I discovered still another diagnostic issue, which was a loose harmonic balancer bolt! Rotating the engine to TDC indicated that the distributor rotor was approximately one tooth advanced in timing, see Photo 1. After removing the distributor, I found that the drive gear had worn out.
My original scope pattern might have been caused by the distributor gear remaining engaged until the engine built up oil pressure. When oil pressure built up in the oil pump, the distributor drive would slip a few teeth and run the engine out of time or slip altogether. (It’s mechanical, stupid!)
Replacing the Distributor Gear
When replacing this particular distributor gear, it will save time to follow the manufacturer’s procedure. The timing mark on the drive gear must align with a paint mark on the distributor housing. When these marks are aligned correctly, the shutter wheel will align with the distributor assembly. The drive slot on the oil pump shaft must also align with the distributor when the engine is rotated to #1 top dead center, compression stroke. Due to poor access and visibility, aligning the oil pump shaft can be difficult. To make matters worse, the distributor has no room for minor adjustments.
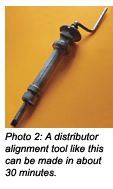 To align the oil pump shaft perfectly the first time, I built an alignment tool from an old HEI distributor by cutting the housing away, removing the drive gear and braze-welding a hand crank on the top of the shaft, see Photo 2. The hand-crank must align with the drive tang on the distributor shaft. This home-made tool will allow the oil pump shaft to be aligned so it will engage the distributor shaft as the distributor is dropped into the engine block.
The Diagnostic Dilemma
With that done, the question arose as to whether my original scope test had really indicated that the cam sensor itself was faulty. Remembering that the owner had reported that the engine had been backfiring intermittently the day before it failed to start, I considered several different diagnostic scenarios.
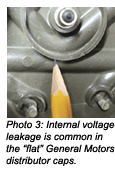 First, General Motors’ “flat” distributor caps have a tendency to arc from one cylinder to another, which might explain the misfire, see Photo 3. Although the odds are extreme, the CMP itself might also be faulty. Considering accessibility issues and that the Tahoe had accumulated nearly 80,000 miles on the odometer, I recommended and replaced the distributor cap, rotor and camshaft position sensor as a preventive repair.
The last step for this particular distributor installation is using a scan tool to adjust the CMP retard offset. If the CMP offset isn’t correct, the MIL will immediately illuminate when the engine is started and a P1345 code will be stored. In general, the CMP must be operating within a few degrees of “zero” to keep the MIL from turning on. Each adjustment may require a key-on, key-off cycle to “read” the new setting. The MIL will go off when the distributor is adjusted correctly.
As for the “oxygen sensor” trouble codes, a second conversation with the owner indicated that these codes were stored each time the engine reprogrammer was set to the “towing” mode. Clearly, the software in the reprogrammer needed some more “tweaking” to eliminate a lean fuel trim condition. So much for chasing trouble codes!
The Hapless Honda
Unfortunately for the diagnostic technician, some vehicle owners assume that assessing diagnosing trouble codes is a text-book process that can easily be mastered by any high school kid. Even worse, some consumers still believe in the “Big Machine” hidden away in a dark corner of the shop that will “tell” the mechanic what’s “wrong with the car.” Sad to say, we’ve all been there, done that, and will continue to do so in the foreseeable future.
In this case, a 1999 Honda four-cylinder CRV appeared during a late afternoon break with the MIL illuminated with the owners panic-stricken because they were packed and ready to leave on a long trip. My scan tool retrieved P0301, 302, 303 and 304 misfire trouble codes indicating a random misfire on all cylinders. Because this engine is equipped with a distributor, I concluded that the distributor rotor might have perforated due to excessive voltage from worn spark plugs. A further inspection revealed that a neighboring shop had recently replaced the spark plugs and filters.
Perforated distributor rotors are common on Hondas because the thin cross section between the rotor’s center contact and the distributor shaft is vulnerable to high secondary voltages caused by worn spark plug gaps. The problem is aggravated by many aftermarket rotors not having enough dielectric strength to contain high secondary voltages.
After relaying the news to the neighboring shop, the shop replaced the rotor and the couple drove the Honda another 6,000 miles before it returned with the same set of misfire trouble codes. For the second time, I noticed the same freeze-frame data indicating that the misfire had occurred at 15 miles per hour with an engine coolant temperature of about 50° F.
At a purely rational level, the usual suspects for a random misfire on distributor ignitions are the ignition coil, distributor cap or distributor rotor. Because the Honda had accumulated more than 140,000 miles on the original spark plug wires, it could be entirely possible that one of the wires had developed an intermittent open-circuit condition when at operating temperature.
The Diagnostic Dilemma
But technical research revealed Technical Service Bulletin #03-038 from Honda indicating that some of the four-cylinder engines had been built with soft exhaust valve seats that allowed the valve to recede into the cylinder head and cause the cylinder to lose compression by holding the exhaust valve open. Going back to the freeze-frame data indicating that the misfire had again occurred at 15 miles per hour with an engine coolant temperature of about 50° F, the pieces of this particular Diagnostic Dilemma began to fall into place.
According to basic physics, aluminum expands or contracts approximately 1.5 times the rate of steel for any given temperature change. Consequently, valve clearance decreases as the engine cools and increases as the engine warms up on an aluminum head engine.
Apparently, after an all-night cold soak, the Honda’s exhaust valves had cooled to nearly zero valve clearance. From a cold-soak drive-away, the steel exhaust valves would 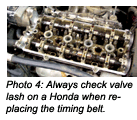 temporarily heat up and expand faster than the cold cylinder head, which unseated the valves and caused a transient misfire from leaking compression. Once the cylinder head temperature increased, the valve clearance would increase, which explains why the misfire couldn’t be duplicated during a normal test drive.
Removing the valve cover on a cold engine revealed that cylinders #1 and #4 had one valve each at nearly zero clearance, see Photo 4. Could cylinders #1 and #4 cause a misfire on cylinders #2 and #3? It’s impossible to say. But, after adjusting the valve clearance and installing a new set of spark plug wires as preventive maintenance, the Honda seems to be doing well. Sure, the soft valve seats are still present, but considering that 140,000 miles had elapsed before the misfire had occurred, another adjustment might well take care of any future problems. Let’s just hope that the next diagnostic technician confronted with misfires on all four cylinders of this Honda CRV remembers: “It’s mechanical, stupid!”

