Honda Tech Tip: New Bolts Silence Clunky CR-V

Honda Tech Tip: New Bolts Silence Clunky CR-V

A Honda CR-V driver may complain of a clunking noise from the front suspension when driving over bumps. The probable cause is that the upper arm flange bolts do not properly clamp the upper arm bushings. To correct the condition, replace the upper arm flange bolts as described in this Tech Tip.

Applicable Models:
1997-’99 CR-V, up to VIN JHLRD_XC
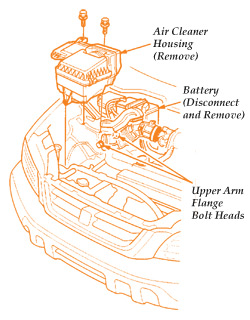
_figure 1

Parts Information:
Flange Bolt, 10 x 68 mm (4 required): P/N 90172-S04-003 

Repair Procedure:
1. Record your customer’s radio station presets.

2. Disconnect and remove the battery (see Fig. 1). 

3. Raise the vehicle on a hoist, just enough to lift the wheels off the ground.

4. Remove the air cleaner housing (see Fig. 1). 

5. Loosen the two flange bolts from the right upper arm. Repeat this step on the left side (see Fig. 1).

6. While supporting the right front tire with your hand, remove the flange bolts, and ease the upper arm away from the upper arm mount. Discard the flange bolts. Repeat this step on the left side (see Fig. 2).  figure 2

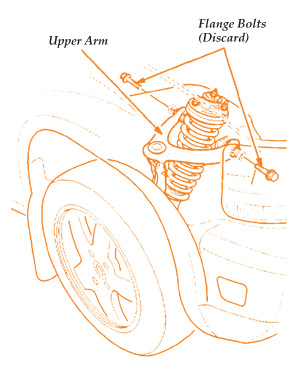
7. Raise the vehicle about four feet off the ground. figure 3

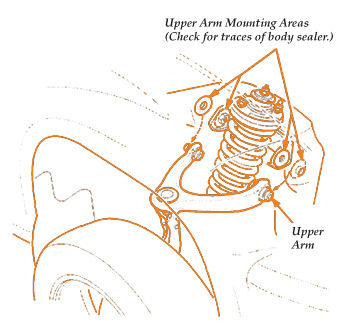
8. From inside the right front wheel well, look for traces of body sealer in the upper arm mounting areas. If any body sealer is found, remove it with a gasket scraper. Repeat this step on the left side (see Fig. 3).
Note: Be careful not to scratch the body finish. If you do, repair the area with touch-up paint. 

9. Lower the vehicle until the wheels are just off the ground. Figure 4

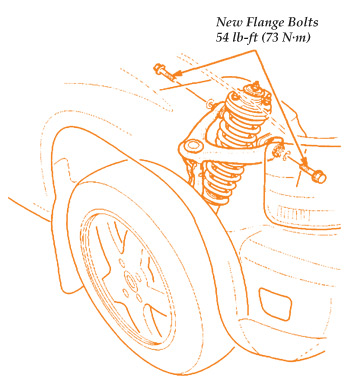
10. Reinstall the right upper arm, and secure it with two new flange bolts (see Parts Information). Repeat this step on the left side (see Fig. 4). 

Note: When installing the new flange bolts, you may need to move the tire slightly with your hand to align the bolt holes.

11. Lower the vehicle to the ground, and then  torque the four new flange bolts to 54 lb.-ft. (73 Nm).

12. Reinstall the air cleaner housing. Torque the two flange bolts to 7.2 lb.-ft. (9.8 Nm).

13. Reinstall the battery.

14. Reset the radio station presets, and set the clock.

15. Test-drive the vehicle over bumps to make sure the noise is gone.

Written by Dennis Shortino, ALLDATA Editor and Jeff Webster, ALLDATA Technical writer.

You May Also Like

Ride Height Sensors

If one of these sensors is replaced, it must be calibrated after it is installed.

Ride-height sensors not only measure the position of the suspension, but also the rate of movement. They are supplied with a voltage of around 5 volts. The signal voltage is changed as a magnet moves past a coil. Most sensors have three wires — ground, power and signal.

Internally, it is difficult to damage one of these sensors. Externally, the linkage that connects the sensor to the suspension arm can also be damaged. The connector can be damaged and cause a short or open and a code will be set. If one of these sensors is replaced, it must be calibrated after it is installed.

Ride Control For Electric Vehicles

Replacement units are available from sources other than the dealer.

Brake Pad Edge Codes

The “Edge Code” can tell you information about a brake pad’s friction material.

Chassis Parts and Alignment Angles

Knowing why the adjustment is required is critical to performing the total alignment.

Suspension Upgrades – Selling Shocks and Struts

The question customers fail to ask is, what is “best” for their vehicle?

Other Posts

Air Ride Suspension Diagnostics

The key to understanding the logic of air ride systems is using service information.

Steering Angle Sensor Operations

It is important for the ABS/ESC module to receive two signals to verify the steering wheel’s position.

Chassis Alignment

The source of the complaint can be the angles, electronics or tires.

Laying Out Your Shop for ADAS/EV Repairs

With so many vehicles equipped with some form of ADAS, rethinking your electronics layout or plan might be in order.