By Dennis Shortino, ALLDATA editor and Jeff Webster,
ALLDATA technical writer
The intake-to-throttle body joint may cause a whistle-like sound on 3.7L engines.
Applicable Models: 2007 Dodge Ram Truck (Light Duty), Durango, Dakota and Nitro; 2007 Jeep Liberty, Grand Cherokee and Commander
Dodge truck or Jeep owners may complain of a slight high frequency (pitch) whistle-like sound while driving. This sound is not loud and may not be noticed by most drivers. The sound can occur at any ambient or engine operating temperature.
The whistle-like sound is most noticeable under load, with a light throttle, and between 1,200 and 2,000 engine rpm. If the customer experiences the above condition, perform the Repair Procedure, which involves applying a thin bead of sealant to the intake manifold-to-throttle body joint.
Note: Very few vehicles will exhibit this condition.
Note: This bulletin applies to vehicles equipped with a 3.7L engine (sales code EKG) built on or before March 12, 2007 (MDH 0312XX).
 Repair Procedure
1. Disconnect and isolate the negative battery cable from the battery.
2. Remove the electronic throttle control (ETC) throttle body from the intake manifold.
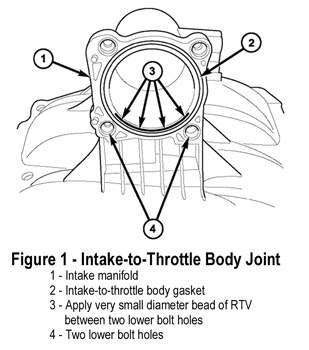
3. Apply a very small diameter bead (1 mm) of sealant (P/N 04883971) to the intake manifold-to-throttle body joint. The sealant is to be applied to the lower section of the joint between the lower two throttle body bolt attachment holes (see Figure 1).
A very small amount of sealant is needed to seal the slight space/gap on the inner surface of the joint. The gap was created by a slight taper in the intake manifold joint surface.
Note: Do not apply an excessive amount of sealant to the joint.
Note: Over-torque of the throttle body attaching bolts may cause damage to the throttle body.
4. Install the ETC throttle body to the intake manifold. Tighten the throttle body four attaching bolts to 60 in.-lbs. (7 Nm).
Note: Wipe off inside joint of any excess sealant squeeze-out.
5. Reassemble the remaining engine components.
6. Connect the negative battery cable to the battery. Set the clock to the correct time.
7. Drive the vehicle to confirm the repair.
Courtesy of ALLDATA.