by Dan Espersen
At certain times during the reassembly of vehicles in your shop, certain parts just don’t seem to fit properly or won’t go back the way they were prior to your repair. This may have been a pre-existing condition that no one had noticed. Regardless of why this situation exists, it can be frustrating as well as time consuming to say the least.
Accessing manufacturers’ Technical Service Bulletins (TSBs) and published repair procedures can save you and your team the head-ache of trying to repair something the manufacturer already knows about. The following is an example of such an issue.
Condition
On some 2004-2008 F-150 and 2006-2008 Mark LT (excluding Heritage) vehicles, the windshield cowl panel may not be fully seated. Or, it may be “popped up” or appear to be warped. Follow the service procedure to correct the condition.
Applications
2004-2008 Ford F-150
2006-2008 Lincoln Mark LT
Vehicles built before 11/12/2007
Service Information
Always refer to ALLDATA Collision for safety procedures, identification of material types, recommended refinish materials, and removal and installation procedures. Always refer to Ford for questions relating to applicable or non-applicable warranty repair information.
Repair Procedure
1. Remove the cowl panel.
2. The cowl design makes use of long “J” hooks (Figure 1, View A) on the bottom side of the cowl panel to engage a sheet metal flange below the cowl panel surface area. When installing the cowl, if the hooks fully engage the flange properly, you’ll hear an audible “click” noise, confirming that the cowl panel is in the correct position with the “J” hook under the flange. If you confirm the audible click, do not continue any further.
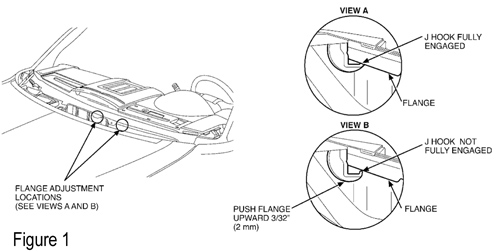
3. If the audible click is not heard or cannot be obtained upon installation of the cowl panel, re-move the left-hand cowl panel (driver side) and place it out of the way. The flange in which the “J” hook engages needs to be adjusted slightly upward 3/32” (2 mm) in two areas (using a pair of wide-bill pliers) (Figure 1, View B). Then, install the cowl, listening for an audible click for the “J” hook engagement again. If the click is heard, complete installation of the cowl.
Note: The center line of the two cowl panels should run uniform from the windshield to the back edge of the hood.
Dan Espersen is the ALLDATA Senior Collision Program Manager. He’s a Gold Pin Member of the Collision Industry Conference (CIC) and holds an AA Degree in Automotive Technology. He has 16 years of experience in the collision industry and 17 years of experience in the automotive industry.
For additional information, visit www.alldata.com.