If a customer brings in a 2006 Ford Escape with a ticking noise in the left bank cylinder head engine area, refer to the following service procedure to identify and resolve the issue.
Vehicles affected: 2005-’07 Five Hundred, Freestyle Montego, 2006-’07 Fusion and Milan, 2006 Zephyr, and 2006-’08 Escape and Mariner vehicles built 1/17/2006 through 5/31/2007, 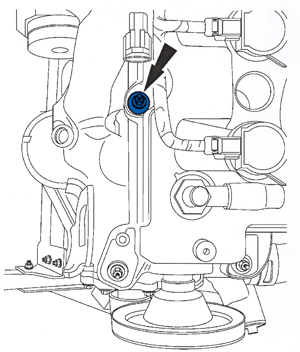 equipped with the 3.0L 4V Duratec engine with exhaust camshaft-driven water pumps.
Service Procedure
To diagnose, with the engine running and warm (normal operation temperature), use a mechanic’s stethoscope to determine if the ticking noise is coming from the left-hand exhaust camshaft at cylinder #6 (see Figure 1). If the ticking noise can be verified, refer to the following instructions.
For 2008 Escape and Mariner, check the date on the left-hand cam cover engine label. If the engine build date is 5/16/20007 or before, refer to the following to identify and resolve the engine ticking noise. For engines built after this date, this procedure does not apply; refer the Workshop Manual (WSM), Section 303-00.
For 2007 Fusion and Milan, check the date on the front cover label. If the engine build date is 5/9/2007 or before, refer to the following to identify and resolve the engine ticking noise. For engines built after this date, this procedure does not apply; refer the WSM, Section 303-00.
1. Remove the left-hand camshaft cover. Refer to WSM, Section 303-01 of the appropriate manual.
2. Rotate the engine clockwise until the cylinder #6 exhaust cam lobes are pointing up and the valves are fully closed.
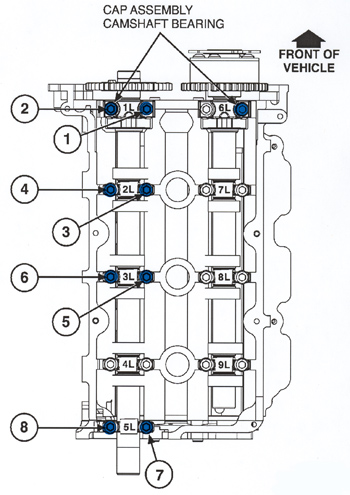
3. Remove all left-hand exhaust cam caps individually and reinstall them finger tight.
4. Torque bolts in sequence as shown in Figure 2, to 72 lbs.-in. (8 Nm) excluding cam cap #4L camshaft cap.
5. Using a screwdriver positioned on each side of the top of cam cap #4L (see Figure 3), apply hand pressure and shift cam cap #4L toward the exhaust side of the cylinder head.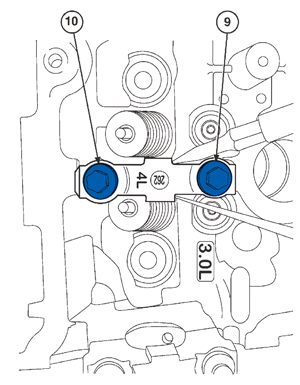
6. While holding cam cap #4L in the shifted position, torque fastener #9 (inboard) first, to 72 lbs.-in. (8 Nm), then torque fastener #10 (Figure 3).
7. Install the left-hand camshaft cover. Refer to the appropriate WSM, Section 303-01.
8. Fully warm the engine to verify the repair.
Technical service bulletin courtesy of Mitchell 1.
For more information on Mitchell 1 products and services, automotive professionals can log onto the company’s website at www.mitchell1.com.