Models:
2003-’11 Saab 9-3 Sedan
2004-’11 Saab 9-3 Convertible
2006-’11 Saab 9-3 Combi
The following diagnosis might be helpful if the vehicle exhibits the symptom(s) described in this bulletin.
Condition/Concern:
A customer may complain of a snapping or popping noise on turns from the front suspension. This typically occurs on sharp turns such as a parking lot maneuver. Duplicate the concern to verify the noise is coming from the front suspension.
Recommendation/Instructions:
After you have duplicated the concern to verify the noise is coming from the front suspension, make sure all components are torqued to specs. Also, a number of wheel bearings have been replaced with the thinking they were the root cause when, in fact, the brake backing plates are popping over the mounting bolts when the suspension is flexed and the wheel is turned.
To remove the backing plate, follow WIS path 9440/Front Suspension/Adjustment-Replacement/Wheel Hub Front.
Note: Do not replace the wheel bearing or hub.
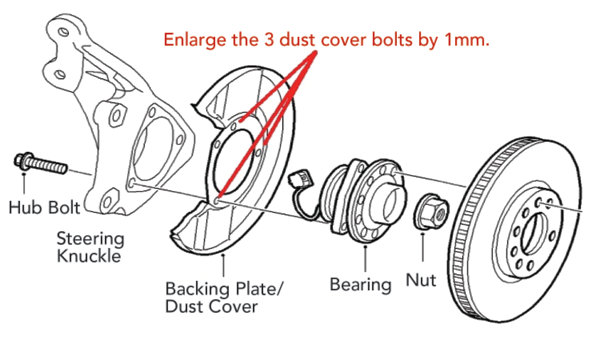
After removal of the backing plate, enlarge the mounting holes in the plate enough to ensure they will not bind or contact the mounting bolt (1 mm is a good rule of thumb). See Fig. 1.
Reinstall per WIS path 9440/Front Suspension/Adjustment-Replacement/Wheel Hub Front, carefully providing necessary clearance between the backing plate and its components.
Service Procedure:
1. Raise the car.
2. Remove the wheel.
3. Remove the hub nut.
4. Press in the driveshaft so that it loosens from the hub.
5. Press in the brake caliper piston by pressing with a screwdriver against the brake pads.
6. Remove the brake caliper and suspend it from the spring.
7. Remove the brake disc lock bolt and lift off the brake disc.
8. Remove the wheel sensor connection.
9. Remove the steering rack tie rod end from the steering swivel member.
Note: It may help to place a wedge between the suspension arm and the anti-roll bar in order to hold down the suspension arm.
10. Remove the two upper bolts securing the strut to the hub.
11. Pull down on the hub and separate the hub from the driveshaft.
Note: Take care that the inner universal joint does not separate.
12. Remove the three bolts from the hub. Remove the brake shield.
13. Using a round file or similar, enlarge the three dust cover mounting holes by 1 mm, making sure they do not contact the hub bolts upon installation.
To fit:
1. Clean the contact surfaces and fit the brake shield and the hub with three bolts.
Note: Make sure that the cable to the wheel sensor fits into position upward/forward.
Tightening torque: 90 Nm +45° (66 lbf.-ft. +45°)
2. Insert the driveshaft into the hub.
Important: Always fit a new hub-center nut if it has been removed because the clamping force of the lock indentations will be reduced if the old one is refitted.
3. Fit the hub nut and pull the shaft to the correct position with the nut.
4. Remove the wedge (if used) and reattach the steering rack to the steering swivel member. Tightening torque: 50 Nm (37 lbf.-ft.)
5. Clean the brake disc surfaces thoroughly. Fit the brake disc into place and tighten the brake disc bolts. Tightening torque 7 Nm (5 lbf.-ft.)
6. Connect the wheel sensor and fit the connector into the holder.
7. Fit the brake caliper. Tightening torque: 210 Nm +30° (155 lbf.-ft. +30°)
8. Fit the wheel. Fit the bolts and tighten them alternately by hand to center the wheel. The wheel must be suspended freely when tightening the wheel bolts.
Tightening torque: aluminum rim, 110 Nm (81 lbf.-ft.)
Tightening torque: steel rim, 50 Nm +90° +90°, max. 110 Nm (37 lbf.-ft. +90° +90°, max. 81 lbf.-ft.)
9. Lower the car so that the wheel rests on the floor.
10. Tighten the hub nut. Tightening torque: 230 Nm (170 lbf.-ft.)
11. Install the wheel emblem.
12. Press out the piston in the brake caliper by stepping on the brake pedal several times before test-driving the vehicle.
13. Test-drive vehicle to verify your repair was a success.
Courtesy of Saab Parts North America.