Have you ever noticed the sides of at least one tire excessively bulging on the car ahead of you in traffic? Of course you have. You’ve likely also found a high number of improperly inflated tires on vehicles that roll into your shop on a regular basis. Improperly inflated tires are commonplace.
The National Highway Traffic Safety Administration proved this problem to be very real. They conducted an inspection of 6,240 vehicles within a 14-day period in August 2001. They did this at service stations with the cooperation from motorists who stopped to refuel.
They found that out of those vehicles tested, 27% of the passenger cars had one or more tires substantially under inflated. They also found that 33% of light trucks and SUVs had one or more tires that were also substantially under inflated. They further found that more than 90% of those stations were equipped with air pumps. However, 10% of them didn’t work.
To make matters worse, less than half of the stations with a working air pump had a tire pressure gauge. Of the ones that did have a pressure gauge, the gauge proved unreliable. Almost 20% of those stations had a gauge that would over-report air pressure by as much as 5 psi, and nearly 10% would over-report by more than 6 psi. So, even if the driver tries to do the right thing and check his air pressure, he’s still likely to be driving on improperly inflated tires. Then to add to it all, there is a widespread misconception about at what pressures tire should be set. The tire says one thing, and often the vehicle’s data plate says something else. Many motorists aren’t aware that the vehicle’s data plate even contains tire pressure information. And, some data plates may not even have the info.
 So what is correct? Assuming that the correct tires for the vehicle are being used (as in the size and speed rating that the vehicle was originally equipped with), then the correct tire pressure is found on the vehicle’s data plate and/or the owner’s manual.
The vehicle manufacturer knows exactly what the weight of the vehicle is, what is it designed to carry, its center of gravity and the general usage of the vehicle.
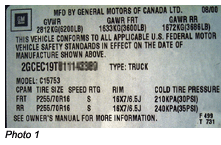
In the vehicle’s data plate shown in Photo 1, notice how the front tires call for 30 psi and the rear tires call for 35 psi. The tires did not change from front to rear, but the general usage did. The rear tires of a truck must be ready to carry extra cargo.
However, on this same vehicle, the tires say something else — the pressure specs found on the tire are 9 to 14 psi higher than what the vehicle manufacturer recommends. The tire reads “max press 44 psi.”
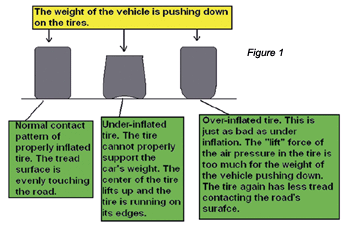 When a tire manufacturer makes a tire, they don’t know exactly what specific vehicle each tire will be installed upon. Nor do they know the exact position the tire will be installed, in most cases. They do, however, know the maximum weight that the tire will safely carry based upon its construction. They also know the air pressure that will be needed inside the tire to carry that maximum weight rating. Therefore, the pressure rating found on the side of the tire is usually a “max pressure” based on the tires maximum capabilities, as is the case with this tire shown. So why not just run the “max” pressure all the time? If a little is good, a lot must be better, right? Too much pressure is just as bad as too little. Too much air pressure can make the tire more susceptible to puncture, and also reduce the tire’s contact patch on the road. See Figure 1.
Too little air pressure:
Contact patch with the road is reduced.
Driver is cheated out of tread life.
Steering response is reduced due to added flexing in the tire.
Tire builds extra heat internally from the flexing and increases the chance of a blow out.
Fuel economy is reduced from increased rolling resistance.
Pulling in the direction of the low tire can be experienced.
Increased wear on steering linkages from continuously having to counter steer against a pulling tire.
Too much air pressure:
Contact patch with the road is reduced.
Driver is cheated out of tread life.
Tire is more rigid and more likely to be punctured by pot holes and other such hazards.
Pulling away from the over-inflated tire.
Increased steering linkage wear from continuously having to counter steer.
Incorrect tire pressure in either direction can raise the chance of a blowout. Blowouts have caused numerous fatalities. So, the U.S. federal government has decided that in September 2007, all new passenger cars and light trucks must be equipped with a tire pressure monitoring system (TPMS) that can directly measure the air pressure in the tires. The phase-in began in September 2005. As repair shop personnel, we should not only be familiar with the system, but also the laws surrounding these systems.
Under 49 U.S.C. 302122(b), “A manufacturer, distributor, dealer or motor vehicle repair business may not knowingly make inoperative any part of a device or element of design installed on or in a motor vehicle or motor vehicle equipment in compliance with the applicable motor vehicle safety standard prescribed under this chapter unless the manufacturer, distributor, dealer or repair business reasonably believes the vehicle or equipment will not be used (except for testing or a similar purpose during maintenance or repair) when the device or element is inoperative.”
Simply put, when it leaves your shop, that TPMS had better work. If the customer wants a set of sparkly rims that don’t normally work with the vehicle’s TPMS, then he either can’t have them or something will have to be purchased or fabricated to make them work. You are not allowed to “make inoperative” any “part or element” of the TPMS. So, this also means that any repair shop that performs tire and rim work will have to master these systems and have the proper diagnostic equipment on hand to deal with them.
How It Works
This portion of the article is going to be very specific to Ford vehicles. Some of this, you will find to be the same or similar to other makes, but, as always, you’ll need to consult your information system for vehicle- and make-specific information.
On Ford vehicles, there are two main types of TPMS: indirect and direct.
Indirect Tire Pressure Monitor System
Indirect TPMS are not compliant with federal law because these systems do not actually measure the air pressure in the tire. All they do is estimate the tire’s circumference based on its rotational speed.
This is all done by the ABS module, which measures the speed of each wheel at a predetermined vehicle speed and saves that information in its KAM. This is a “calibration mode” that is entered the first time the vehicle is driven after the rest button has been pressed. Each time the vehicle then reaches that predetermined speed (often 15 mph), the ABS module compares that saved data to the live wheel speed data. This is referred to as the diagnostic/monitoring mode. If the rotational speed of any wheel varies by more than 12 mph from the saved wheel speeds, then the ABS module commands the low tire warning light to illuminate.
This system “fools” easily. Anytime the tires are rotated or replaced, the rest function must be performed. If not, the low tire light will illuminate because the new rotational speeds will be different than the saved data for those positions. Severe uneven tire wear, the use of tire chains or loss of traction can cause this system to falsely illuminate the warning light. This system also can be rendered completely ineffective if the module enters the calibration mode on under-inflated tires.
To reset these systems, simply press and hold the tire pressure reset button until the light flashes and then turns off.
Direct Tire Pressure Monitor Systems
Direct tire pressure monitor systems are called such because they directly measure the air pressure in the tires. They do this by use of a pressure sensor inside the tire. The sensor is powered by a 10-year lithium battery. Mileage-wise, the battery is expected to last about 150,000 miles. The battery is not considered to be serviceable. When the battery dies, it’s time for a new sensor.
The sensor reports data to the control module by the use of radio frequency (RF) signals. When driving over 20 mph, the sensors report once every 60 seconds. When parked, the sensors report once every six hours. Depending on the exact type of system (year and model dependent), the TPMS can either be a stand-alone TPMS module, or it can be integrated into the vehicle security module (VSM) or smart junction box (SJB). The SJB replaced the separate GEM and fuse panel to make one unit out of the two. The SJB, TPMS module and VSM communicate to the cluster to illuminate the warning light by using either the CAN or SCP networks depending on year and model.
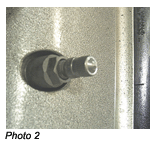 There are two main types of sensors used on direct TPMS. The first is the stem-mounted sensor, which is actually a part of the stem and uses the stem as antenna. They can be identified by the retaining nut on the stem. See Photo 2.
Depending on the year and model there are two types of stem-mounted sensors. They are color coded in blue and black. The blue-bodied sensor is used on 2003-’05 vehicles and reports to a dedicated TPMS module. The black sensor is found on some 2005 and 2006 Expeditions and Navigators; they report to the VSM. The two color codes are not interchangeable. The blue sensors transmit a 433.92 MHz frequency, and the black transmit a 315 MHz frequency. The other type of pressure sensor is a band-mounted sensor inside the drop well of the rim, located 180° from the valve stem. These are used on 2006 and later vehicles.
Dismounting the tire requires some special care on both systems. With the stem mounted, it is advised by the manufacturer that you do not remove the valve core inside the sensor. This is because they have a nickel-plated brass valve core that breaks off easily. Instead, they recommend that you deflate the tire by removing the valve stem nut and push the sensor inside the tire. Then, break the bead and reach into the tire and remove the sensor before dismounting the tire from the rim.
After installing the new tire onto the rim, press the tire’s side wall down and slip the sensor into place with a new sealing grommet on it. Then install the nut and tighten to 44 in.-lbs. of torque (about two clockwise turns from finger tight). If you ever have to replace the valve core on these sensors, you are supposed to use the nickel-plated brass core and not a standard valve core. The use of a standard valve core will promote corrosion in the sensor.
In the case of a band-mounted sensor, break the bead with the valve stem in either the 6 o’clock or 12 o’clock position. Take extra care with the tire iron not to insert it where the sensor is located. You can help this by making sure you insert the tool at the valve stem, which will place the sensor 180° away at the time.
If the sensor requires replacement, then the band and cradle do not need to be replaced. There is a plastic clip at one end of it called a CPA clip. Remove the clip, depress the lock tab and lift the sensor from the CPA clip end to unhinge the sensor from the cradle.
However, if the cradle needs to be replaced, the entire band and cradle must be replaced together. The original band is a permanent-style band, similar to that of a giant version of a CV boot clamp. The clamp’s lock has to be pried open and is therefore ruined. The replacement band similar to that of a giant version of a worm gear hose clamp.
The cradle has a special adhesive under it. The rim must be cleaned with alcohol before installing the new cradle. The new clamp should be installed so that the worm gear clamp ends up on the CPA clip side of the cradle, about 1/2-1” away from the sensor after it is tightened. With both systems, retraining is necessary when a sensor has been replaced. The system should also be retrained when the tires are rotated or replaced and the rims are installed in a different location. It is not necessary to retrain the sensors if the rims are removed and reinstalled into the same positions with the same sensors installed on them. This is assuming the positions have been properly trained in the past. The sensors are trained to a specific location and the TPMS displays data PIDs of each tire’s pressure and other data in a position-specific reference. If the sensors are not retrained, the position references will be inaccurate.
 Retraining
To enter the retraining mode on a Ford product, cycle the key from off to run three times, ending in the on position. Next, press and release the brake pedal once. Then, cycle the key from off to run three more times ending in the on position. The horn will chirp and the tire warning light will flash or the message center will say “Train LF Tire.”
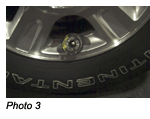
If the system uses the valve stem sensors, then a round doughnut-like magnet will be needed. See Photo 3.
Place the magnet over the LF valve stem and wait until the horn chirps, then do the RF, then RR and finish up with the LR (if the spare is equipped with a sensor, then the spare comes last). The horn will then chirp and, if equipped, the message center will say “Tire training mode complete.”
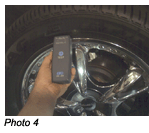 If the vehicle uses the band-mounted sensors, then you will have to use a special reset tool that communicates with the sensor via radio waves tuned to the sensor’s frequency. See Photo 4. Place the tool against the tire’s sidewall 180° away from the valve stem. Different brands (and the latest versions) of these tools may have different buttons, but the one shown here only has one button labeled “test” to push to activate. The sensor may take six seconds to respond. The horn will chirp after each sensor is trained. The sequence is the same as the stem-mounted sensors: LF, RF, RR, LR. If the vehicle is equipped with a sensor in the spare tire, then the spare tire is last in the sequence.
Diagnostic Tips
If the warning light illuminates, with any TPMS, first check the air pressure in the tires. Don’t forget to check the spare as well.
Tire pressure raises and lowers in the tire 1 psi for every 10° F rise or fall in temperature. It’s also normal to lose 1 psi per month from seepage. So, if a tire is at 30 psi on an 80° day in June, it will likely be at 17 psi on a 20° day in January.
Indirect TPMS requires a system reset by use of the reset button after adjusting the air pressure and/or tire rotation.
The spare tire pressure sensor is currently optional. Not all will have them.
Direct TPMS systems require a test drive more than 20 mph for at least one minute after adjusting air pressure to turn the warning light off if the training tool is not used to do so. They also require system retraining if the tires are rotated, or the sensors are replaced or otherwise moved around to a new corner of the vehicle.
Mechanical tire pressure gauges are not recommended for usage on direct TPMS due to accuracy reasons. I tested the same tire on a 2007 Explorer with both a mechanical and a digital gauge. The mechanical gauge read 32 psi, while the digital gauge read 29.5 psi.
The digital gauge matches the data PID and is the reason the low tire warning light was activated. It only takes a 5 psi loss to activate the warning light. The data plate says “35 psi” so the RF tripped the warning, and the other three are only 0.5 psi away from tripping the light as well, see Figure 2.
The tire pressure data PIDs are not live data. They are updated once every minute while driving and once every six hours when parked. If the sensors are damaged or missing and can’t report in, that data PIDs will not change. A vehicle with all four sensors missing will show air pressure on the scan tool at all four tires. However, if the sensors do not report in, the TPMS module will “know.” The module will illuminate the low tire pressure light or will display “Tire Pressure malfunction” on the message center.
The data PIDs that are available, in addition to the pressure PIDs, from the TPMS on this exampled ’07 Explorer are shown in Figure 3.
The control module keeps a record of the malfunction events. In this shot, there has only ever been one pressure warning event. Events 2 through 5 are displaying default data. This screen capture is from an IDS, the event numbers are labeled with the prefix EVT1 through EVT5. For this screen shot, the suffix of the PID description states what the PID is about.
“FUNC” is the sensor’s last reported function code.
“IGN” is the age of the event in the number of key cycles.
“PSI” is the barometrically compensated reported air pressure at the time of the event.
“RAWP” is the directly measured sensor pressure, not barometrically compensated. Raw pressure reading at the time of the event.
“STAT” is the sensor’s warning status at the time of the event.
“TEMP” this is the temperature of the air in the tire during the event.
“TLOC” is the last learned location for that sensor.
“TxID” is the transmitter’s ID code for the sensor that reported the event.
As you can see, these are displayed for event numbers 1 through 5. Closer to the bottom and to the right of the screen, you can see PIDs labeled “LAST_” and then “FUNC/ID/RAWP/TEMP.” These are to identify which readings are the last ones received by the module and will be useful when all of the events are filled much later in the vehicle’s life. Across the bottom are the ID codes for the sensors that have not reported an event, TP_STAT (system status), and the live/current commanded state of the MIL. Barometric pressure and the MIL status are the only two truly live PIDs shown here in this capture. Everything else is a snapshot-type display from the module’s memory.
The factory tool is not the only tool capable of displaying data from the TPMS.
The clock is running out. If you haven’t seen many vehicles with TPMS come through your shop yet, then you are about to see them on every single car. Make sure your information system, scan tools and technicians are ready.