Applicable Vehicles: 2003 4Runner vehicles with the 1GR-FE engine. With 4Runner vehicles before engine number 1GR-0053092 and before the VINs shown below, proceed to step 1.
• JTEZU17R030013188; and
• JTEBU14R830014935.
With 4Runner vehicles after engine number 1GR-0053092 and after the VINs shown below, go to step 7.
• JTEZU14R938006844; and
• JTEBU14R638007466.
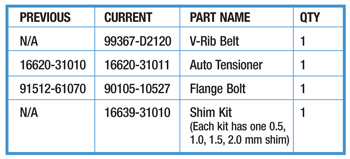
Parts Information:
 Required Tools & Material:
• Metric socket set and basic hand tools; and
• Straightedge and metric ruler with mm.
Repair Procedure:
Note: Review safety procedures in ALLDATA Repair before beginning.
1. Check the engine number. If the engine number is higher than 1GR-0053092, go to step 7 (refer to the VIN Information). Otherwise, continue with step 2.
2. Remove the accessory drive belt and remove the alternator from the vehicle using factory and/or industry standard-approved practices.
3. Remove the A/C compressor from the auto tensioner assembly using factory and/or industry standard-approved practices and carefully move the A/C compressor to the side to allow access to the five bolts holding the auto tensioner assembly to the engine block. Pay close attention to all wire harnesses, connectors and A/C lines. It’s not necessary to disconnect any A/C lines to perform this procedure.
4. Remove the five bolts holding the auto tensioner assembly to the engine block and remove the auto tensioner assembly from the engine.
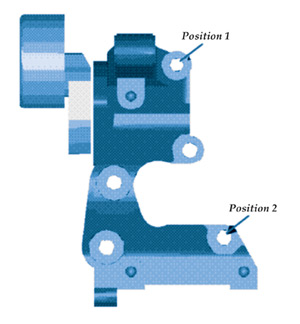
5. Install the new auto tensioner with the new flange bolt in Position 1 and one of the previously removed bolts in Position 2 as shown in Fig. 2. Install the two bolts finger-tight. First torque the flange bolt in Position 1 to 27 ft.-lbs., then torque the bolt in Position 2 to 27 ft.-lbs. Lastly, tighten the other three bolts to 27 ft.-lbs.
6. Reinstall the A/C compressor and alternator, then install the new V-rib belt, ensuring that the belt is properly installed. See Fig. 3.
7. If the VIN information above refers to step 7, replace the V-rib belt before proceeding with step 8.
8. Start the engine and allow it to run for at least 10 seconds under the following conditions: A/C switch is in the off position and do not turn the steering wheel to prevent load on the power steering pump; and engine temperature should be warm and engine speed should be kept below 1,000 rpm.
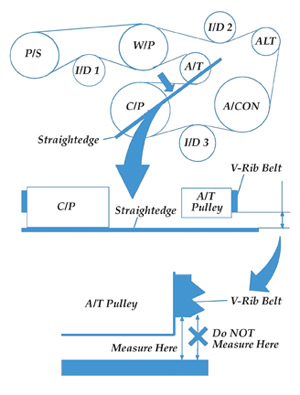
9. Using the diagram below, with the engine off, hold a straightedge flat against the face of the crank pulley. Next, take the metric ruler and measure the distance from the straightedge to the side of the V-rib belt. The target specification is 8.5-10.5 mm. If the measurement is within the target, go to step 11. If the measurement is less than the target measurement, go to step 10.
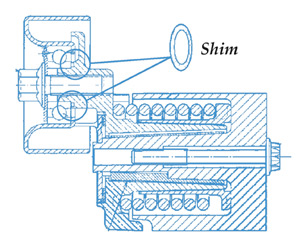
10. Remove the V-rib belt and auto tensioner pulley and insert a 0.5 mm shim in the location indicated in Fig. 4. Only one shim should be inserted at a time; total thickness of the shim must be 2.0 mm or less.
Note: The pulley bolt is a left-hand threaded bolt.
Hint: Reinstall the pulley and torque the pulley bolt to 40 ft.-lbs. Reinstall the V-rib belt and perform steps 8 and 9 again.
If the measurement value is less than the target specification, replace the shim in the following order: 0.5 mm, 1.0 mm, 1.5 mm and 2.0 mm.
11. Start the engine and let the engine idle for 10 minutes to confirm the repair effectiveness.
Written by ALLDATA Editor Chris Burton and ALLDATA Technical Writer Jeff Webster.