Under certain driving conditions, some 2001-’02 Prius vehicles (those built before VIN JT2BK18U*20067085) may exhibit a Master, Hybrid and MIL Warning Light “on” condition where only DTC P3125, information code 287, has set in the Hybrid Vehicle Control Unit (HV ECU). Use the following procedure to identify whether the HV ECU or inverter/converter assembly should be replaced.
Note: The HV ECU is to be replaced only if the recorded information code 287 data satisfies all of the following three conditions:
• Vehicle speed is between 25-44 mph;
• Throttle opening is 60% or more; and
• Vehicle indicated speed is greater than the recorded MG2 revolutions.
If one or more of the above conditions does not apply, use the Prius Repair Manual P3125, information code 287 Fault Isolation Procedure (FIP).
Required Tools & Material:
• Toyota Diagnostic Tester Kit, P/N 01001271;
• Toyota Diagnostic Test VP414 Printer Kit, P/N 01002488;
• 12 MB Diagnostic Tester Program Card with Version 9.3a Software (or later), P/N 01002593-005; and
• Prius Automatic Trickle Charger, P/N 00002-YA122-01.
Note: Additional diagnostic tester kits, program cards or SSTs may be ordered by calling SPX/OTC at (800) 933-8335.
Diagnostic Procedure:
1. Connect the Toyota Diagnostic Tester and print the DTC P3125, Information Code 287 freeze-frame data (or store as a Techview file using the Technical Information System).
2. Check the recorded vehicle speed. Is the vehicle speed between 25-44 mph? If yes, go to Step 3. If no, refer to the repair manual.
3. Check the accelerator sensor main value. Is it 60% or more? If yes, go to Step 4. If no, refer to the repair manual.
4. Check and note the recorded MG2 revolution speed from the Info 287 freeze-frame data.
5. Perform the following calculation to convert the vehicle speed value: Multiply the vehicle speed (mph) noted in Step 2 by 57.6 (or by 36 if vehicle speed is measured in km/h) and subtract 100. Is this value greater than the recorded MG2 revolution speed recorded in Step 4?
6. Compare the MG2 revolution speed from Step 4 to the converted vehicle speed value found in Step 5. Is the vehicle speed value higher than the MG2 revolution speed? If yes, replace the HV ECU. If not, refer to the repair manual.
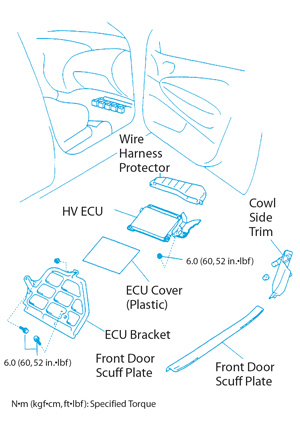 |
| Figure 1 |
Repair Procedure:
a. Removal and Replacement of the HV ECU.
Note: Refer to Fig. 1 and the following instructions to remove and replace the HV ECU:
1. Turn the ignition key on, push the radio power button and the audio button. Record the radio presets. Turn off all lights and accessories.
2. Turn the ignition key off and remove the key.
3. Remove the auxiliary battery cover. See Fig. 2.
4. Disconnect the negative terminal from the auxiliary battery. To prevent damage to the battery terminal, loosen the cable nut and raise the terminal straight up without twisting or prying the cable.
5. Remove the R/F door scuff plate and cowl side trim. See Fig. 1.
6. Fold the carpet back toward the passenger seat.
7. Unbolt and remove the ECU Bracket. See Fig. 1.
8. Unbolt and remove the HV ECU. Carefully remove the wire harness protector and unplug the electrical connectors from the HV ECU. Peel the (plastic) ECU cover off the HV ECU. See Fig. 1.
9. Unscrew and remove the HV ECU mounting brackets.
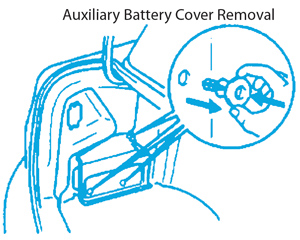 |
| Figure 2 |
10. Screw the mounting brackets onto the new HV ECU. Install the (plastic) ECU cover.
11. Carefully plug each electrical connector and install the wire harness protector.
12. Install the HV ECU and torque the mounting nuts.
Torque: 52 in.-lbf. (6.0 Nm, 60 kgf.cm).
13. Install the ECU Bracket. Torque the mounting bolts and nuts.
Torque: 52 in.-lbf. (6.0 Nm, 60 kgf.cm).
14. Roll out the carpet and install the front door scuff plate and cowl side trim.
15. Connect the negative (-) battery terminal and tighten the cable nut.
Torque: 52 in.-lbf. (6.0 Nm, 60 kgf.cm).
16. Remove the positive (+) battery terminal cover.
17. Connect the 12-volt Prius Automatic Trickle Charger SST (P/N 00002-YA122-01) to the auxiliary battery. Connect the red charger clamp to the positive (+) terminal and the black charger clamp to the negative (-) battery terminal.
18. Plug the charger into a grounded 110V nominal outlet and verify the red “POWER” light is on. Push the charger current toggle switch to the 10-amp position. Ensure the yellow “CHARGING” light is on.
HV Immobilizer Key Code Registration Procedure:
1. Ensure the parking brake is applied and the running mode selector lever is in “P.”
2. Insert the ignition key and turn the ignition switch to the “ON” position. Leave the vehicle in this condition for at least 30 minutes.
3. After a minimum of 30 minutes has elapsed, turn the ignition key “OFF.”
4. Unplug the charger from the 110V outlet. Remove the red and black charger clamps from the battery.
5. Install the battery positive (+) terminal cover.
6. Install the auxiliary battery cover.
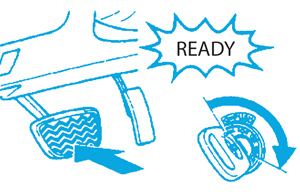 |
| Figure 3 |
7. Depress the brake pedal, and turn and hold the ignition switch to “START” until the green “READY” indicator light remains on and steady. Then release the ignition key. See Fig. 3.
8. Ensure no trouble lights are illuminated on the Instrument panel or Multi-Information Display (MID).
9. Reset all recorded radio stations.
10. Reset the clock to the current time.
Courtesy of Mitchell 1.
For more information on Mitchell 1 products and services, automotive professionals can log onto the company’s website at www.mitchell1.com.