By Eric Seifert
Automotive Technical Editor
Each year, Robert and his family enjoy driving their 1998 Volvo C70 through the New England states to see the brilliant fall colors. This year was a little different than previous vacations though. After an unusually warm October day, the engine began to make a “warbling” noise any time the car was running. When Robert called the shop, we discovered that the timing belt had recently been replaced. One of my technicians recalled that the timing belt tensioner adjustment can be problematic if the procedure isn’t followed exactly. We were able to solve Robert’s noise complaint in a timely manner.
Applicable Vehicles: S70 / V70 / C70 1998 – B52X2/B52X4 Engine S/N: 1266128
Repair Procedure: (Review timing belt replacement and safety procedures in the ALLDATA system before beginning)
Adjusting the camshaft belt tensioner and camshaft belt 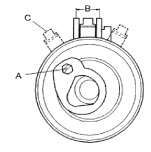 1. Install timing belt.
2. Ensure that belt is tight between crankshaft and intake pulley, if not reinstall.
3. Tighten the center screw to 5 Nm (4 ft.lb.).
4. Holding the center screw stationary, turn the eccentric (A) with a 6 mm allen wrench COUNTER-clockwise until the tension indicator passes the right side of the adjustment window (B).
5. Turn the eccentric (A) back CLOCKWISE until the indicator (C) reaches the correct position based on the temperature of the engine (see illustration).
6. Hold the eccentric secure and tighten the center screw to 20 Nm (15 ft.lb.)
Note: When setting the final adjustment the needle (C) must enter the adjustment window (B) from the right. If the needle exits the window to the left, it must be readjusted past the window so that it enters from the right.
7. Press on the timing belt and verify that the indicator moves in response to the pressure.
8. Note! If the bolts holding either cam wheel had been loosened, tighten them at this time to 20 Nm (15 ft.lb.).
9. Press the camshaft belt and check that the belt tensioner needle moves freely
Needle position at different temperatures
This adjustment is always carried out on a cold engine.
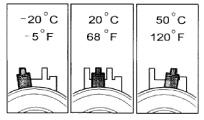 A suitable temperature is approximately 20°C/68°F.
At higher temperatures, for example with engine at otemperature or at higher ambient temperature, the indicator is further to the right. perating he
The illustration shows the needle position when adjusting tcamshaft belt tensioner at different engine temperature.
Written by ALLDATA Technical Editor, Eric Seifert. Eric is an ASE certified Master Technician and Engine Machinist. He is a graduate of the De Anza College Automotive Technology Program, with 20 years of independent shop and parts store experience.
For additional information, visit www.alldata.com.