Owners of several General Motors vehicles may experience a rattling noise coming from the front of their vehicles.
The problem affects the following 2000 and 2001 models:
• Buick Century and Regal;
• Chevrolet Impala, Monte Carlo and Venture;
• Oldsmobile Intrigue and Silhouette; and
• Pontiac Grand Prix and Montana.
This annoying rattle usually occurs at vehicle speeds under 30 mph (48 km/h) and while driving over bumps. A light application of the brake pedal usually eliminates the noise.
The cause is too much clearance between the front brake caliper bracket and the caliper pins in the bottom of the bracket bores. GM offers a front brake caliper service kit that should eliminate the problem (P/N 18046457). Install the brake caliper kits to both sides of the vehicle using the following service procedure. Each kit contains two pins, two boots and two packets of grease.
Repair Procedure
Note: Review safety procedures contained in the ALLDATA system before beginning.
- Raise and suitably support the vehicle, then remove both front tires and wheels.
- Install and hand-tighten at least two wheel nuts to retain the rotor to the hub.
-
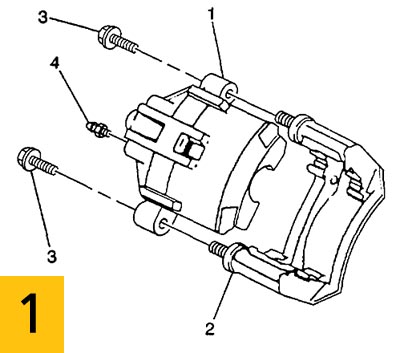 Install a large C-clamp (2) over the top of the brake caliper and against the back of the outboard brake pad.
 - Tighten the C-clamp until the caliper piston is pushed into the caliper bore enough to slide the caliper off the rotor, then remove the C-clamp from the caliper.
- Remove the caliper pin bolts (3) and discard. New bolts are supplied with the service kit.
- Remove the caliper (1) from the caliper bracket (2) and support the caliper with heavy mechanic’s wire, or equivalent.
- Using a flat bladed tool or punch, carefully tap the caliper pin boots from the brake caliper bracket and discard.
-
 Carefully insert a small screwdriver into the brake caliper bracket bore, then rotate and pull the bushing outward to remove. Discard the bushings.
 - Remove the brake pads from the brake caliper bracket.
- Thoroughly clean the brake caliper bracket bores of all lubricant.
- Install the brake pads into the brake caliper bracket.
- Lubricate the brake caliper bracket bores by dividing the large packet of grease (supplied in the kit) and putting one-half of a packet into each bore.
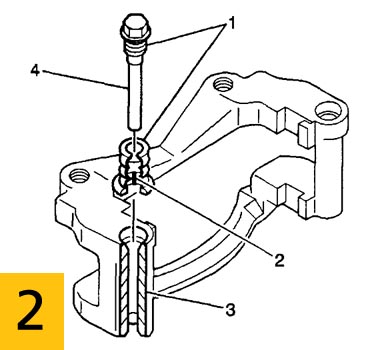
- Lubricate the new caliper pin boots by using the small packet of grease (supplied in the kit) only on the bottom internal threads (2).
-
 Install the new caliper pin boots into the caliper pin bores (3) on the bracket. Carefully tap boots into bores using a deep well socket or equivalent.
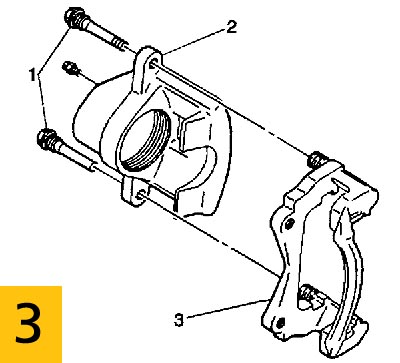
 - Install the caliper over the rotor and onto the caliper bracket. Ensure that the caliper pin boots are not pinched. NOTE: The leading caliper pin, or top pin, has a bushing as part of the assembly. The trailing caliper pin, or bottom pin, is a solid design.
- Install the new caliper pin bolts (1) and tighten them to 70 lb ft (95 N.m). NOTE: It is important to note which caliper pin is designed for the correct bore. The leading caliper pin, or top pin, has a bushing as part of the assembly. The trailing caliper pin, or bottom pin, is a solid design. Ensure that the bolt boots fit securely in the groove of the pin bolts. Be sure not to pinch or tear the boots. If the boots are damaged, they must be replaced.
- Remove the wheel nuts retaining the rotor to the hub.
- Repeat the above steps for the other side and install both front tires and wheels.
GM, Buick, Century, Regal, Chevrolet, Impala, Monte Carlo, Venture, Oldsmobile, Intrigue, Silhouette, Pontiac, Grand Prix and Montana are registered trademark names and model designations of the General Motors Corporation and are being used solely for reference and application purposes.
Written by ALLDATA Technical Editor, Rich Diegle. Rich is an Advanced Engine Performance Certified and ASE Master Technician with an Associate of Arts degree in automotive technology and 22 years of dealership and independent shop experience.
For additional information, visit www.alldata.com.


