By Tom Purser, ALLDATA editor and Jeff Webster, ALLDATA technical writer
If a Saab owner complains about a rattling timing chain, oil sludge or any of the other conditions described in this Tech Tip, follow the recommended procedures. Various conditions can cause the formation of oil sludge in the engine or a rattling noise from the timing chain and balancer shaft chain. Additional symptoms may include abnormal whining, bellowing or knocking noise from the engine and/or an illuminated oil pressure lamp.
Affected Models: 1998-2003 Saab 9-5 and 1999-2003 Saab 9-3
Action – Checking the Damage
1. Check the oil level and fill as necessary. If more than 1 liter of oil is added, then run the engine for 15 minutes more before checking for noise. Listen to the engine for noise. The engine must be run up to operating temperature! If the engine sounds normal and the oil pressure lamp does not come on, consult with the owner about the need to perform more frequent oil and filter changes, and the need to switch to full-synthetic oil in accordance with Saab recommendations.
2. If the oil pressure lamp flashes or comes on steadily:
• Check the oil level and top off as necessary.
• Check the oil pressure. If the oil pressure is in accordance with the specification, replace the oil pressure sensor. If not, continue with step 5.
3. Checking in the event of noise:
• If a high-pitched whining noise is audible, particularly in a cold engine, then it is most often from the oil filter or the check valve in the oil filter adapter.
• If a low-pitched “bellowing” noise is audible at idling speed, similar to the noise from a hydraulic pump, then this indicates a clogged oil strainer.
• If a knocking noise can be heard from the lower end of the engine, then this indicates noise from the bearings.
• If any of the above noises can be heard, proceed to step 5.
• If noise is coming from the timing chain or balancer shaft chain, continue with step 4.
 4. Checking wear on timing and balancer shaft chains:
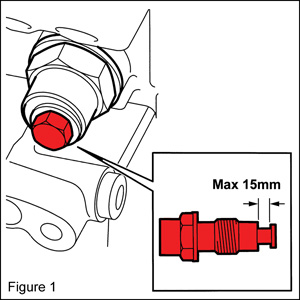
• Remove the small hex bolt from the end of the tensioner so that the piston does not protrude farther when the tensioner is removed.
• Remove the tensioner from the cylinder block and measure the length (see Figure 1).
• If the piston in the tensioner protrudes less than 15 mm, continue with step 5.
• If the tensioner piston protrudes more than 15 mm, replace both the timing and balancer shaft chains.
Note: Before proceeding with chain replacement, any other damage must be identified. Continue with step 5.
5. Determining the extent of damage to engine lower end:
• Remove the pan.
• Remove the big-end bearings on cylinders 1 and 4.
• Add a bead of 30 06 558 Plastigauge. Type PG-1 (green) must be used.
• Fit the bearing caps with bearing shells. (NOTE: the marking figures on the connecting rods should be turned to the same direction).
• Tightening torque (with nut) —15 ft.-lb. + 70° (20 Nm + 70°).
• Tightening torque (with screw) — 18 ft.-lb. + 100° (25 Nm + 100°).
• Remove the bearing caps and measure the Plastigauge strip. The bearing play must be between 0.014 and 0.062 mm.
• In the event of bearing damage, replace the short block. If the bearings are within the specification, continue with “Action — Cleaning the Engine Components.”
Action – Cleaning the Engine Components
To ensure that the engine does not return with additional subsequent damage, it is imperative that all components are cleaned before reassembly.
 1. Cylinder head:
• If it is determined after inspection that the cylinder head must be cleaned to a higher level then that could be achieved while installed in the car, then remove the cylinder head assembly for cleaning.
• Remove the intake and exhaust manifolds and thermostat housing from the cylinder head.
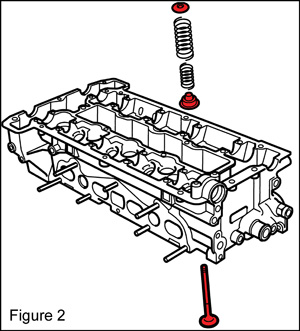
• Remove the camshaft bearing caps, camshafts, tappets, valve springs, valves and valve seals (see Figure 2).
• Refit the bearing caps loosely.
• Place the cylinder head with components (but not the tappets) in an appropriate cleaning solution long enough to fully remove all contamination.
• Blow out all passages and cavities. Check that all contamination has been removed. Any residue must be removed with a stiff brush.
• Fit the valve mechanism with new valve seals and camshaft bearing caps. Depending on the condition of the valves, it may be necessary to grind them in with grinding compound before fitting.
• Fit the thermostat housing, exhaust and intake manifolds.
• Fit the cylinder head.
2. Oil sump:
• Remove the baffle plate, oil suction pipe and delivery pipe from the oil sump.
• Clean all components in a suitable cleaning solution.
• Fit the components and use a new oil suction pipe, if necessary, and a new O-ring.
3. Oil filter adapter with thermostat:
• Remove the baffle plate, oil suction pipe and delivery pipe from the oil sump.
• Remove the thermostat from the oil filter adapter.
• Clean the components in a suitable cleaning solution.
• Fit the thermostat on the oil filter adapter.
• Fit the delivery pipe, the oil suction pipe and the baffle plate.
4. Camshaft cover:
• Clean the camshaft cover sealing surface from gasket residue. Clean the camshaft cover in a suitable cleaning solution.
• Check the pipes in the camshaft cover and blow clean. If necessary, clean with a steel wire so that free flow is obtained.
Action – Miscellaneous
1. Inspect all ventilation hoses with regard to
condition and leakage before fitting.
2. If necessary, replace the oil trap with a new one in accordance with the part numbers previously shown under “Replace if necessary”
3. Replace the oil filter.
4. Fill the engine with semi-synthetic oil.
5. Run the engine to the temperature that starts the radiator fan, and then continue for an additional 5 minutes at an engine speed of 2,000-3,000 rpm.
6. Drain the oil and replace the oil filter.
7. Fill with a full-synthetic oil in accordance with Saab’s oil recommendations so that the extended special policy is valid. Full-synthetic oil must also be used where the previous recommendations were mineral or semi-synthetic oil.
8. Consult with the customer over the need for shorter service intervals and the use of full-synthetic long-life oil.
Technical service bulletin courtesy of ALLDATA.
For additional information, visit www.alldata.com.