Believe it or not, measuring for voltage drops is the best way to find unwanted resistance in a circuit or component. The procedure is quick and easy, you can use it on both the ground and power sides of the circuit, and it’s done with normal system voltage going through the circuit.
Checking for continuity with an ohmmeter lets you find simple opens and shorts easily, but measuring for voltage drops points you right to those elusive poor connections and bad switch or solenoid contacts that waste your time and make you want to pull your hair out.
A voltage drop in either the power side or the ground side of a circuit means the component isn’t getting all the current it’s supposed to from that circuit. So, it isn’t going to work the way it should, or it may not even work at all. An engine that won’t crank fast enough because of corroded battery connections is a classic example of a voltage drop.
To help you understand voltage drop, let’s take a quick look at Ohm’s Law: E = I x R. Since E = voltage, I = current and R= resistance, another way to express this equation is Voltage = Current x Resistance.
Therefore, when you have current flowing through a circuit with resistance, you’ll have a voltage drop.
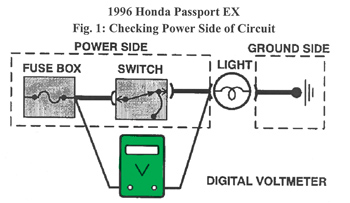 To illustrate the voltage drop principle, let’s troubleshoot a light that’s dimmer than normal. First, we’ll check the power side of the circuit. See Figure 1. Connect the positive lead of your digital voltmeter to the side of the switch that’s nearest to the power source. Then connect the negative lead to the side of the switch that’s nearest to the light. Now turn on the light.
Note: You can’t check for a voltage drop unless the circuit is on (remember, there has to be current flow). Even if the component in the circuit won’t work at all, turn it on.
Let’s say your voltmeter reads 4.0V. This means there’s a voltage drop of 4.0V in the switch. The light is dim because it’s only getting 8.0V instead of 12.0V. There’s a bad connection or dirty contacts (resistance) inside the switch.
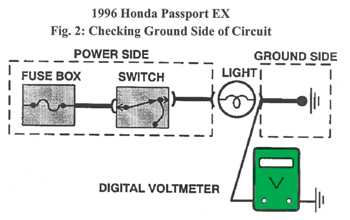 On the other hand, let’s suppose there isn’t enough voltage drop in the power side of the circuit to cause a problem (less than 1.0V, probably only 0.1 or 0.2V). So now we’ll check the ground side of the circuit (see Figure 2). Connect the positive lead of your voltmeter to the ground side of the light and the negative lead to a good body ground. Look at your voltmeter; it’s reading 3.0V. Give yourself a big hand. You’ve pinpointed a bad connection (resistance) that’s causing the light to dim.
Most of the circuits you troubleshoot aren’t this simple, but the principle remains the same:
• Find out if the voltage drop is on the power side or the ground side.
• Measure for voltage drop from the power source to the component, then from the component to ground.
• Pinpoint the exact location of the problem by referring to the appropriate ETM and measuring the voltage drop in each length of wire, across each connector, each fuse, each splice and each switch in the circuit.
Note: Make sure you use a digital voltmeter. Since a voltage drop of less than 1.0V is enough to cause a problem, an analog voltmeter just isn’t sensitive enough.
For additional information, visit www.mitchell1.com.
Technical service bulletin courtesy of Mitchell 1.