A ticking noise may come from the V6 engine of 1994-’97 Passports during normal operation. According to Honda, the probable cause is one or more hydraulic lash adjusters (HLAs) does not fully extend due to varnish buildup inside. This condition results from exceeding the required oil and filter change schedule. See the appropriate Passport owner’s manual for details.
Repair Procedure
1. Drain the engine oil, replace the oil filter with P/N 15400-P0H-305, and refill the crankcase with 0W-30 Mobil 1 synthetic engine oil.
Note: Although the current recommended Passport V6 engine oil is 10W-30 API SJ, the 0W-30 oil allows air in the HLA(s) to bleed out quickly and removes the varnish that is preventing HLA piston travel.
2. With the engine warm, run it at 2,500 rpm for 30 minutes.
• If the ticking noise persists, continue with Step 3.
 3. Allow the engine to idle until the ticking becomes loud and consistent. Use a stethoscope or long screwdriver to determine which bank is noisy, then stop the engine.
4. Remove the cylinder head cover on the noisy bank.
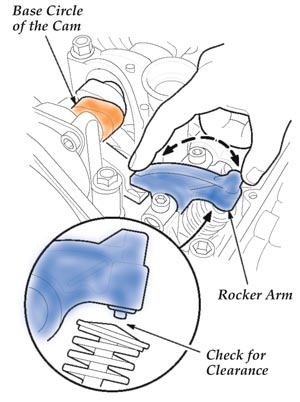
5. Check each rocker arm for clearance at the valve when the rocker is on the base circle of the cam and the valve is closed. (The rocker arms with clearance are the ones making noise.) See Figure 1.
Note: Each cylinder head has one oil pressure relief valve (P/N 8-94384-311-0) that controls oil pressure to its rocker arms. If all rocker arms on one cylinder head have clearance and/or the rocker arm pivot shaft is worn, the cylinder head oil pressure relief valve may be stuck open. Refer to page 6-17 of the appropriate Passport service manual for additional troubleshooting instructions.
6. Remove the ticking rocker arm assembly(s), and visually inspect the wear pattern of the HLA surface that contacts the valve stem. (The intake rocker arms [P/N 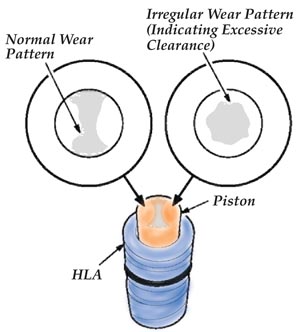 8-97084-929-1], located under the camshafts, require timing belt removal.) See Figure 2.
7. Using your fingers or soft-jaw pliers, remove the affected HLA(s) from the rocker arms. Be careful not to damage the O-ring on the outside of the HLA, or you will have to replace the entire rocker arm. (The HLA cannot be ordered separately.) When replacing an exhaust rocker arm, also replace its intermediate rocker arm. (Exhaust Rocker Arm (78C) (curves left): P/N 8-97032-013-1; Exhaust Rocker Arm (78D) (curves right): P/N 8-97032-014-1; and Intermediate Exhaust Rocker: P/N 8-97089-270-2).
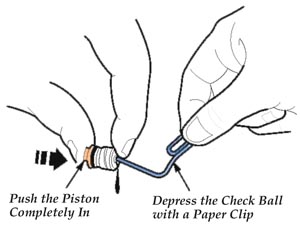
8. Insert a paper clip into the hole at the top of the HLA, and depress the spring-loaded check ball while completely pushing in the piston at the opposite end. The oil inside the HLA will come out of the check ball hole. See Figure 3.
 9. Carefully remove and retain the HLA O-ring, then with the HLA piston compressed, spray the piston end with carburetor cleaner to remove any varnish. Continue to spray the HLA until the runoff is clear, and the HLA piston compresses and extends freely.
10. Submerge the HLA in a cup of new cleaning solvent. While depressing the check ball, compress and release the piston several times to pump the solvent through the HLA.
11. Submerge the HLA in a cup of clean 0W-30 Mobil 1 engine oil, and pump oil through the HLA in the same manner as in Step 10. Finish up by allowing the spring inside the HLA to fully extend the piston. This fills the HLA with oil.
12. Reinstall the HLA O-ring.
13. Lube the rocker arm bore that houses the HLA with engine oil, then push the HLA back into place.
14. Check for leaks at the check ball and piston by attempting to compress the HLA piston without depressing the check ball. (The HLA should not compress or leak when full of oil.)
Note: An oil-filled HLA will hold its valve off the seat for several crank revolutions. This may cause the engine to run rough for a short period after starting.
If all of the HLAs (of all rockers and all cylinders) are filled to maximum extension, low compression will require a long cranking time. To prevent this, select one cylinder and bleed off some oil (depress the check ball and compress the piston approximately 1/4 of the way down) after filling those four HLAs.
This will allow the valve to close. Do not remove all of the oil or the valve spring and cam will collapse the HLA permanently.
15. Reassemble the engine using new cylinder head cover gaskets (P/N 15400-PR3-004). Apply Hondabond HT (P/N 08718-0001) at the corners where the cam tower, gasket and cylinder head meet. Torque the cylinder head cover bolts to 8 Nm (69 lb.-in.) using hand tools only.
16. Start the engine and listen for noise.
17. Remind the customer that varnish accumulation can be prevented with more frequent engine oil changes in accordance with their driving habits. An oil rated a minimum of API Service SG should be used. The current API service rating of SJ is preferred.
Source: Honda Parts Express.