, it would be head gasket failures on late ‘90s Civic models. If you’re comfortable with engine repairs, there is no reason not to welcome this work. The cars fix well, should offer no surprises to the tech, a little profit for the shop and as good an experience possible for the customer.
A head gasket failure will present itself as an overheating condition, or maybe a customer complaint of the heat occasionally blowing cold as a result of coolant loss. More severe cases will have the customer reporting white exhaust smoke on start up. Like any other job, the first step is to diagnose the problem. You never want to dive into an extensive engine job like this without first confirming the problem.
Before you do any testing, be sure the cooling system is full. You’ll never find a leak in the system if is there is no coolant to leak. While this sounds basic, and it is, I’ve seen instances where the tech will fill a low system, but not wanting to get it warm, won’t run and bleed the system. This allows the thermostat to open, and the system doesn’t actually fill. If you suspect a head gasket failure, this filling process is your first step in confirming those suspicions. With the funnel attached to the radiator, watch for air bubbles working through the coolant. You’ll get some initially as the coolant displaces the air, but if there’s a steady stream of air, it’s coming from somewhere — most likely the cylinders.
If you didn’t seem to get much air when the system was bled, it’s time to remove the funnel and pressurize the system to look for external leaks. Be sure to leave the tester on long enough for any leaks to show up. This is also a good time to conduct a thorough, visual inspection for obvious leaks, as well as evidence that there has been a leak. Be sure to take a good look at the radiator — by far the most common leak point on a Honda.
On the other hand, if you had a good amount of bubbles, you’ll want to confirm that they’re coming from the cylinders and find out which one. To pinpoint the problem, we’ll do a cylinder leak-down test that will pressurize the cylinders, while we watch the coolant for signs of the escaping air. Keep the funnel installed and remove the spark plugs. Turn the engine in the direction of rotation, in our case counter-clockwise, bringing the crankshaft to TDC as indicated by the solo white mark on the crank pulley.
At this point, you won’t know if number 1 or number 4 is on the desired compression stroke.If you test number 1 and have extreme leakage, move to number four. Some techs will install the leak-down hose in the cylinder and try to feel for compression, but I find the trial-and-error system to be just as easy. Like the pressure tester, give the air some time to work its way to the funnel. As you continue testing, remember to turn the crank in the direction of rotation and follow the firing order.
You won’t have the benefit of the white TDC mark on the crank for cylinders 2 and 3, but it isn’t difficult to know when the pistons are at TDC with the Honda’s central plug location. Always be aware that the engine may turn over when air is introduced into the cylinder. Keep your hands clear and don’t leave the wrench on the crank pulley. Following the fire order, check all of the cylinders. When you find the offending cylinder, it will be obvious by the reaction of the coolant. Be sure to make note of the leak-down readings. If you’re going to be removing the head to replace the gasket, the leak-down test will give you a good indication of the sealing capabilities of the valves and compression rings.
With the head gasket confirmed, it’s time to get started on the repair. I always suggest reviewing your service information before you tear into a big job; it takes only a couple of minutes but could save hours. In the case of the Civic, there are no surprises and the job should go smoothly.
On the Civic, we’ve had good luck with just replacing the offending head gasket with the latest OEM replacement. While there are plenty of good aftermarket gasket companies out there, I like to use the OEM version with a tri-metal head gasket design. But that doesn’t mean you don’t have to do a thorough inspection of the head. Use a straightedge to confirm the head is flat and doesn’t need to be resurfaced, taking a good look at the edges of the valves for any signs of burning.
Another good indication of valve failure is tight valve lash. If you’re working on a high-mileage car for which you don’t know the history, it would pay to check the lash before disassembly.

As you estimate the job, there are a couple of other decisions that have to be made based on your experience as well as your inspections. If the engine overheated, a new thermostat should be installed and, depending on the vehicle’s mileage, condition and history, it’s a good time to replace the timing belt, drive belts and water pump.
If the radiator is showing signs of leakage or fin deterioration, it may need a replacement to ensure against future overheating problems. The customer may not be prepared to make that kind of investment, but there is some money to be saved performing these services with the engine repair. It’s always a good idea to list any customer-denied, recommended services on the repair order to avoid any confusion in the future, especially if a belt should fail or that questionable valve results in a misfire in a few thousand miles.
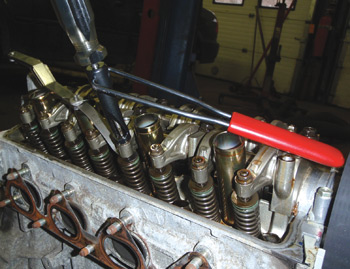
Back to the gasket replacement. With the valve cover removed, it’s easy to set the engine with number 1 at TDC on compression (all valves closed). With the coolant drained and the battery disconnected, remove any wiring or hoses, making note of where they go (a digital photo works great for this). Remove the distributor and intake manifold, and then back off the tension on the timing belt. If equipped, remove the power steering pump without disconnecting the lines and move it out of the way. Loosen the valve adjustment screws and remove the camshaft holding plate/rocker arm assembly following the recommended crisscrossing sequence. The same type of sequence is recommended for slowly loosening the head bolts about a third of a turn at a time until loose. Lift the head and do your inspections and prepare to put it back together.
Clean up or replace the head bolts. If necessary, chase the threads in the block to ensure correct clamping forces. Don’t overlook cleaning the oil jet/passage on the deck that sends oil to the cam.
The intake gasket can be tough to remove from the manifold, but with some fresh razor blades, patience and a liberal application of an aerosol carb cleaner, it can be conquered. I don’t like to use a roll lock-type disc to “grind” a gasket off near an open engine. It’s too hard to control the fine dust that’s generated. If you’re going to replace the timing belt and water pump, this is a good time to install the pump while the area is still “dirty.” Before you begin reassembly, take a few minutes to prepare the area and the parts. A couple of minutes spent putting away tools and sweeping up any oil will pay dividends as the job goes back together.
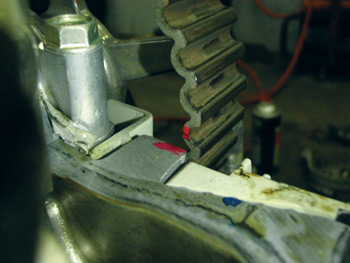
Be sure the number 1 piston is at TDC and the cam is in the correct position with the word “up” at the top of the pulley. To prevent any chance of the pistons striking the valves, install the timing belt, following the sequence in your service information, as soon as the head and cam plate are properly tightened. When tensioning the belt, don’t be tempted to help the tensioning spring, placing undue loads on the water pump as well as the crank and camshafts. Follow the factory procedure; turn the crankshaft in the direction of rotation (counter-clockwise looking at the front of the engine) about five or six revolutions stopping at TDC number 1. Confirm the timing marks and loosen the tensioner bolt a half a turn, then turn the crankshaft counter-clockwise three teeth on the camshaft pulley, putting the slack on the tensioner side of the belt allowing the spring to take up any slack. Tighten the tensioner and you’re done.
ADJUSTING VALVE LASH
The next step is to adjust the valve lash. For techs who aren’t used to this procedure, it can appear to be a little tricky, but it’s actually a straightforward process. First, be sure you’re adjusting to the proper spec. Honda lists the metric as well as the inch spec on the underhood sticker, and I’ve seen more than one good tech mix them up. The service information will have you turning the engine over four times to adjust the valves, bringing each cylinder up to TDC compression stroke.
I prefer to use the method where, with number 1 on TDC compression stroke, you adjust all the valves in number 1, the exhaust valves on 2 and the intake on 3. Turn the engine one revolution to number 4 TDC compression and do the others.
Being that it’s an overhead cam engine, it’s easy to see which valves are on the base circle of the cam. When reinstalling the valve cover, don’t forget to put a dab of sealer on the corners to prevent leakage. Now it’s time to install the manifolds, exhaust system and other components removed on disassembly.
Reinstall the distributor, and fill and bleed the cooling system. Depending on the year, some cars will have bleeder valves at the thermostat housing. Either way, use the funnel attached to the radiator and allow the engine to run with heat on until heat is present at the vents and the radiator fans have run a couple of times. Don’t forget to set the ignition timing to 15° BTDC (the red mark on the pulley). With the cooling system bled and all the levels including the coolant reservoir topped up, it’s time for road test and the car is ready to go back to the customer.
TIMING BELT REPLACEMENT
On the above Civic, we talked about replacing the belt as part of the head gasket repair, but the more common scenario will be a belt replacement as preventive maintenance.
We’ll switch gears a bit and look at a 2001 Acura TL 3.2 timing belt replacement. While the recommended replacement interval is 60,000 miles, we’ve had no problems with the more common replacement interval of 90,000 to 105,000 miles. We always recommend that the water pump be replaced while it’s accessible, and it goes without saying that new drive belts should be installed.
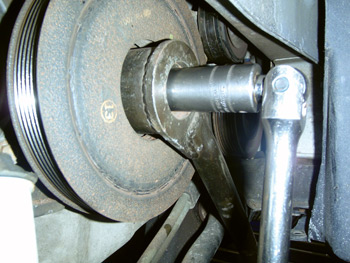
If there is a special tool that’s required when servicing these engines (either the four- or six-cylinder), it’s the tool that fits in the crankshaft pulley that will permit holding the crankshaft to allow removal of the crankshaft bolt. You’ll occasionally get lucky and be able to loosen the crank bolt with an impact gun, but more often than not, you’ll have the tool levered against the chassis with a long breaker bar and maybe even with a torque multiplier (extension pipe) just to loosen the bolt.
With the bolt loosened, move the crankshaft back to number 1 TDC and remove the drive belts and timing belt covers. And, like with the Civic, remove the steering pump and wire out of the way. Confirm the timing marks are lined up where they should be and, to make reassembly easier, you might want to make your own marks at this point.
The six cylinders use a hydraulic tensioner that will have to be held in place as the belt is removed. A modified battery hold-down bolt makes a convenient tool for the job; there is no reason to apply a great deal of force on the bolt. You’re just preventing the auto tensioner from moving outward as the idler pulley is loosened, putting slack in the belt to allow removal.
With the timing belt removed, it’s quick work to replace the water pump and clean the area in preparation to install the new belt. With the auto tensioner removed, compress the plunger in a press or vice, using slow, steady pressure until a locking pin can be installed through the tensioner body and plunger. If there are any signs of leakage or the plunger is not retracting smoothly, don’t take any chances and replace the tensioner. This is a good time to check all the pulleys for smooth, noise-free operation.
With the pin installed, remount the tensioner and install the belt in a counter-clockwise sequence — crank pulley, idler, front cam, water pump, rear cam to tensioner pulley. At this point, tighten the previously loosened idler pulley and remove the lock pin from the tensioner. Be sure the plunger moves outward tensioning the belt. Like the Civic, turn the crankshaft five or six revolutions and be sure the timing marks are aligned.
One other note…don’t use an impact gun to tighten the crank bolt. The safer method is to use the crankshaft-holding tool and torque the bolt to the proper specification. There have been instances of breaking the snout off the crank with the impact gun. That would certainly turn a good job bad in a hurry.