A Mitsubishi owner may complain of water on the front driver’s side floor of the vehicle. The HVAC drain tube can become blocked by internal foam packing material or by external debris (such as leaves, etc.) entering the front cowl area. If this occurs, the HVAC case may fill up with condensation and overflow onto the passenger’s side floorboard. In some cases, it can overflow into the blower motor.
If water is found to be leaking onto the driver’s side floorboard, it may be due to a deteriorated grommet seal between the HVAC unit and the bulkhead at the HVAC drain tube. As the vehicle is driven, air flow under the hood forces HVAC drainage back past the grommet and into the vehicle, where it collects on the driver’s side floorboard.
To eliminate these conditions, remove the debris and move the internal foam material away from the drain tube as described in this Tech Tip, and install the new grommet seal listed in the Parts Information section below. Always perform both operations when removing the HVAC assembly.
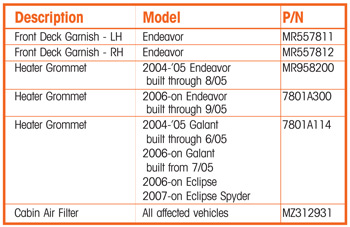
On certain Endeavor models only, if debris is found in the HVAC case, install a redesigned front deck (cowl) garnish, which will prevent future debris entry. Install the new garnish listed in Parts Information if one was not previously installed for this condition.
Applicable Models:
- 2004 and up Endeavor, Galant
- 2006 and up Eclipse
- 2007 and up Eclipse Spyder
Repair Procedure:
1. Confirm proper blower motor operation.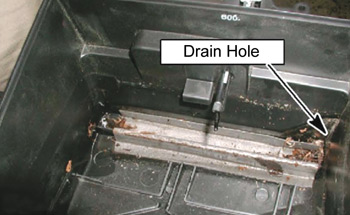
2. Clean any debris from the evaporator housing drain tube and HVAC case and install a new grommet seal.
a. Remove the HVAC case and evaporator. Disassemble the HVAC and remove debris from the drain hole area inside (see Fig. 1).
b. Inspect the foam inside the HVAC case for drain blockage.
• If the foam is loose, reaffix it to the case using a small bead of suitable adhesive.
• If the foam is blocking the passage for the condensation to reach the drain hole, cut away the foam as necessary in the area indicated in Fig. 2.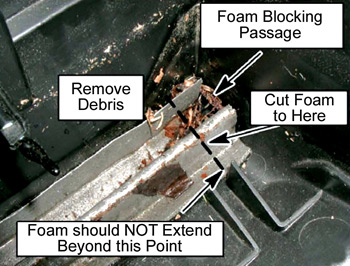
3. During installation of the cooling unit, replace the grommet seal where the drain passes through the bulkhead. Ensure that the bulkhead and cooling unit surfaces are cleaned of old material prior to replacement (see Fig. 3).
4. If debris (leaves, twigs, etc.) was found in the HVAC assembly, install a cabin air filter into the blower motor housing. Follow the installation instructions included with each filter.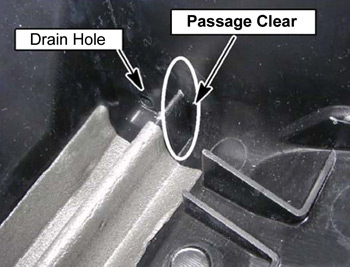
5. On Endeavor models built only prior to July 20, 2004. If external debris was found inside the HVAC case, and one has not been installed as part of a prior repair, install a new, improved front deck (cowl) garnish to prevent future entry of debris. Later models were built with the garnish (see Fig. 4).
a. Remove the front wipers.
b. Remove the old front deck garnish.
c. Install the new front deck garnish (use both LH and RH parts listed in Parts Information).
d. Reinstall the front wipers.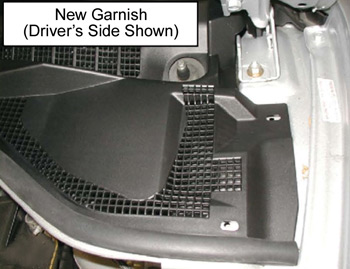
By Ed Dorowski, ALLDATA editor and Jeff Webster, ALLDATA technical writer