By Gary Goms
Contributing Editor
All diagnostic techs are eventually confronted with a random, no-code failure that occurs only under a very narrow range of circumstances. All too often, solving a random, no-code malfunction is a long-shot proposition for any diagnostic tech because a particular combination of events is required to initiate that particular malfunction.
Sure, every once in a while a technician can get lucky with a chance roll of the diagnostic dice, but that’s about it when it comes to diagnosing random, no-code malfunctions. Lucky or not, the chances of locating the cause of a random, no-code malfunction can be increased by determining the sequence of events needed to trigger the malfunction. Determining this sequence of events is what I call, “Finding the Failure Pattern.”
From the outset, let’s note that finding a particular failure pattern requires time and diligence which, in many cases, can amount to hours, days and perhaps weeks of either driving the vehicle or trying to simulate a particular driving condition in the shop.
But, if the problem is to be solved, the failure pattern must be given time to develop. In this article, I’ll give you an example of how I solved a mysterious and seldom-occurring low-speed surging and stalling complaint on one vehicle. Although this case study involves an older vehicle, the same diagnostic logic can be applied to any electronically-controlled vehicle system.
Failure History
This case begins during the winter of 2006, when the customer was referred by another shop for a mysterious high-idle complaint on his 1988 GMC C1500 pickup truck. In our area, this type of truck is known as a “wood truck,” which is used to venture into the high country to gather firewood in preparation for winter. The truck was mechanically and cosmetically in good condition, so it was worth the expense of the anticipated diagnosis and repair.
According to my service notes, I had evidently found a problem in the idle air control (IAC) system that controls idle speed, which I attributed to a faulty IAC driver in the truck’s electronic control module (ECM). I replaced the ECM and the owner motored through the remainder of the winter in fine style with no further complaints.
Fast-forwarding to nearly a year later, the owner returned with a surging and stalling complaint. The owner, who lives about three miles north of our city limits, complained that the engine would begin surging and would eventually stall when driving at slow, in-town speeds. The owner could re-start the engine, but couldn’t keep it running once the automatic transmission was pulled into gear.
By comparing the owner’s complaint with my previous service notes, I came to the conclusion that I obviously wasn’t dealing with another IAC problem. As with most random malfunction cases, extensive idling and low-speed test-driving failed to duplicate the complaint. In this instance, the owner left the vehicle with me with simple instructions to “Fix the problem.”
Pattern Failures and Failure Patterns
Let’s begin by differentiating between a pattern failure and a failure pattern. Pattern failures are malfunctions common to specific vehicle model years and applications. Failure patterns, on the other hand, are the set of circumstances or events that cause an intermittent or random malfunction.
While the pattern failures on the 1988 General Motors throttle-body, fuel-injected, 350 cid V8 engine are few, the most outstanding is cracks radiating throughout the ferrous magnet mounted on the distributor shaft. On many GM applications, this magnet is riveted in place. As the material ages, cracks radiate from the rivets throughout the ferrous material. This cracking process weakens the strength of the magnetic pulse, which, in turn, causes momentary ignition failure that results in hard starting, rolling idle and other low-speed performance complaints.
As with any two-wire magnetic reluctor sensor, the strength of the magnetic signal increases with engine speed, so the symptoms disappear as the engine accelerates. These characteristics matched the symptoms of the GMC’s surging and stalling complaint.
Upon close examination, I did indeed find cracks radiating throughout the original distributor magnet. Whether the cracking had advanced far enough to initiate the surging and stalling complaint under a specific driving condition is, at best, a speculative assessment. From the diagnostic point of view, however, it’s always best to replace any questionable component before proceeding with a diagnosis.
Although GM still supplies a replacement distributor shaft and magnet, I replaced the distributor with a rebuilt version using a more reliable magnet configuration. By doing that, I eliminated a troublesome pattern failure that could be causing this particular driveability complaint. As you might guess, the new distributor didn’t remedy the GMC’s low-speed surging and stalling complaint!
Finding the Failure Pattern
At this point, I began thinking through the recent course of events. First, the surging/stalling complaint never occurred unless the vehicle was driven in cold weather. This prompted a thorough test of all underhood sensors and actuators including the MAP, TP, ECT and other sensors to see if any delivered a marginal or questionable voltage signal during cold weather. I also used lab scope waveform analysis to test the throttle body’s two fuel injectors. All underhood sensors and actuators performed perfectly, even in cold weather.
But, one day, as the engine was idling smoothly in the service bay, I began thinking, “What else is common to cold-weather driving?”
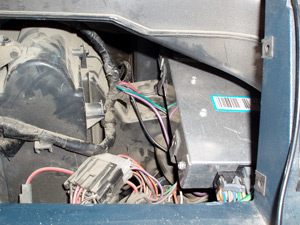 |
| Photo 1: My first failure pattern clue was the observation that the ECM was positioned directly over the heater core housing. |
The answer, of course, was that the driver would turn on the passenger compartment heater in cold weather. I had already removed the glove box door so I could pin-test the ECM connector on a moment’s notice. I also noticed that the ECM was mounted directly above the heater housing, which is an excellent place to transfer heat from the cooling system to an electronic component like the ECM. See Photo 1.
On a hunch, I turned the heater on to maximum heat and blower output and began to measure the ECM’s case temperature with my non-contact thermometer. It took several hours to drive the ECM’s core temperature in excess of 150° F. Once that temperature had been reached, the IAC count soared as it pulled wide-open and the engine began to emit a deep-throated gasping noise, indicating that the ECM was trying to keep the engine running. The engine would continue in this “gasping” mode for a few minutes and then abruptly stall. The fact that the engine had to run two hours with the heater on was, indeed, the failure pattern I had spent so much time trying to discover.
Rich or Lean?
Attaching a timing light to one of the spark plug wires indicated that the engine had a steady spark and that ignition timing was close to what it should be for closed-loop operating mode. I also disconnected the EGR valve vacuum hose to eliminate the possibility of the EGR valve opening and causing a similar surging and stalling complaint. Next, as the engine began to stall, I squirted some throttle body cleaner into the throttle body. Because the throttle body cleaner actually aggravated the stalling problem, it was obvious that the engine was running rich.
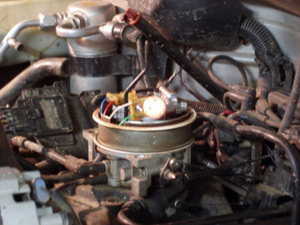 |
| Photo 2: Testing for the presence of an injector pulse with a common ‘noid light gave me my first clue that the driver’s side injector was staying open too long. |
During an earlier test, I noticed that the “noid” light I had attached to the injector harness had momentarily glowed very brightly as I cranked the engine. Could it be that a sensor malfunction was driving the ECM to increase the injector pulse width well beyond specifications? Or, could it be that one of the two injector circuits was being shorted to ground and holding the injector open? See Photo 2.
The next round of testing with a lab scope attached to the injectors proved beyond a doubt that the ECM was dramatically increasing the pulse width on one injector, which caused the surging and stalling complaint by flooding one manifold runner with fuel. By taking a scope reading at the ECM terminal and by observing that the ECM core temperature had to reach at least 150° F before the injectors stayed open indicated that the short to ground was taking place in the ECM rather than the wiring harness. See Photos 3 and 4.
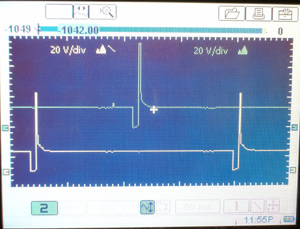 |
| Photo 3: Under most circumstances, the GM throttle body injectors fire in a peak-and-hold pattern. In this instance, the two throttle body injectors are firing alternately in a normal pattern. |
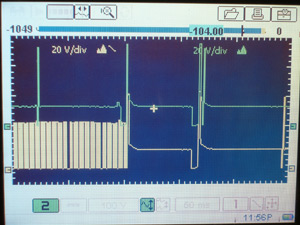 |
| Photo 4: This scope pattern shows the driver’s side fuel injector being held in the “open” position. Note that the injectors are being fired simultaneously rather than alternately. |
Another Temperature-Related Surprise
The complexity of this diagnosis was aggravated by the fact that I had originally installed a remanufactured ECM to remedy the idle air control malfunction. Nearly one year later, I found myself making a warranty replacement on that remanufactured ECM to remedy the fuel injector malfunction.
Now, with another entirely “new” remanufactured ECM in place, I verified the repair to see if the stalling condition returned after the engine ran its prerequisite two hours of operation. Imagine my surprise and outright disgust when, indeed, the engine began chugging away and the IAC was once again gasping air to keep the engine running!
The old saying is that, “What doesn’t kill you makes you stronger.” All diagnostic techs need to post this on their tool boxes simply because we all either have had or will soon experience a diagnosis which, despite all of the information and testing that went into the original determination, seems to be dead wrong.
But, wait just a minute. The surging and stalling symptoms were similar, but did they stem from the same cause? A closer examination of the ECM’s data stream indicated that the fuel injector pulse was fixed. A test with the timing light indicated that, at 194° operating temperature, the engine was running at base timing. The fact of the matter was, the ECM had dropped into the “limp-in” mode, which meant that the ECM had failed and was running with base timing and a slightly over-rich air/fuel mixture. The third remanufactured replacement ECM proved road worthy and, as of this writing, has delivered dependable performance.
A Diagnostic Summary
I’ve had several experiences during the past several years in which a failure pattern was related to a rise in cabin temperature. Years ago, I wrote about a mid-’90s Ford pickup that suddenly would lose power and then suddenly accelerate after being parked in the sun for several hours. The problem was that, when the core temperature of the analog/digital (A/D) converter located in the instrument cluster would rise above 80-90° F, it would indicate that the vehicle was exceeding its governed speed of 118 mph. A change in A/D converter temperature prompted the ECM to suddenly disable half of the engine’s fuel injectors.
Similarly, I had an ECM in a ’96 Nissan that would short the power transistor circuit in the primary ignition system when the cabin temperature exceeded 80° F. Last winter, I also diagnosed a ’93 Isuzu with a cold-weather starting problem that was caused by the ECM failing to ground the fuel pump relay when cabin temperatures dropped below 40° F.
As with the GMC, all of these failure patterns were caused by changes in cabin temperature that, in turn, affected the operation of the ECM. Keep in mind that, while most ECMs are tested for functionality at room temperature, I doubt that very few are tested for functionality at either extreme of the seasonal temperature scale. Consequently, it’s always important to never under-estimate the influence of ambient temperature in any random electronic malfunction. Finding such a failure pattern may require hours, days and perhaps weeks but, in the end, finding such a failure pattern might be the only viable pathway to diagnostic success.
Gary Goms is a former educator and shop owner who remains active in the aftermarket service industry. Gary is an ASE-certified Master Automobile Technician (CMAT) and has earned the L1 advanced engine performance certification. He is also a graduate of Colorado State University and belongs to the Automotive Service Association (ASA) and the Society of Automotive Engineers (SAE).