Some Ford Expedition and 1998-2002 Lincoln Navigator vehicles equipped with four-wheel air suspension, may exhibit repeat air compressor drier failures. The drier cap may become detached from the drier body, or the drier body may be broken at the neck near the compressor head. This may be due to incomplete or incorrect system diagnosis that leads to replacement of only the original air suspension compressor, despite the fact that the compressor is not the root cause of the concern. Compressor failure in these instances is only a symptom of an underlying system problem.
Be sure to check the system for proper pneumatic function to ensure a complete repair.
Proper pneumatic function can be tested by verifying that both the front AND the rear of the vehicle can be raised and lowered one inch using a scan tool, and by monitoring the height sensor PIDs for movement while the vehicle is in the service bay. If the vehicle does not raise and lower normally, check the solenoid valves and air lines for blockages and/or restrictions. Replace any blocked or restricted solenoids and air lines. ALWAYS check for proper pneumatic function before returning the vehicle back to the customer.
NOTE: DISCONNECTING AN AIR LINE THAT IS CONNECTED TO THE AIR COMPRESSOR CAN CAUSE PERSONAL INJURY OR DAMAGE TO COMPONENTS AS HIGH PRESSURE IS VENTED UNCONTROLLED.
Applicable Vehicles:
1997-2002 Ford Expedition 4X4
1998-2002 Lincoln Navigator 4X4
Repair Procedure:
Review safety procedures in ALLDATA Repair before beginning
1. Using a suitable generic scan tool, vent the compressor/drier assembly.
2. Using shop air, blow out the air lines from the drier to the front fill solenoid valve and from the drier to the rear fill solenoid valve, before installing the new compressor.
3. Replace the air suspension compressor.
4. Replace the front fill solenoid. The front fill solenoid must be replaced because in these cases; it may have sustained damage from the drier desiccant or other contaminants.
5. Connect the scan tool to the vehicle while the vehicle is running in the service bay.
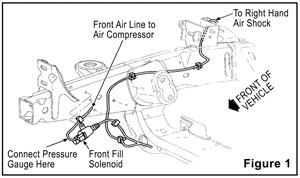 6. Install a pressure gauge capable of reading 400 PSI at the front air line (Figure 1). Using the scan tool, command the compressor ON. Check the output of the compressor on the gauge:
a) If the compressor does not output at least 110 PSI within 30 seconds, replace the compressor again and retest.
NOTE: VERIFY THAT THE SUSPENSION RAISES PROPERLY.
7. Using the scan tool, command the front of the vehicle to raise up one inch. It should do so in 25 seconds or less.
a) If the compressor output is near 300 PSI, check for air line or solenoid restrictions, repair as necessary and retest. Otherwise, proceed to Step 7b.
NOTE: SUSPENSION MOVEMENT CAN BE VERIFIED BY MONITORING EITHER OF THE FRONT HEIGHT SENSOR PIDS, WHICH SHOULD INCREASE/DECREASE BY .35 TO .45 VOLTS.
b) If the front of the vehicle DOES NOT raise, check the front pneumatic system for leaks, inoperable or blocked solenoid valves or pinched air lines. If an issue is found, repair as required and repeat Step 7 to verify proper operation.
c) If no problem found, continue to Step 8.
8. If the front of the vehicle DOES raise, use the scan tool to command the front of the vehicle to lower one inch. It should do so in 20 seconds or less.
a) If the front of the vehicle DOES NOT lower, check the front pneumatic system for leaks, inoperable or blocked solenoid valves, an inoperable vent solenoid, or pinched air lines. Repair air lines or replace solenoid valves as required.
9. Repeat Steps 7 and 8 for the rear. Command the rear of the vehicle, and monitor the rear height sensor PID. Voltages should increase when the vehicle is lowered, and decrease when the vehicle is raised. If the rear of the vehicle does not raise and lower as commanded, inspect the rear pneumatic system for leaks, inoperable or blocked solenoid valves, an inoperable vent solenoid, or pinched air lines, and repair as necessary.
10. If the vehicle raises and lowers normally in both the front and the rear, test drive the vehicle to confirm the repair.
NOTE: This Repair/Service Procedure is excerpted from a Technical Service Bulletin published by the vehicle manufacturer, and is intended for use by trained, professional technicians with the knowledge, tools and equipment to do the job properly and safely. It is recommended that this procedure not be performed by “do-it-yourselfers.”
Written by ALLDATA Technical Editor, Eric Seifert. Eric is an ASE certified Master Technician and Engine Machinist. He is a graduate of the De Anza College Automotive Technology Program, with 20 years of independent shop and parts store experience.
2009 ALLDATA LLC. All rights reserved. All technical information, images and specifications are from ALLDATA Repair. ALLDATA is a registered trademark and ALLDATA Repair is a mark of ALLDATA LLC. All other brand names and marks are the property of their respective holders.
Expedition, Navigator, Ford and Lincoln are registered trademark names and model designations of Ford Motor Company. All trademark names and model designations are being used solely for reference and application purposes.