Saturn's Cooling System: Driveability Concerns

Tech Tip: Driveability Concerns Revolve Around Saturn’s Cooling System

Customers may comment about various driveability and/or engine operating concerns including: hard start, erratic idle, rough running, engine overheating, low and/or leaking coolant and/or Service Engine Soon lamp illuminated on 1991-2001 Saturn S-Series vehicles. This condition may be caused by a cracked engine coolant temperature sensor. You'll need to replace the engine coolant temperature sensor, inspect and, if necessary, replace the sensor harness connector.

Customers may comment about various driveability and/or engine operating concerns including: hard start, erratic idle, rough running, engine overheating, low and/or leaking coolant and/or Service Engine Soon lamp illuminated on 1991-2001 Saturn S-Series vehicles. This condition may be caused by a cracked engine coolant temperature sensor. You’ll need to replace the engine coolant temperature sensor, inspect and, if necessary, replace the sensor harness connector.

Procedure:
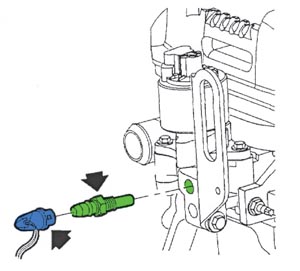
1. Disconnect the engine coolant temperature (ECT) sensor electrical connector and inspect sensor and connector terminals for corrosion and/or evidence of engine coolant. See Figure 1.

  • If the terminals are corroded or if there is evidence of engine coolant, proceed to step 4.
  • If the terminals are not corroded and there is no evidence of engine coolant, reconnect the electrical connector and continue to the next step.

Caution: To avoid the danger of being burned, do not remove the cap while the engine, radiator and surge tank are still hot. Scalding fluid and steam can be blown out under pressure.

2. Perform one or both of the following checks to determine whether the ECT sensor is providing the correct temperature indication.

  • If the engine is at ambient temperature (the vehicle has been sitting overnight or not started for several hours), use a scan tool to compare the inlet air temperature (IAT) to the ECT. These two readings should be within 2° C (4° F) of each other.
  • If the engine is at operating temperature, install a thermometer in the coolant recovery reservoir. With the engine running and A/C off, use a scan tool to compare the ECT sensor reading to the thermometer reading. These two readings should be within 8° C (15° F) of each other.
  • If the ECT sensor reading does not pass either of the above tests, continue with the next step.
  • If the ECT sensor reading passes both of the tests above, refer to the appropriate symptom diagnostic chart in the Engine/Emissions Controls section of applicable engine service manual.

3. Turn off the ignition.

4. Remove the coolant surge tank cap.

Caution: Do not remove the cap or open the cooling system drains from a hot system. Allow the system to cool first.

5. Drain at least 1.9L (2 qt.) of engine coolant from the cooling system by opening the radiator drain valve or removing the engine drain plug. Collect the engine coolant in a container.

6. Disconnect the ECT sensor electrical connector.

7. Remove the ECT sensor from the cylinder head.

8. Obtain the replacement ECT sensor (P/N 21025106).

9. Use the appropriate tap to clean the sensor mounting hole of any thread sealant residue.

10. Install the ECT sensor in the cylinder head.
Torque: ECT Sensor: 8 Nm (71 in.-lbs.)

11. Inspect the harness connector terminals for corrosion and/or evidence of engine coolant. If the harness connector terminals are corroded or there is evidence of engine coolant, the harness connector must be replaced with a new connector (P/N 12117087-includes: connector, terminals, wires and splice sleeves).

12. Connect the ECT sensor connector.

13. Transfer the engine coolant drained in step 5 into a coolant surge tank. If necessary, fill the coolant surge tank to the FULL COLD range with 50/50 solution of the correct type of antifreeze and clean water.

14. Start the engine and check for leaks.

15. Run the engine until the upper radiator hose is hot, then add more coolant if needed to bring the level to the FULL COLD level (1991-early 1997) or within the Min./Max. cold range (late l997-2001).

16. Install the coolant surge tank cap.

Technical service bulletin courtesy of Mitchell 1.

For additional information, visit www.mitchell1.com.

You May Also Like

GM Tech Tip: Clunk Or Thump Noise From Front Suspension

Some customers may comment on a clunk or thump noise coming from the front suspension while driving over rough road surfaces. This noise will typically occur when the front suspension is returning to the upward position after a hard downward stroke, such as after driving through a large rut or pothole.

gm-suspension-noise-featured

Models:
2008-2011 Buick Enclave, LaCrosse, Lucerne
2011-2012 Buick Regal
2005-2010 Chevrolet Cobalt (Including SS)
2006-2011 Chevrolet HHR (Including SS)
2008-2009 Chevrolet Uplander
2008-2011 Chevrolet Aveo
2008-2012 Chevrolet Equinox, Impala, Malibu
2009-2012 Chevrolet Traverse
2010-2012 Chevrolet Camaro
2011-2012 Chevrolet Cruze, Volt
2008-2012 GMC Acadia
2010-2012 GMC Terrain
2007-2010 Pontiac G5
2008 Pontiac Grand Prix
2008-2009 Pontiac Montana SV6, Torrent
2008-2010 Pontiac G3, G6, Vibe, Wave

GM: Intermittent Check Engine Light, DTC P2138 With Reduced Engine Power

Some customers may comment on an intermittent malfunction indicator lamp (MIL) being illuminated with a message or an indicator that displays Reduced Engine Power. The technician may observe on a scan tool DTC P2138 – Accelerator Pedal Position (APP) Sensor 1-2 Correlation set as Current or in History.

gm-check-engine-light
Lost And Found: When Good Tools Go Missing

There are those occasions when a phone call or a complete search of the shop doesn’t yield any sign of a lost tool. For the most part, you can mark that tool down as “gone for good,” lost to that place where wayward nuts, bolts and tools always end up.

wrench-on-engine
Tech Tip: Ford/Lincoln/Mercury Transmission Fluid Leak

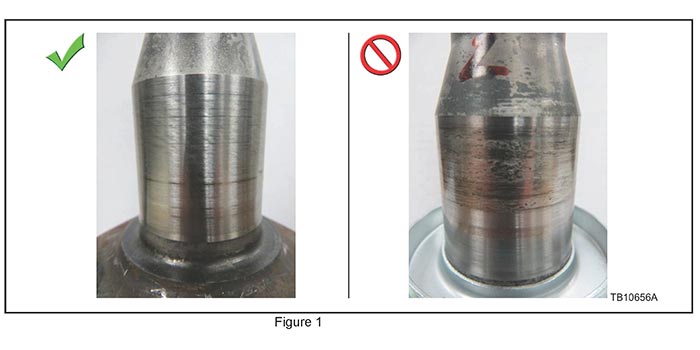
Follow these tips to diagnose and fix a transmission fluid leak on several Ford, Lincoln and Mercury models. The first step is to remove the LH halfshaft and inspect the halfshaft journal surface finish.

Transmission leak
Automotive Automatic Transmission Filter O-Rings And Lip Seals

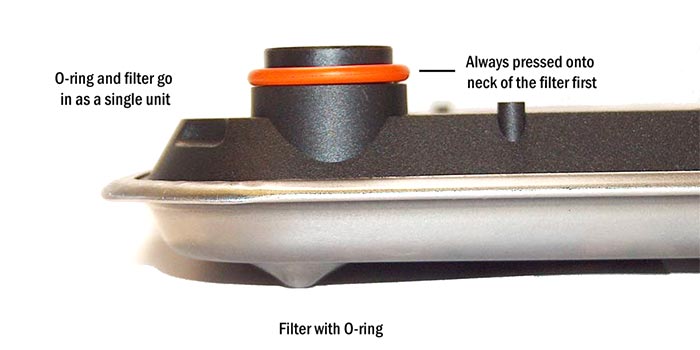
Many transmission filters require a seal at the point where they assemble into the transmission. Most of these seals are called “lip seals,” although some filters may use an O-ring. Before filter installation, it is important to make sure that there is no O-ring or lip seal in the case or pump bore left over from the old filter.

Other Posts

BRAKELIGHT: The Car Cradle (March 1986)

Some ideas just never catch on… Related Articles – Welcome To The Future: Are Your Networks Protected? – BRAKELIGHT: BFE Sponsors Soapbox Derby – BRAKELIGHT: Spiffs from the 1970s (1976) I wonder if the Car Cradle paid for itself by shaking out the coins that were trapped in the seats? The ad claims that there

Welcome To The Future: Are Your Networks Protected?

For those of you who do not know me, I will give you a quick download on my background. Related Articles – BRAKELIGHT: Ford Helps Disabled Veterans (June 1951) – BRAKELIGHT: Wreck Display Increases Brake Business 150 Percent (August 1936) – Brakelights: Foam Means Fade (June 1961) I have been playing with cars for 40

cybersecurity
BRAKELIGHT: BFE Sponsors Soapbox Derby

In the summer of 2013, Brake & Front End sponsored a soapbox derby car for the National Super Kids Classic. Held in conjunction with the All American Soapbox Derby, the National Super Kids Classic is for disabled children to race at one of the most iconic American sporting events. Sponsoring a racecar or sports team can

BRAKELIGHT: Spiffs from the 1970s (1976)

A spiff, SPIF (Sales Performance Incentive Fund) or spiv is typically given by a manufacturer or distributor for selling a specific product or for buying an assortment of parts. Special spiffs have been around since the start of Brake & Front End. Products that could be used outside of the shop were a little more