By Rich Diegle
Senior Automotive Editor
Some 2002-2005 Ford Explorer Mercury Mountaineer and 2003-2005 Lincoln Aviator vehicles may exhibit a noise from the rear wheel hub bearings. Previous service procedures required replacement of the wheel hub bearing assembly. This new service procedure allows replacement of just the wheel bearing to repair the noise condition.
To replace the rear hub bearing and wheel bearing retainer ring, refer to the following manufacturer’s Service Procedure.
Service Procedure
(Review safety procedures in ALLDATA Repair before beginning.)
![]() CAUTION: Suspension fasteners are critical. When replacing suspension fasteners, only install original equipment, or fasteners of equivalent quality and design. Proper torque values must be observed during reassemble to ensure correct retention of all components. Make sure the fasteners are reinstalled in the same orientation as when removed.
CAUTION: Suspension fasteners are critical. When replacing suspension fasteners, only install original equipment, or fasteners of equivalent quality and design. Proper torque values must be observed during reassemble to ensure correct retention of all components. Make sure the fasteners are reinstalled in the same orientation as when removed.
CAUTION: Do not loosen the axle wheel hub retainer until the wheel and tire are removed from the vehicle.
Wheel bearing damage will occur if the wheel bearing is unloaded with the weight of the vehicle applied.
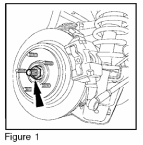 1. Remove the axle-to-wheel hub retainer nut and washer (Figure 1).
Discard the nut. When installing, tighten to 203 lb-ft (275 N.m).
NOTE: Have an assistant press the brake pedal to keep the axle from turning.
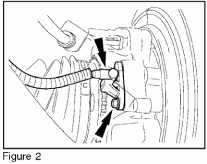
2. Remove the bolt and disconnect the wheel speed sensor (Figure 2). When installing, tighten to 71 lb-in (8 N.m).
3. Remove the parking brake shoes.
 4. Remove and discard the toe link-to-wheel knuckle nut. When installing, tighten to 66 lb-ft (90 N.m).
CAUTION: Do not damage the boot while separating the toe link from the wheel knuckle.
5. Remove the bolt and separate the toe link from the wheel knuckle.
6. Remove and discard the upper arm-to-wheel knuckle nut. When installing, tighten to 66 lb-ft (90 N.m).
 CAUTION: Do not damage the boot while separating the ball joint from the wheel knuckle.
7. Remove the bolt and separate the upper arm from the wheel knuckle.
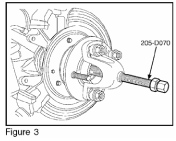
8. Press the outboard CV joint until it is loose from the hub (Figure 3).
9. Remove and discard the lower arm-to-wheel knuckle nut. When installing, tighten to 111 lb-ft (150 N.m).
 10. Remove the lower arm-to-wheel knuckle bolt.
11. Remove the wheel knuckle.
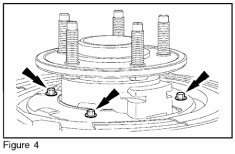
12. Remove the three (3) brake disc shield-to-wheel knuckle bolts (Figure 4). When installing, tighten to 10 lb-ft (13 N.m).
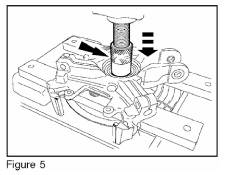
13. Using a suitable press, remove the wheel hub (Figure 5).
 14. Remove the brake disc shield.
NOTE: This step may not be necessary if the inner wheel bearing race remains in the wheel knuckle after removing the wheel hub.
15. Press the inner wheel bearing race from the wheel hub (Figure 6).
16. Remove the wheel bearing retainer ring.
17. Using a suitable press, remove and discard the wheel 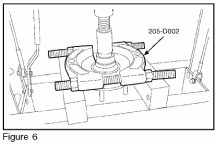 bearing.
NOTE: During reassembly, always install new:
• Axle-to-wheel hub retainer nut;
• Toe link-to-wheel knuckle nut;
• Upper arm-to-wheel knuckle nut;
• Lower arm-to-wheel knuckle nut; and
• Wheel bearing.
18. To install, reverse the removal procedure.
Written by ALLDATA Senior Automotive Editor, Rich Diegle. Rich is an Advanced Engine Performance Certified, ASE Master Technician with an AA Degree in automotive technology and 23 years of dealership and independent shop experience.
For additional information, visit www.alldata.com.