The engine runs rough, gas mileage is down and more importantly the "check engine" light is on. That little illuminated check engine light strikes fear in the hearts and minds of the average vehicle owner – it’s supposed to. Otherwise, people would keep driving their vehicles as long as they could, eclipsing the light with a piece of electrical tape. That wouldn’t be good for our air quality. Luckily, most good citizens are of the belief that if that check engine light is on, not only is the vehicle going to leave them stranded at the most inopportune time, a plague could befall their entire family and their subsequent heirs for generations.
To the professional technician however, the "check engine" light is a sign that there may be a significant problem, but it’s probably nothing that’s going to change the course of history. With the help of ongoing education, a good scan tool and accurate diagnostic information, thousands of technicians repair "check engine" light related problems daily.
So why does something as simple as an engine misfire warrant a tech tip? Many techs assume that because automotive technology has become more complex, drivability problems have become more complex. In some ways they have, but on the other hand, sometimes facilitating a timely repair is just a matter of checking the simple basics.
In keeping with the simplicity theme, let’s cut straight to the details of this tech tip. If any of the applied vehicles (listed below) have a check engine light on, diagnostic trouble codes P0300 through P0304 (cylinder misfire) stored and/or exhibit a rough running engine, check the spark plug wire tubes and boots as follows:
Applied Vehicles:
• 1995-97.5 Altima (U13) models built before: 1N4BU31D3VC245368; and
• 1998 Altima (L30) models built before: 1N4DL01D8WC165916.
Applied Dates:
• 1995-97.5 Altima (U13) models built before March 5, 1997; and
• 1998 Altima (L30) models built before October 28, 1997.
PROCEDURE:
1. Remove the spark plug wires and inspect for water in the spark plug holes. If water is in the spark plug holes, perform the following steps:
• Remove water from the spark plug holes.
• Insert a paper clip through the steam vent hole in the spark plug wire boots to insure the holes are clear (see Figure 1).
NOTE: The steam vent hole allows water vapor to escape if water becomes trapped in the spark plug hole.
• Inspect spark plug wire boots for cracks, hardening or deformities that could prevent sealing between the boots and the camshaft (valve) cover.
• Replace all spark plug wires if one or more of the boots show signs of cracks, hardening or deformities.
If the spark plug holes are dry and the spark plug wire boots are in good condition, proceed with step 2.
2. Inspect the entire surface of each spark plug wire tube for pinholes and/or cracks (see Figure 2).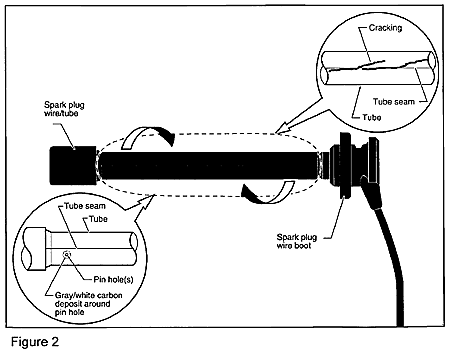
• If one or more spark plug wire tubes have pinholes and/or cracks, replace all of the spark plug wires.
And there you have it — in these complex times, a simple solution to a simple problem. And all that was required was an ongoing education, a good scan tool and accurate diagnostic information. It’s up to you to provide the first two items. As for the last item — I’m always glad to help.
Written by ALLDATA Technical Editor, Rich Diegle. Rich is an Advanced Engine Performance Certified and ASE Master Technician with an Associate of Arts degree in automotive technology and 22 years of dealership and independent shop experience.
For additional information, visit www.alldata.com.