Tech Tip: Diagnosing a Lit Diamante Traction Control Lamp

Tech Tip: Diagnosing a Lit Diamante Traction Control Lamp

Darrel's wife has a 2002 Mitsubishi Diamante that she uses for shuttling around her real estate clients. Recently, the Diamante's TCL (Traction Control Lamp) came on. Concerned for his wife's safety, Darrel brought the car by for an inspection. We retrieved a code 72, but could not come up with a cause for the code. I talked to a friend who works for a Mitsubishi dealer and he turned me on to the solution.

By Eric Seifert
ALLDATA Automotive Technical Editor

Darrel’s wife has a 2002 Mitsubishi Diamante that she uses for shuttling around her real estate clients. Recently, the Diamante’s TCL (Traction Control Lamp) came on. Concerned for his wife’s safety, Darrel brought the car by for an inspection. We retrieved a code 72, but could not come up with a cause for the code. I talked to a friend who works for a Mitsubishi dealer and he turned me on to the solution.

Traction Control Diagnostic Trouble Code 72 or 73, “Vacuum Ventilation Control Solenoid Circuit System” may set, and the TCL light may come on, due to excessive ignition signal interference affecting the voltage in the TCL solenoid valve harness. This may also cause MFI DTC P1101 or P1102 to set in the PCM. To eliminate this condition, install a noise filter in the wiring harness at the distributor connector as described in the repair procedure.

The repair will require one Mitsubishi noise filter P/N MM902517.

Applicable Vehicles:
2001-2002 Diamante models equipped with TCL.

Repair Procedure:
1. Remove the plastic engine cover.

2. Disconnect the 7-pin connector from the distributor. See Figure 1.

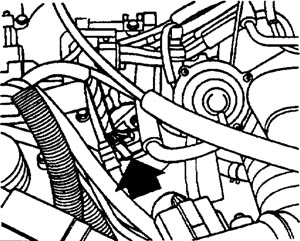
3. Use a sharp blade to open the plastic harness covering behind the main loom to expose the wires.

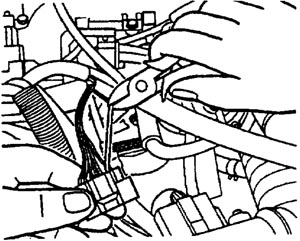
4. At pin 2, cut the white wire 2” from the connector. See Figure 2.

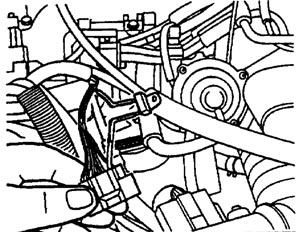
5. Install a noise filter as shown in Figure 3. Be sure that the wires are properly positioned before soldering, and that a clean, strong joint is formed.

a. Solder the black wire to the connector side of the harness.
b. Solder the white/red wire to the harness lead.
c. Install heat shrink tubing over the soldered areas for insulation.

6. Reinstall the plastic harness covering and tape securely for a watertight seal.

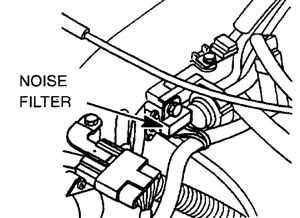
7. Position the noise filter between the vacuum control valve bracket and the bolt as shown in Figure 4.

8. Reconnect the distributor connector.

9. Reinstall the plastic engine cover.

Eric Seifert is an ASE certified Master Technician and Engine Machinist, with 20 years of independent shop and parts store experience.

For additional information, visit www.alldata.com.

You May Also Like

Tips On Shocks and Struts

Here are 10 basic tips on shocks and struts.

10. Writing An Estimate

To give the customer an apples-to-apples comparison, you may opt to write your estimate in two sections. The loaded strut option, if available, will be very straightforward and require less installation time. For the second section, give the customer a breakdown of the cost for each component required for a complete repair, explaining that each of these pieces is already included in the cost of the loaded assembly. When purchased individually, these components tend to add up quickly and often exceed the price of the pre-assembled unit. Finally, itemize the difference in labor costs, pointing out the additional time required to “rebuild” the strut, which is above and beyond the time already required for removal and reinstallation.

Axle Torque Procedures

Guessing the correct torque setting is a bad idea.

Auto Pros Visit Interstate Auto Care, Madison Heights, MI

For Bill Nalu, business is more than fixing cars – it’s about connecting with people on a personal level.

Constant-Velocity Axle Options

Whether new or remanufactured, complete CV axle assemblies can throw you a curveball from time to time.

All-Electric Fisker Ocean Extreme Achieves 360-Mile Range

EPA values confirm the Fisker Ocean Extreme has the longest range of any new electric SUV under $200K sold in the U.S.

Other Posts

Turning Off The TPMS Light

If a vehicle comes into your shop with the TPMS light on, there are a few key things to check first for time’s sake.

Reprogramming ADAS Procedures

As a vehicle ages, the J2534 programming becomes even more important to the vehicle’s ADAS operation.

Brake Booster Replacement

Hydro-boost vehicles are not hard to work on, but they do require service information and a working knowledge of the system.

AAM to Supply e-Beam Axles for Future Stellantis EV

The future program will feature both front and rear e-Beam axles that include AAM’s integrated 3-in-1 e-Drive technology.