Tech Tip: Adjusting Mechanical Camshaft Belt Tensioner

Tech Tip: Adjusting Mechanical Camshaft Belt Tensioner

Use the following procedure when adjusting the mechanical camshaft belt tensioner on 1998 Volvo S70/V70/C70 (B52X2/B52X4) vehicles with engine serial number 1266128-on.

Use the following procedure when adjusting the mechanical camshaft belt tensioner on 1998 Volvo S70/V70/C70 (B52X2/B52X4) vehicles with engine serial number 1266128-on.

Service Procedure:
1. Install the timing belt.

2. Ensure that the belt is tight between the crankshaft and the intake pulley; if not, reinstall it.

3. Tighten the center screw to 5 Nm (4 ft.-lb.).

4. Holding the center screw stationary, turn the eccentric (A) with a 6 mm Allen wrench counter-clockwise until the tension indicator passes the right side of the adjustment window (B). See Fig. 1.
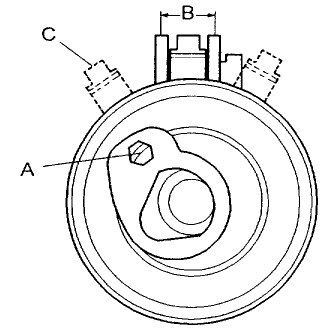
5. Turn the eccentric (A) back clockwise until the indicator (C) reaches the correct position based on the temperature of the engine. See Fig. 1.

6. Hold the eccentric secure and tighten the center screw to 20 Nm (15 ft.-lb.).
Note: When setting the final adjustment, the needle (C) must enter the adjustment window (B) from the right. If the needle exits the window to the left, it must be readjusted past the window so that it enters from the right. See Fig. 1.

7. Press on the timing belt and verify that the indicator moves in response to the pressure.

8. If the bolts holding either cam wheel had been loosened, tighten them at this time to 20 Nm (15 ft.-lb.).

9. Press the camshaft belt and check that the belt tensioner needle moves freely.

Needle Position at Different Temperatures:
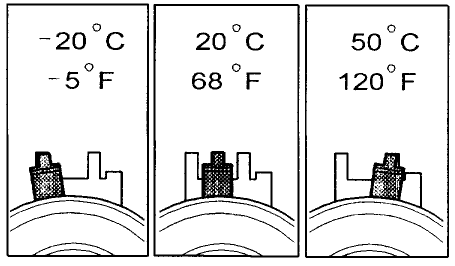
Note: This adjustment is always carried out on a cold engine. A suitable temperature is approximately 20°C/68° F.

At higher temperatures, for example with engine at operating temperature or at higher ambient temperature, the indicator is farther to the right. See Fig. 2 which shows the needle position when adjusting the camshaft belt tensioner at different engine temperatures.
Courtesy of IDENTIFIX.

For additional information, visit www.identifix.com.

You May Also Like

Tips On Shocks and Struts

Here are 10 basic tips on shocks and struts.

10. Writing An Estimate

To give the customer an apples-to-apples comparison, you may opt to write your estimate in two sections. The loaded strut option, if available, will be very straightforward and require less installation time. For the second section, give the customer a breakdown of the cost for each component required for a complete repair, explaining that each of these pieces is already included in the cost of the loaded assembly. When purchased individually, these components tend to add up quickly and often exceed the price of the pre-assembled unit. Finally, itemize the difference in labor costs, pointing out the additional time required to “rebuild” the strut, which is above and beyond the time already required for removal and reinstallation.

Axle Torque Procedures

Guessing the correct torque setting is a bad idea.

Auto Pros Visit Interstate Auto Care, Madison Heights, MI

For Bill Nalu, business is more than fixing cars – it’s about connecting with people on a personal level.

Constant-Velocity Axle Options

Whether new or remanufactured, complete CV axle assemblies can throw you a curveball from time to time.

All-Electric Fisker Ocean Extreme Achieves 360-Mile Range

EPA values confirm the Fisker Ocean Extreme has the longest range of any new electric SUV under $200K sold in the U.S.

Other Posts

Turning Off The TPMS Light

If a vehicle comes into your shop with the TPMS light on, there are a few key things to check first for time’s sake.

Reprogramming ADAS Procedures

As a vehicle ages, the J2534 programming becomes even more important to the vehicle’s ADAS operation.

Brake Booster Replacement

Hydro-boost vehicles are not hard to work on, but they do require service information and a working knowledge of the system.

AAM to Supply e-Beam Axles for Future Stellantis EV

The future program will feature both front and rear e-Beam axles that include AAM’s integrated 3-in-1 e-Drive technology.