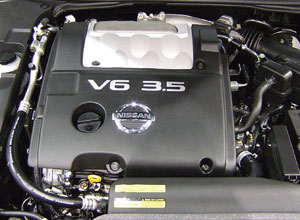
The cooling system on late-model Nissan Altimas and Maximas with the 3.5L V6 engine is similar to many other late-model vehicles in that the water pump is buried and typically takes two to three hours to replace depending on the model, year and your manual dexterity.

One thing that is a little different on these applications is that the water pump is driven off the timing chain rather than a serpentine belt or a timing belt. Consequently, there are a couple of extra steps you’ll have to take to create enough slack in the timing chain to remove the water pump if the pump needs to be replaced.
The first signs of trouble are usually engine overheating, coolant loss or coolant leaking from the front of the engine. The engine in these cars is mounted sideways, so if the pump is leaking, you may find a puddle of coolant on the ground under the passenger side of the engine just behind the front right wheel. Of course, a coolant leak doesn’t always mean the water pump shaft seal has reached the end of the road. The leak might be a bad hose or a cracked coolant reservoir.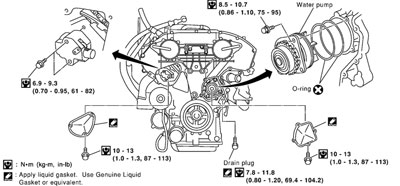
If the engine is overheating and/or coolant is disappearing, but you can’t see any signs of external leakage, the problem might be a leaky head gasket. The head gaskets on the 3.5L V6 have been very reliable with few reported problems. Even so, you should pressure test the cooling system to see if it holds pressure.
A good system should hold the rated pressure on the radiator cap for at least five minutes. If the pressure drops, there’s an internal leak and most likely the head gasket is the problem.
If you suspect an internal coolant leak, check the dipstick too for any signs of coolant in the oil.
Other signs of trouble that may indicate a failing water pump include bearing noise (rumbling, chirping or growling) from the vicinity of the pump, which is located on the front of the engine just below the front cylinder head (or right cylinder bank if you are looking at the front of the engine from the right side of the car).
 Use a mechanic’s stethoscope to isolate the sound as it might be due to worn bearings in one of the engine’s accessories or pulleys. If the sound seems to be coming from the area of the water pump, and the vehicle has a lot of miles on it, chances are the pump is failing.
On rare occasion, a water pump will fail internally. The pump may not be leaking but the engine is overheating because the pump is not pushing coolant through the motor. Some late-model water pumps have plastic impellers that are designed to reduce drag and noise. Over time, the fins on the plastic impeller can erode away, reducing the pump’s ability to circulate coolant through the engine. The water pump that’s used in the 3.5L engines has a stamped steel impeller, so this sound may not be an issue here. But a metal impeller can sometimes come loose and slip on its shaft, preventing it from spinning or pumping coolant.
Replacing the Water Pump
Here’s the factory procedure for replacing the water pump on a late-model 3.5L Altima or Maxima:
1. Drain the coolant out of the cooling system by opening the drain plugs on the radiator and right side of the cylinder block.
2. Remove the right-side engine mounting, mounting bracket and nuts (which requires supporting the engine from underneath or above).
3. Remove the drive belts and idler pulley bracket from the front of the engine.
4. Remove the water pump drain plug (located below and slightly to the right of the pump cover). See Figure 1.
5. Remove the chain tensioner cover and water pump cover.

6. There is a small lever on the timing chain tensioner. Pull this lever down, and release the plunger stopper tab. You can now push the plunger stopper tab up to release it.
7. Insert a stopper pin into the tensioner body hole to hold the lever in place and keep the tab released.
8. The plunger can now be pushed into the tensioner body by pressing on the timing chain guide.
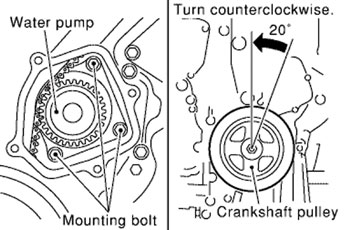
9. While holding the guide in, fix it in place by pushing the stopper pin through the lever hole and body hole. You will now have some slack in the timing chain. But you need the slack at the water pump.
10. Rotate the crankshaft pulley approximately 20° clockwise so that the slack in the chain is off the tensioner.
11. Remove the chain tensioner. Be careful not to drop mounting bolts inside chain case.
12. You can now remove the three water pump bolts, and rotate the crankshaft pulley 20° backwards (counterclockwise) to move the chain slack to the water pump (see Figure 2).
13. To pull the pump out of the engine, install two 2” M8 bolts into two of the water pump bolt holes.
14. Tighten the M8 bolts by turning each one-half turn alternately until they reach the timing chain rear case (see Figure 3). In order to prevent damage to the water pump or timing chain rear case, do not tighten one bolt continuously. Always turn each bolt a half turn each time. This will gradually push the water pump forward and out of the engine.
15. Lift up the water pump and remove it. When lifting it up, do not allow the water pump gear to hit the timing chain.
Water Pump Installation
The water pump on the 3.5L engine has two O-rings that seal it against the engine. Make sure you replace both O-rings.
1. Apply engine oil and coolant to O-rings for lubrication.
2. Install the water pump and tighten the three mounting bolts to 8.5 to 10.7 Nm (75 to 95 in.-lbs.). Be careful no sharp edges damage the O-rings during the installation.
3. Before installing the water pump and timing chain tensioner access covers, remove all traces of liquid gasket from all mating surfaces using a scraper or chemical gasket remover.
4. Apply a continuous bead of liquid gasket to the mating surfaces on the chain tensioner and water pump covers.
5. Return the crankshaft pulley to its original position by turning it 20° forward (clockwise).
6. Install the timing chain tensioner, then remove the stopper pin. Apply some oil to the tensioner.
7. Replace the radiator and engine drain plugs, and reinstall the remaining parts in the reverse order they were removed.
Refilling the Cooling System
Nissan recommends using its coolant to refill the cooling system, but any brand of extended-life, OAT-based coolant or universal coolant should work just fine. The coolant capacity is 7.5 liters on the Maxima and 8.2 liters on the Altima (or approximately two gallons including the coolant reservoir).
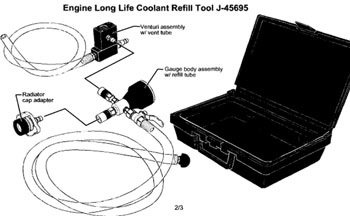
Refilling the cooling system on these cars can be tricky because air can become trapped in the heater core. One way to help get air out of the system is to raise the front of the car when you are refilling the radiator. Another way is to use a special tool Nissan has for purging air from the cooling system (see Figure 4). The tool is P/N J-45695. The tool attaches to the radiator cap filler neck, and uses shop air to create vacuum inside the radiator.
To purge the system with Nissan’s special tool, you need to set the heater controls to full HOT and turn the heater control to ON. Then turn the ignition on, but don’t start the engine yet. When the shop air supply to the tool is turned on, it will start to pull vacuum, which you can see on the tool’s gauge. Nissan says you need to pull 28” of vacuum (26” if your shop is higher than 3,281’ above sea level).
When the vacuum gauge shows maximum vacuum, disconnect the air hose and wait 20 seconds to make sure the cooling system holds vacuum and is not leaking. If the gauge reading holds steady, place the coolant container level with the top of the radiator (with the tool’s refill hose inserted all the way in the container) and open the valve on the refill hose. Coolant will be drawn into the system until the vacuum gauge reads zero. At this point, the radiator, heater core and engine should all be full of coolant with no air entrapped to cause problems later.
Finish by removing the tool, replacing the radiator cap and refilling the coolant reservoir to the COLD FULL mark.
After starting the engine, Nissan says you should idle the engine for three minutes, then rev the engine up to 3,000 rpm under no load to purge air from the high-pressure oil chamber of the chain tensioners. The engine may produce a rattling noise. But Nissan says not to worry as some air may remain in the
timing chain tensioners and will gradually work itself out.
Other Checks
Other items that also should be checked if you are replacing a water pump include the belts and hoses. Replace any that are found to be in less than perfect condition. Hoses that are brittle, aged cracked, bulging or chaffed must be replaced. New clamps are also recommended. Belts that are frayed, cracked or glazed should also be replaced.
If the engine has overheated, it’s also a good idea to replace the thermostat because overheating may have damaged the thermostat increasing the risk of it sticking shut. The thermostat housing on the 3.5L V6 is located on the front of the engine just above the alternator. The OEM thermostat is a jiggle-pin design with an opening temperature of 180°. Make sure the replacement thermostat has the same temperature rating and the same design, and that the jiggle-pin is installed so that it is facing upward to vent air properly.
Radiator Leaks
Like any radiator, the one on the Altima or Maxima can succumb to internal corrosion from coolant neglect. It may also develop leaks as a result of vibration or road hazard damage. The radiator is aluminum with plastic end tanks, so it is rebuildable. But it’s often faster and easier just to replace it with a new one if the old unit is corroded or damaged.
A replacement radiator should have the same cooling capacity as the original (or better). If the car is used for towing, or the engine has been modified for more horsepower, a radiator with increased cooling capacity should be recommended to reduce the risk of overheating.
Cooling Fan Circuit
The Altima and Maxima have dual variable-speed cooling fans that are powered by a module in the engine compartment. Fan speed is commanded by the powertrain control module (PCM) based on engine speed, vehicle speed, coolant temperature and A/C cooling load. The control module then operates the fans at one of three speeds (or leaves them off), depending on the cooling requirements commanded by the PCM.
There are three relays for the cooling fan circuit, and they are located in the power distribution center in the engine compartment.
As you can see, a thorough understanding of the cooling system on the Nissan 3.5L engine will help keep your customers’ and their Maximas/Altimas from overheating this summer.
Illustrations courtesy of ALLDATA