KABOOM!!! That’s kinda fun on the holidays isn’t it? Well, the pyrotechnics in a car can be satisfying as well. Satisfying to your wallet that is. I’m sure you’ve heard how “dangerous” air bags can be. Well they can be dangerous, but at the same time, they are pretty safe, too.
An electronically controlled air bag requires a sufficient voltage and ground supplied to it or it will not detonate. Notice I specified “electronically controlled.” There are some older models that were mechanically activated. I encountered one such style years ago on a 1991 Jaguar XJS. The driver’s air bag on that vehicle actually detonated by mechanical means of the steering shaft bumping a pin in the back of the bag. There was a disarming bolt that had to be backed out in order to remove the bag. Even with the bag disarmed, that one still made me a little nervous, knowing that I was handling something that was designed to explode from bumping it around.
However, when it comes to the typical electronic SRS system, I’m not worried because I know that I have to mess up pretty badly to set one off. So after reading this article, if you feel as though you’d like to add SRS work to your shop, go for it. Just be sure to get more indepth training for yourself and your techs before actually taking these systems on because they can have deadly consequences in untrained hands.
Air Bags
It used to be that only the driver had an air bag. Nowadays, the interior is surrounded with explosives. Inside the common air bag is a “squib.” A squib is a small explosive device that doesn’t really “explode,” so much as it fizzles. If you were to break a firecracker in the middle, you will have made two squibs.
An electrical pulse ignites the squib. As the squib burns, it pushes potassium nitrate through a wall of sodium azide inside of the device. The two chemicals react and produce a hot burst of nitrogen gas that fills the nylon fabric bag in less than 1/20th of a second. The nylon fabric bag soon deflates due to tiny pin holes present in the bag. That way, the bag gets out of the way of the occupants to exit. There will likely be a white powder residue found on the bag. That is a cornstarch or talcum powder used to keep the bags flexible and lubricated until they are used.
Different OEMs have used different methods throughout the years to control air bag detonation. Some were mechanically detonated by impact from the steering shaft. Some have been electrically detonated directly by a crash sensor in a type of “dumb” electrical fashion. The newer systems are generally controlled by a smart electronic system. In this article, we’ll use Ford’s first-generation system and SRS (current system) for discussion.
Module
On the first generation air bag system, the air bag was not fired by the module due to any type of data processing and logic. The module’s involvement in the actual firing of the air bag was limited to the fact that it houses a safing sensor on most designs, but not all. The module on these older systems where referred to as a “diagnostic monitor.”
The job of the logic within the diagnostic monitor was to detect problems in the system that could either cause lack of deployment or unwanted deployment. If a fault is detected, the diagnostic monitor will illuminate the air bag warning light and store a fault code, and flash the warning lamp with the appropriate fault code. If the air bag lamp circuit is the fault, you will hear a repeated beep. If a fault is detected that could cause an unwanted deployment, the thermal fuse inside the 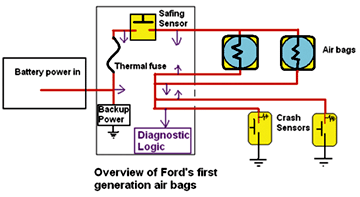 diagnostic monitor will blow. If the thermal fuse is blown, the cause of the problem must be corrected before installing the new monitor or the new monitor will also blow its fuse and require replacement. The monitor also contains a backup power supply that is capable of supplying power to blow the air bags in case the normal power feed to the module is lost during the wreck. See Figure 1.
In the current air bag system, the module involved is an actual control module for the system. It is referred to as the Restraints Control Module (RCM). Unlike the older system, this module makes the decision of when and how to fire the air bags. The crash sensors, seat position sensors, seat belt buckle switches and occupant classification sensor (via CAN network) are all inputs to the RCM. The air bags, warning lights and pretensioners are outputs of the RCM. The RCM determines how to deploy the air bags based on deceleration rate, seat positions and passenger’s weight (with an Occupant Classification Sensor or OCS).
 In both systems, the safing sensor provides the positive battery power to the air bags for firing. In the first generation system, the ground path was supplied by the crash sensors. In the current SRS system, the module selectively supplies the ground path for each individual air bag and pretensioner. With both systems, there is a very low current voltage supplied to all squib circuits during key operation. This is only for diagnostic monitoring of the squib circuits and obviously not enough for firing. See Figure 2.
Crash Sensors
First-generation crash sensors were mechanical in nature. They consisted of a gold-plated steel ball bearing held in place by a magnet at one end of the sensor. During a strong enough impact, the ball would break free from the magnet and was forced down a tube. At the other end of that tube was a pair of gold-plated electrical contacts. The ball would then bridge the contacts completing the path. For a safing sensor, completing the path meant battery power was supplied to the squibs. For a crash sensor, that meant it would complete the ground path. Although they functioned the same, a crash sensor was still slightly different from a safing sensor. The difference was in calibration — a safing sensor trips with less force than a crash sensor.
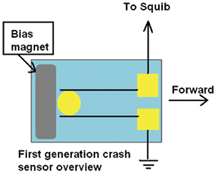 The purpose of a safing sensor is to provide isolation from the battery power during normal operation. This protects against accidental detonation should the wiring to an air bag become accidentally grounded. See Figure 3.
The modern crash sensor is a solid state-design. There are still moving parts, but just barely. But unlike the older crash sensors, if you open a modern crash sensor, you won’t see the moving parts. Instead of a magnet, ball and contacts, you will find the typical electric components with an accelerometer. The accelerometer inside of a modern crash sensor is known as a Micro Electro-Mechanical System (MEMS). Some MEMS accelerometers may contain a cantilever beam (or a diaphragm) that flexes under stress. Regardless of what method it uses, the idea is the same. As the beam or diaphragm flexes, the accompanying electronics within the sensor measure that movement and send a “crash detected” signal to the RCM if a predetermined threshold is reached.
With either design of crash sensor, the sensor should reset after an impact. In the ball-type design, the ball has to roll up hill through that tube to the contacts and should roll back to the magnet. With the accelerometer type, the beam or diaphragm just flexes a little and should return to a normal position. However, just because you can doesn’t mean you should. From the moment the crash sensor was designed on paper by its engineers, to that fateful moment that its services were called upon, it lived for only one purpose. After the crash, its duty has been fulfilled and should be retired.
There is no good way of determining the amount of internal damage that the crash sensor may have incurred. Are there flat spots on the ball and contacts now that could interfere with its ability to make good contact again? Did the beam or diaphragm inside the accelerometer incur distortion that could hinder it? You don’t know. All you know for sure is that the crash sensor worked that one time. You don’t know for sure it will work a second time. So, for that reason, you should always replace all crash sensors on a vehicle with air bag deployment after a collision.
Regardless of design, crash sensors must be correctly oriented on the vehicle to function properly. They also will have a very high resistance electrical path from the wiring to their case. This is so that the module can determine if they are mounted firmly to the vehicle versus hanging loose and swinging by the harness.
Pretensioner
A pretensioner is a squib device that can be located in either the retractor half or the buckle half of the seat belt. (See photos below.) Its job is to rapidly take up slack in the seat belt during impact to counter act that free play present in the belt that can be felt before the inertia lock engages.
Occupant Classification Sensor
The job of the Occupant Classification Sensor (OCS) is to determine the weight of the passenger. It classifies the passenger as either greater than or lesser than 40 lbs.
There are two methods used on Ford vehicles to measure the passenger’s weight. One method is a gel-filled bladder located inside the passenger’s seat cushion. When someone sits on the seat, the gel is displaced accordingly in the bladder and puts pressure on a sensor via a tube. Another method is by use of seat track-mounted weight sensors. The OCS module reads the weight sensor and communicates with the RCM over the high-speed CAN network as to the weight of the passenger. The RCM uses this information to determine which air bags to deploy, how hard to deploy them or not to deploy them at all.
Anytime an OCS component is replaced, a capable scan tool must be used to perform an OCS reset. Anytime the passenger seat is removed and installed, but no OCS component has been replaced, a scan tool must be used to perform the zero seat weight test. These are two separate tests listed in the OE scan tool.
As a general rule on Ford OCS, if it uses the bladder-type system, then the bladder, pressure sensor and OCS module must be replaced as one unit. They are calibrated to each other and sold together. An example of the bladder-type system can be found on a 2006 Taurus.
If the OCS is the type to use track mounted weight sensors, then the weight sensors can be replaced separately from the module and vice-versa. The weight-sensing tracks are a separate for the left and right sides and are installed individually. However, they are to be replaced as a pair. They require no mechanical adjustments. An example of this type of system can be found on a 2006 Fusion.
The Little Things
The “clockspring” is a coil of wires in a housing located behind the driver’s steering wheel. Sometimes it’s referred to as a contact or slip ring assembly. Those are old terms left over from an era when there was an actual copper ring with greased contacts that ran around the rings.
That was a simpler time when all that was located on the steering wheel was a horn button. But with an electronic air bag, the circuit resistance must be constant because of the module’s diagnostics of the circuit. The old slip ring and contact design just won’t deliver that type of consistency. Plus, when you consider the fact that the steering wheel also has the horn, cruise buttons, and sometimes radio and air conditioning controls, you’d end up with a massive slip ring due to all of the channels needed. So, nowadays, that slip ring has been replaced with a ribbon wire that is wound into a coil shape and housed inside of a two-piece plastic shell.
The coil of wires is usually isolated from the sides of the housing by thin plastic that prevents the wires from squeaking as the wheel rotates. At center, the wires are neither coiled tight or loose. Turning the wheel one direction winds the coil inward, and the other direction winds it outward. Eventually, the wires do break from flexing, and multiple steering wheel controls may be lost.
“PAD” stands for passenger side disable. This refers to the disable light for the passenger air bag. On some PAD-equipped vehicles, typically trucks, the driver must manually disable and enable the passenger air bag. On OCS systems, this function is automatic. With a manual type setup, the light will come on when the passenger air bag switch is set to disable. On OCS systems, the light will usually come on only for bulb “prove out” at startup, and then again if the occupant weighs less than the threshold weight because the air bag is disarmed.
If the occupant weighs more than the threshold weight, the light will be off because the air bag is armed. If there is no occupant at all in the seat, the light will usually be off even though the air bag is disarmed. The driver may notice the light go on and off if the passenger weighs slightly over the threshold weight and the vehicle bounces or the passenger does not sit upright. I have had customers complain of the light cycling on and off when the occupant weighs as much as 100 lbs. This is normal when the vehicle is driven over rough roads or roads with a sudden downward grade, or when the passenger leans to one side. Reference to this can be found in the owner’s manual.
The MIL bulb for older systems is hard-wired to the module. If there is no battery power present at the module for the MIL circuit pin, the module “knows” that the MIL circuit is open and sounds a shrill beeping alarm. For newer models, the “bulb” may be an LED, in which case, the SRS MIL circuit may be monitored by the IC module. If the circuit is open, it will inform the RCM through the network. The “bulb” for the PAD light is an LED and is directly monitored by the RCM through hardwiring. If the PAD light circuit is broken, the RCM will not sound an alarm, but it will set a fault code and illuminate the MIL. The “bulb” inside the PAD is not serviceable separately from the PAD assembly.
Let’s Fix Something!
A 2007 Fusion came in with the complaint of the air bag light on. Retrieving fault codes found two codes in the RCM: B1884 — “PAD warning lamp failure” and a U1900 for “CAN communication failure.” The IC also contained a U1900, as well. Of the codes, the B1884 has the most focused direction. The communication faults can be set by a wider range of possibilities.
So we start testing for the most straightforward of the codes. Looking at my wiring diagram shows that the RCM is on the ground side of the PAD light (pin 22 of the RCM). In order for the RCM to monitor this circuit, it must make its decision to set a B1884 based on the lack of power present at pin 22.
Further viewing of the wiring diagram shows that the PAD light is powered from fuse 24 in the underdash fuse panel. Power for the PAD light exits the fuse panel at pin 18. The diagram also shows a jump inside the fuse panel over to pin 5 of the fuse panel, so that same fuse also powers the OCS module as well. If the OCS module is off line, communication fault codes will be set. Testing fuse 24 shows a blown fuse. Installing a new fuse causes the fuse to pop immediately. The location of the OCS module is under the passenger’s seat. Wiring that’s under a seat is subject to damage from items being stuffed under the seat. Sometimes, these wires break or become shoved into the seat track where they can be damaged. Inspection of the passenger seat wiring in this case reveals nothing.
Unplugging the bulk connector under the seat makes the fuse no longer pop. Unplugging the OCS module and reconnecting the bulk connector does not cause the fuse to pop. Reconnecting the OCS module causes the fuse to pop. The OCS module is shorted internally.
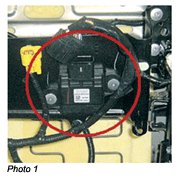 Replacement of the OCS module involves removal of the passenger seat. On this model, there is no bladder under the seat so the upholstery stays on the seat. If this vehicle used the bladder, instead of track-mounted sensors, then the coverings would need to be removed. However, the OCS module is riveted to the seat frame and room is needed to drill the rivets out, as well as to install new ones. See Photo 1.
The module doesn’t have to be “programmed” the same way other modules may, but you do have to rezero the seat. This will require a capable scan tool.
This is a simple process with the OE tool. First, the tool instructs you to make sure that the seat is empty and that the interior temp is within a given range. The interior temp is most critical on bladder-type OCS sensors due to expansion and contraction of the bladder at various temps. See Figure 5.
The next step is to firmly hit the head rest three times. This is most critical on track-mounted weight sensors in order to settle the seat track.
The tool then clears the KAM and trains the module to the current empty status as its new zero point. I hope that you have enjoyed the information. Be sure to play it safe with SRS systems and seek indepth training for SRS. When dealing with live air bags, don’t be a “crash-test dummy.” Be sure to read and follow all instructions, such as system depowering procedures!