A customer just purchased a used (2004) Infiniti FX35. The first time he went to fill the Infiniti’s tank, fuel started to spray back out of the filler neck. Our shop had recently fixed a 2005 G35 with similar issues.
If you confirm the fuel tank is intermittently difficult to fill, replace the shutter valve inside of the fuel tank.
Important: You must closely follow the entire Service Procedure as it contains information that is essential to successfully complete this repair.
One Fuel Level Sensor O-Ring, P/N 17342-CE800, and one Shutter Valve, P/N 17260-AM600, will be required to complete the repair.
Applicable Vehicles: 2003-’05 G35 (V35) and (CV35); and 2003-’05 FX (S50).
Repair Procedure:
Review Fuel Tank and Fuel Level Sender service repair, in addition to safety procedures in ALLDATA Repair before beginning.
 1. Release the fuel pressure from the fuel system using CONSULT-II (or other suitable method).
2. Use a suitable device to remove as much fuel as possible from the fuel tank.
3. Remove the fuel level sensor.
Warning: The fuel level sensor opening and internal baffle have sharp edges.
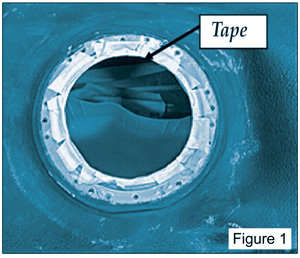
4. You’ll be working inside the fuel tank. To prevent injury, place a split piece of rubber vacuum hose or electrical harness cover tape or other suitable covering onto the edge of the fuel level sensor opening. (See Fig 1.) Apply an electrical harness cover to the edge 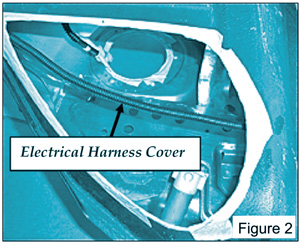 of the vented baffle inside the tank. (See Fig. 2, cutaway view from bottom of tank.)
5. Reach inside the tank and gently bend the baffle away from you so you can reach under it. But don’t overdo it. If you bend it too far, you won’t be able to reach the shutter valve on the end of the tank inlet.
6. Remove the shutter valve with a twisting motion while pulling it straight off. (See Fig. 3, cutaway view from bottom of tank.)
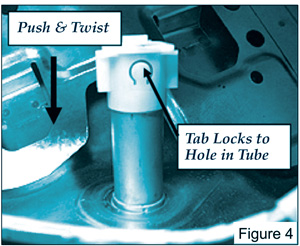
7. Install the new shutter valve P/N 17260-AM600.
• Push it onto the end of the tube with a twisting motion.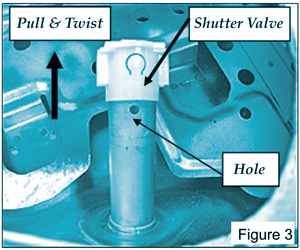 • Turn it until a “snap” is heard and felt.
• Confirm the tab locks to the hole. See Fig. 3.
• The hole is on the end of the fuel inlet tube. See Fig. 4.
8. Gently bend the baffle back to its original position.
9. Remove the protectors you installed onto the tank in step 4 (opening and baffle).
10. Install the new fuel level sensor O-ring in the groove on the fuel tank.
11. Re-install the fuel level sensor on the fuel tank.
 12. Add the removed quantity of fuel to the tank.
Written by ALLDATA Technical Editor, Eric Seifert. Eric is an ASE-certified Master Technician and Engine Machinist, with 20 years of independent shop and parts store experience.
Courtesy of ALLDATA.
For information on products offered by ALLDATA, visit www.alldata.com.