The Volkswagen VR6 engine has been around now for more than 10 years. And given its proven track record of reliability and durability, it’ll be around for years to come. Although not as popular (or as high in production) as its 4-cylinder brothers, we do see quite a few of these cars for regular maintenance, and some for common repairs. These engines are a bit different in design from standard V6s, but VW has built a pretty stout and interesting powerplant that makes for good horsepower in a very compact package.
Differences in early and later versions of this engine relate mainly to the layout of the fuel injection components and installation of OBD II-compatible controls. This engine has a cast-iron block and alloy head, so cooling system problems can be damaging if they are not attended to quickly. Driveability issues are usually caused by lack of maintenance or abuse. Internal repairs are rare, but early cars had some problems with head gasket leaks.
This article will cover a few popular fixes for these systems, and also try to give you help in reducing what could be some rather long procedures for what are easy repairs on other models.
 Driveability Diagnostics
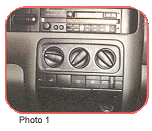
The first step in driveability diagnosis on these cars is to pull any DTCs from the Motronic engine management system. All of the cars equipped with the VR6 engine have either OBD I or OBD II diagnostic capability. OBD I cars (1993 and early 1994) have two separate connectors located behind blind plugs in the dash just below the heater controls. In late 1994 and later cars, there is a single OBD II standard connector located behind a panel next to the ashtray (see Photo 1).
Remove the ashtray by releasing it with the button on the bottom edge, then slide the panel with the Check Engine symbol to the left. Blink codes can be accessed on cars produced until late in the 1995 model run, when blink codes were replaced by standardized OBD II codes accessed with a scanner. The best method to pull codes is with a VAG 1551 or comparable scanner that will give both generic and manufacturer-specific codes. The VAG-type scanners usually will give you a much more specific code, even on OBD I cars.
Fuel Rim Issues
Probably the most common DTCs we see are related to fuel trim. Usually the limit has been reached for compensation and the MIL is on. Or the car won’t start, or starts and dies. First, find out when the last oil change was done, and then check the condition of the battery and charging system. A lot of these cars are driven to submission with little maintenance. By 60,000 miles, the spark plugs may not even have any ground electrode left. VW recommends replacement at either 30K or 40K depending on year and model, but many customers seem to believe that all cars can go 60K. Oil change intervals have been stretched as well by most manufacturers, VW included.
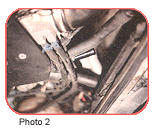 When crank times increase due to worn-out ignition components, fuel dilution of the oil causes fumes to collect in the intake and breather systems causing major adaptive requirements, and turning on the MIL. If you have a pre-1995 VR6 that doesn’t idle well, or the idle is erratic, look at the back center of the engine compartment for a missing part. There is a damper for the idle control system that often is blown apart by a backfire when enough fumes collect in the intake/breather system (see Photo 2).
Note: Don’t just replace it; it’ll blow off again. Usually a replacement of the spark plugs and wires (if needed) and a fresh air filter and oil change will get operating parameters back in line.
As with most OBD II vehicles, fuel trim is influenced by inputs from the MAF sensor as well. Any leaks in the intake boot upstream of the MAF can adversely affect fuel mixture, again causing the MIL to illuminate. Obviously, when the above-mentioned damper is gone, it can cause outside air to enter. But also take a look at the intake ducting itself. The boot is actually hard plastic and is often hardened and easily broken during air filter replacements.
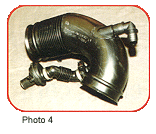
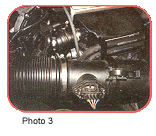 Pay particular attention to the small hose connected to the valve cover (see Photo 3), as this is often broken at the valve in the middle of this duct. There is really no easy fix for this other than replacement, although I have made temporary repairs with a proper size hose until the customer is ready to replace the entire boot. At least this boot has come down in price in the last year or so, but individual parts still aren’t available (see Photo 4). Taking a look at the engine mounts is also a good idea, as a broken or weak mount is sometimes the cause of intake boot breakage when too much right foot is applied.
Ignition System
The most common tow-in reason for these cars is “no start, cranks OK.” Of course, by the time we see it, the battery is dead, the engine is flooded and by jumping it with a good battery at full throttle, the engine fires and seems to run OK after it cleans out. We see this with a lot of other cars these days, too. The first step after pulling codes (check those first) is to pull a spark plug. As noted earlier, you’ll probably find them totally worn out if they’re more than 30,000 miles old. Because the VR6 engine uses distributorless ignition, there are really few components that fail. I’ve yet to see a failed coil pack, but the plug wires on these engines are marginal over 50,000 miles.
 Driveability problems on these cars often can be cured by just replacing incorrect plugs. The other components of the ignition and timing control system have been very reliable. About the only failure of knock sensors or crank sensors has been harness damage or improper attempts to repair harnesses.
Carefully look at the plug wires for signs of burn through, test them for resistance and replace them with OEM quality. You’ll notice that the wires are held in place in the plastic intake cover. Be careful when reinserting the wires to prevent puncturing the insulation. I use a small amount of silicone paste to ease installation. Using aftermarket wires without the proper plug connectors can make removing the wires later a real challenge.
Cooling System
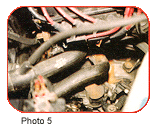
You’d expect that with the cramped engine compartment, there would be overheating problems with the VR6. Really, we haven’t seen much overheating, but we do see coolant leaks. The first place to look, and usually the most obvious leak area, is just under the coil pack at the left rear end of the block. Note the area covered with dry, rusty coolant in Photo 5. With a mirror, you can follow the trail up under the thermostat housing and see where coolant has been coming out, where the multi-purpose housing is bolted to the block. A look at the housing indicates it has more than one function, as it also contains temperature switches and separate housings for the thermostat cover and connection to the supply pipe from the water pump.
 A close look at the large housing will show deterioration and leakage at the seal where the irregularly shaped O-ring seals to the block. The crack to one of the mounting bolts may not be real obvious, but it’s there. Make sure you get all of the necessary O-rings to seal the mating points, as you’ll want to do this job only once. You’ll need three small rings for the switches; two medium rings for the pipe to flange and flange to main housing; one for the thermostat cover; and, if the main housing doesn’t already have an attached seal, you’ll need that one, too.
The main housing is held to the block with rather long, 6 mm Allen head bolts, so use care when removing them. Tighten them slightly, then snap them loose. Make sure you clean the block surface very well before reinstalling the new housing. Even a small mound of rust under the new cover can easily crack the new housing. I like to use a little bit of silicone paste on the O-rings to make sure they are able to move without becoming dislodged while I’m aligning the various parts. The three temperature sensors don’t have to go back in their original locations unless the wiring is too short to allow misplacement.
Water Pump Replacement
On the other end of the engine (front or right side) is the water pump. Because this engine does not have a timing belt, access to the pump would be great if it wasn’t so tight between the block and body. Actually, if you loosen a few things and remove some items, you can get the water pump out without taking the engine out of the car.
Start by removing the small flap of plastic on top of the radiator support; then you’ll be able to look down and see the upper bolt for the front engine mount. Remove the bolt from the front mount and from the rear right mount (passenger side).
Carefully detach components from the air filter housing, including the air intake boot (see previous cautions) along with the MAF, the evaporative purge valve, air tube for the alternator and the filter cover.
Remove the lower portion of the air filter housing by releasing the rubber bands securing it to the body. It’s a tight fit, but the housing will come out. Now you can loosen the three water pump pulley screws before releasing tension on the serpentine belt.
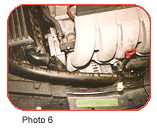
Tension on the serpentine belt is released by installing an 8 mm x 80 mm all-thread bolt in the threaded hole on the tensioner housing (see Photo 6). Run the bolt in only far enough to remove the belt; you could damage the tensioner if you go too far. If you’ll be reusing the serpentine belt, it’s a good idea to mark it for direction and reinstall it as it was removed.
With a floor jack and a piece of wood for protecting the pan, you can carefully jack up the engine far enough to remove the three bolts holding the pump to the block. Again, make sure that you clean the block surface, especially the tapered area where the O-ring goes into the block. Use some silicone paste to prevent the O-ring from rolling out of its groove when installing the pump.
Reverse the disassembly and reinstall everything that was removed. Refill the cooling system slowly to allow air bubbles to escape, or use a vacuum filler.
Electrical Outage
About the only electrical failure we’ve encountered has been the alternator on some early VWs. There must have been a change in design, because we haven’t had one fail on any of the newer cars yet. The replacement procedure is virtually identical to the water pump removal. In fact, we’ve mistaken bad water pump bearings for alternators, and vice versa. The alternator is bolted directly to the block, and although the bolts are a little hard to access, once the air filter and ducting is out of the way, the removal can be done without lifting the engine completely out of the car.
|
Repair Notes
These engines are going to be around for quite awhile. There’s no timing belt to wear out or break; the ignition and fuel systems are fairly trouble-free; and the clutch and transaxle are built heavier than the 4-cylinder components. The rest of the car is built to the same high quality of other VWs, so about the only thing you’ll need to sell your customer is normal maintenance and replacement of wear items. Keep an eye open for oil leaks at the oil cooler adapter and coolant leaks in the areas mentioned, and you’ll be able to keep your customers happy for years to come. In talking with my friends at the local dealer, they noted that they almost all have some minor seepage at the head gasket. The only other internal repair needed semi-regularly has been replacing stretched timing chains that have badly worn sprockets. This will cause a bad, internal upper-end rattle just off idle to about 3,000 rpm. The problem is most likely caused by lack of maintenance or hard driving. |
