With station wagons, small multi-purpose trucks and high-powered sports models in its product mix, Subaru has become an obvious choice for multi-use purchasers. And, by building one basic platform with all of the right stuff, Subaru has been able to concentrate on quality.
That brings us to the topic of this article, Subaru electrical systems. I will try to bring up a few possible trouble areas as well as ways to prevent repeat failures. Because the Legacy line is the basis of virtually every Subaru model, that will be the focus. Component locations, test procedures, and remove and replace steps are pretty much the same across the entire model lineup. While connections and wiring diagrams are similar for the whole line, having the correct information for a specific model is important.
Back to the Basics
Any discussion of electrical systems has to begin with some cautions. It doesn’t take much today to actually cause problems, simply by using the wrong tools or test equipment. Make sure you know the proper procedures before performing any tests that might cause arcing or shorting of power wires. Merely disconnecting the battery can affect the factory coding of processors, setting of codes and loss of memory in ECUs. Make sure that the key is off — better yet, out of the ignition altogether — before anything is disconnected or reconnected.
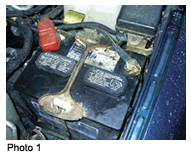 One diagnostic mistake I see made over and over again is that the battery is too weak to provide useable test results. Any testing of charging, starting and vehicle electronics needs to start with an assessment of the battery condition (see Photo 1). If the battery is insufficient, start there, even if you just substitute a known-good battery for test purposes.
The condition of the battery cables and connections also can be a source of incorrect diagnosis and also cause the failure of other components. Battery replacement should be considered as a maintenance item on many newer cars just because the key-off draw can be high enough to kill any battery, especially when the car is used primarily for short trips or with maximum use of accessories.
Charging In
Mounted on top, front and center (see Photo 2) on virtually all of the Legacy models, the alternator is in a location that will be subject to considerable heat.
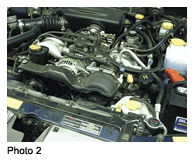 The location does, however, provide much more protection from damage and the elements in secondary road use because it is mounted high. The center location also makes possible the use of a very short belt drive, and R&R is very easy. Wiring harnesses are short and easy to trace for problems.
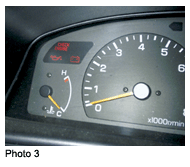
Often overlooked is the first diagnostic step in almost every car made since the 1950s. With the key on, there should be an indicator light for the battery (see Photo 3). You should start your diagnosis by testing for adequate battery voltage, and then make sure there is a charge light. Even if the car has a voltage meter, there should also be a light. After starting the engine, the light should go out. With a low battery, it may take a high idle to get enough initial charge to overcome the ground circuit in the regulator to turn off the light. If the light goes out, the next step will be different than if the light stays on.
 Output Tests
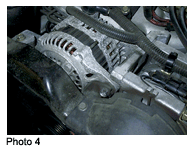
Testing of charging output should be done in a planned sequence that will test all of the various tasks that the alternator needs to fill (see Photo 4). The short list follows.
If the charge light does not come on:
Using the wiring diagram for the model you are working on, ground the exciter circuit wire at the alternator connector (after disconnecting the harness). This is usually a black wire with white tracer. Always start by checking the wiring diagram for the model you are working on. If the light on the dash is now on with the key in the run position, the regulator ground circuit is bad.
If the light still doesn’t come on, use a test light to check the ground through the voltage regulator by putting the test light clamp on the positive battery post and touching the exciter terminal on the alternator with the probe. If the test light lights, there is a problem in the circuit from the indicator light, or a blown charge light bulb.
If the charging light stays on with the engine running:
Test the voltage output of the alternator at the battery and at the alternator charging post. If there is less voltage at the battery than at the alternator, check for a voltage drop in the charging circuit between the battery and alternator.
If there is sufficient voltage output at idle with accessories off (more than 13.5 volts), add accessories to see if the alternator can sustain a rate above 13 volts.
If the alternator fails these basic tests, and the circuit between the alternator and battery shows no more than a minimal voltage drop, the alternator needs to be replaced.
If the alternator light goes out, but the customer is having starting or charging trouble:
Again check that sufficient voltage is reaching the battery, with and without a load.
If voltage is adequate, break out the alternator tester and load the system to check for amperage output. This test should be performed only with a fully charged battery or the results will be flawed.
A battery that fails a load test will also cause a failed alternator load test. Most Subaru alternators should put out a minimum of 50 amps for 10 to 15 seconds and maintain more than 11 volts output with a significant load (more than 100 amps).
If the alternator passes the previous tests, the alternator probably hasn’t failed and other causes for a dead battery should be explored.
Trouble Starters
The Subarus we are talking about all have pretty much the same starter system. The starter is mounted on the top, left (driver’s side) rear of the engine. All use a gear reduction-type starter with an integral solenoid that operates the drive gear. Though we see a relatively small amount of failures for the number of Subarus we service, the starters do fail from time to time. Some basic tests are important to prevent repeated failures caused by other than just old age. As noted earlier, you should always start at the battery since that is where most starter failures originate. Having a standard sequence of tests should pinpoint the needed repair and the most likely cause in short order.
Assuming that the battery tests OK, and the lights on the dash light up indicating the ignition switch is operating, if the engine won’t crank, start by moving the shift lever on automatic transmission cars, or depressing the clutch pedal on manual transmission models, and retrying.
If the starter still doesn’t operate, try turning the key to the crank position and holding it there while you are doing the movement of the shifter or clutch pedal. Be positive that the manual transmission is in neutral before performing this operation. If you are a contortionist, the key crank shifter move operation on automatics will be easier.
If the starter doesn’t activate, watch the lights on the instrument panel for any sign of a draw in the crank position. If there is an obvious dimming of the indicator lights, then there is probably some current getting to the starter solenoid. If there is no change in the lights, the diagnosis may be more complicated.
Go under the hood, locate the starter and remove the small wire at the solenoid housing (this is usually a red wire with a yellow tracer) and use a voltmeter to check for a minimum of 10 volts from the harness in the crank position. You may need a helper to perform this test, or just put longer test leads on the meter and look through the windshield.
If there is sufficient voltage at the solenoid connection, you can use a remote starter button to check the starter operation. If the starter doesn’t crank remotely, replace the starter.
If there isn’t sufficient voltage at the solenoid terminal, trace power back to the neutral switch at the shifter, or the clutch switch on the clutch pedal assembly. Wire colors are usually blue with a red tracer from the ignition switch to the interlock switch, and red with yellow from the switch to the solenoid. You can use a jumper to eliminate the interlock for test purposes. Do not use a jumper to fix the problem.
If you continue to have a starter failure, even after replacing a starter more than once, be sure that there isn’t a voltage drop from the battery to the starter, which will cause internal damage to the solenoid contacts.
We have also seen high-resistance problems in the circuit from the ignition switch, through the interlock to the solenoid. In a number of cases, we’ve added a remote relay close to the starter to shorten the wiring path and reduce the load on the dash wiring harness rather than trying to open the harness. A standard 40-amp relay kit works well for this upgrade.
Sensor Solutions
The most common sensor failures, due to parts failure from wear and tear, are probably the cam and crank sensors, the knock sensor and the EGR solenoid. There really isn’t a problem here; they certainly do not fail any more than other manufacturers. On OBD II cars, codes will almost always be present with the failure of these components, and there will be some warnings when failure is imminent.
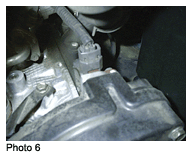
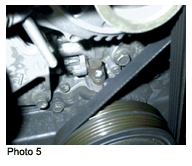 Camshaft and crankshaft position sensors for the Legacy models are generally very accessible, easily tested and easy to replace. Both sensors are magnetic-pulse generators, with similar operating ranges, but they are not interchangeable due to mounting differences. The crank sensor is mounted front and center under the alternator (see Photo 5). The camshaft sensor is most often mounted on top of the left (driver’s) side timing cover (see Photo 6); again easy to access for testing and replacement.
To test either of the sensors, just remove the connector and use a VOM to check resistance, or a lab scope or graphing multimeter to check output.
 The knock sensor often sets a code in excessively hot weather or at high altitude. The light won’t always turn itself back off, even after the vehicle cools down or comes down off a mountain. We suspect it has to do with fuel quality, lean mixture or just excessive engine heat in the area where the sensor is mounted — center, top, rear of engine or under the intake. Very often the sensor housing is cracked or there are other indications of heat damage.
The sensor housing is made of a ceramic material, and there is a metal diaphragm inside, so handle carefully. Replacement can be a challenge, but with the right combination of extensions and U-joints, the bolt can be removed and the sensor pulled from its protected area. Make sure the mounting area is clean and corrosion-free before bolting in the new sensor, so there is no chance that a bad connection with the engine block will cause erratic operation.
We really haven’t found a consistent cause of EGR solenoid failures but, again, the typical mounting location on the top of the engine subjects a rather delicate part to a harsh environment. You can check for operation, try cleaning the orifices and clearing the code, but it may come back. The solenoid isn’t hard to replace, but can be a little pricey.
This article didn’t address every electrical problem you might encounter, but I’ve just tried to steer you in a direction that will simplify diagnosis and facilitate a better repair. Remember to always check the basics first, not last. The Subaru line has been a very good producer for our shop by bringing us some very loyal and understanding customers, and it can do the same for your shop.
Assorted Subaru Service Tips
Diagnosing Power Steering Groan or Vibration on Subaru Vehicle?
You may have a customer with a 2000-’02 Legacy sedan, wagon or Outback with a 2.5L engine may complain of an abnormal noise (groan) coming from the power steering pump and/or slight vibration in the steering wheel when turning at very low speeds.
The new style hose assembly was used in production starting in April 2002 with the following VINs: Legacy Sedan, 2*215560; Legacy Wagon, 2*310501; and Outback, 2*660215.
 Repair Procedure
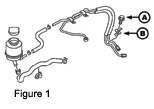
Remove the bolt (A) and clamps (B) that secure the high-pressure power steering hose (see Figure 1).
Confirm that the abnormal noise and/or vibration has been reduced. If so, leave the clamps off; no further action is required.
If the abnormal noise and/or vibration have not been reduced, replace the high-pressure power steering hose with the updated hose, P/N 34610AE09B, and leave the clamps off.
If, after replacing the hose, the abnormal noise and/or vibration is still evident, replace the power steering pump.
Courtesy of ALLDATA.
Viewing a P0325 DTC?
If the check engine light is on in a 1995-’99 Legacy 2.2L or 1996-2002 Legacy 2.5L with DTC P0325, the knock sensor is faulty.
Locate and unplug the knock sensor connector. Using a digital volt ohmmeter, check for a 5-volt reference on the knock sensor signal wire from the ECM with the key on engine off. If there is a 5-volt reference on the knock sensor signal wire with the connector unplugged, re-connect the knock sensor connector and carefully back probe the knock sensor signal wire.
Verify the knock sensor signal voltage drops to approximately 2.5 volts with the knock sensor connected and the key on engine off. If the knock sensor signal voltage drops down to around 0 volts or stays up around 5 volts with the knock sensor connected, the code will set. If the 5-volt reference is present with the knock sensor unplugged but the voltage is not correct with the knock sensor connected, then the knock sensor is faulty and will need to be replaced. If the code is intermittent, test drive the vehicle and monitor the voltage for the knock sensor.
Courtesy of Identifix.
Daytime Running Lights Not Running? Here’s a strange service tip for a customer who’s concerned that his/her daytime running lights (DRLs) do not operate. First, check to see if the brake fluid level warning light is “on.” If it is, the DRLs will not function.
You need to check the brake fluid master cylinder for proper level. If the fluid gets too low, the rubber plunger inside the master cylinder drops down and pushes on the low fluid warning light switch, turning on the dash light. This renders the DRLs inoperative. No repair should be attempted other than bringing the brake fluid to its proper level.
Courtesy of ALLDATA.

