Every diagnostic technician experiences operational complaints that are more bizarre than they are technically complex. The problem is made difficult when the technician fails to stand back from the problem and look at what I call, “The Big Picture.” As you will see in the following case study, The Big Picture is a collection of seemingly unrelated details — details that ultimately became part of the solution itself.
This month’s case study is about a “Plain Jane” 2001 Chevrolet all-wheel-drive Astro commercial van that is called upon during the very early hours of morning to deliver newspapers to the famed mountain ski resort of Vail, CO. This customer was referred to me through a mutual friend who was trying to help the owner solve an operational problem of the headlamps dimming as she hauled newspapers over treacherously narrow and often snow-covered mountain passes.
Because she needed one-stop service, the vehicle’s owner had a Chevrolet dealership in a neighboring community maintain the van since it was new. Unfortunately in this case, the dealership people had reached the end of their wits in dealing with the dimming headlight complaint.
The Customer Interview
When approaching an operational complaint like intermittent dimming of the headlamps, it’s important to understand the history of the complaint. During the initial interview, the customer indicated that the headlamps were going dim when she was using “passing gear” to climb one particularly steep point on her trip to Vail. When I asked her how dim the headlamps became, she replied, “If a deer jumped in front of me, I wouldn’t see it.” Of course, that’s dangerously dim. Dim enough in my estimation to warrant a serious investigation of the complaint.
I asked when the problem started, and she mentioned that the problem began after the dealership had replaced a worn-out alternator. It seems the original alternator failed, which would be normal for a vehicle with more than 180,000 miles of night-time, cold-weather driving. Unfortunately, the new replacement alternator developed an intermittent charging condition, which meant that the headlamps would vary in intensity as the van was driven on the road.
Requesting Documentation
Although the dealership replaced the faulty alternator under warranty, the customer had become sensitized to the headlamps dimming. Fortunately, she kept a record of every service performed on her bread-and-butter Astro van. The van’s five-year-old battery had been replaced during a routine service. Similarly, the dealership also had repaired a loose connection on the driver’s side headlamp during another maintenance stop. At that time, the dealership was also requested to repair the All-Wheel-Drive display light, the battery warning light and the Service Engine Soon warning light. At this point, the dealership replaced the alternator to remedy the battery and SES warning light issues. Thus begins our tale of the mysteriously dimming headlamps.
Remedial Action
Although the dealership had replaced the new alternator under warranty, the customer felt that the headlamp dimming problem hadn’t been cured either by the battery replacement, the wiring repairs or the warranty alternator replacement.
Judging from the service records, the dealership technicians had done a thorough test of the system including measuring resistance through the wiring harness to the headlamps. The dealership had also told the owner that the alternator was pulse-modulated, which means that the PCM controls alternator output. In this case, when the engine approached 4,300 rpm at wide-open throttle (WOT), the PCM was programmed to reduce alternator output, evidently because 4,300 rpm at WOT is considered an emergency power requirement situation.
The technician verified that this condition was occurring during a test drive with a scan tool attached. The dealership even took the extraordinary step of installing a PCM from an identical vehicle to confirm the operating strategy. In this case, the dealership had gone above and beyond in its responsibility in replacing the faulty alternator and diagnosing the dimming headlamp condition, and had seen no reason for pursuing the complaint any further.
Professional Courtesy
At this point, I want to emphasize that it never helps to disparage the work of the previous shop. In fact, disparaging the work of another shop simply leaves your own credibility in doubt. After examining the documentation, I told the owner that I thought the dealership had done a reasonably thorough job of working through the headlamp dimming issue.
The only technical issue I had with the previous diagnostic work was that, instead of testing resistance in the wiring harness, I would have performed a voltage drop test, which is a more accurate method of measuring resistance in wiring connections. Of course, the dealership also hadn’t driven the Astro van at night to verify the dimming complaint, presumably because darkness occurred after normal working hours.
A Cautionary Note
My preliminary research in cases like this usually begins with reviewing technical service bulletins and the applicable wiring schematic print-outs. During this process, I discovered that aftermarket wiring schematics covered a number of exterior lighting configurations for this vehicle. Some schematics superimposed configurations. One schematic included the multi-function switch located on the steering column, while another did not. Some of these schematics indicate that the daylight running light and body control modules affect headlamp operation while, again, some did not. In addition, these schematics show some vehicles equipped with composite headlamps and others equipped with sealed beam headlamps like those on our commercial van. Even more important, the “dimming switch” indicated on the schematics referred to the dimming switch for the instrument panel lights, not the high to low beam headlamp switch.
To cut through this jungle of technical jargon, I polled the vehicle electronics and discovered that the commercial version of the Astro van didn’t incorporate a body control computer. So, rather than diagnosing the complete headlamp circuit, I used the applicable sealed-beam schematics and concentrated my efforts on measuring available voltage at the headlamp itself.
Testing Amperage
One advantage of owning an independent shop is that we can set our own policies and, if necessary, our own hours. In this case, my policy is to start a diagnosis from the beginning, just to make sure no stone is left unturned in the diagnostic process. I began by load-testing the battery with an adjustable carbon-pile tester. As might be expected, the new battery tested 125% of its rated cold-cranking amperage capacity. I followed with an electronic conductance test just to make sure that the sealed OEM battery didn’t have any dead or deficient cells.
 I also load-tested the alternator at idle because General Motors had issued several service bulletins concerning battery drain during low-speed driving with full accessory loads. Since the Astro commercial van was being driven six hours each night with a full accessory load, I decided to see if the accessory load exceeded the low-speed alternator output.
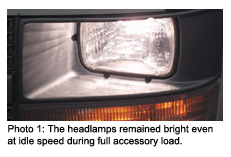
With all accessories, including exterior lighting, wipers and the HVAC blower motor turned on, the total accessory amperage load totaled 52 amperes, which was well below the 100+ amp output of the new alternator at idle speeds. At idle with full accessory load, the headlamps remained bright. See Photo 1.
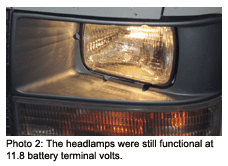 Last, I tested the durability of the battery itself by leaving the vehicle under a full accessory load minus the windshield wipers for 20 minutes. At the end of the 20-minute test, the battery still produced 11.8 volts, which is still more than enough to power the headlamps. See Photo 2.
Testing Voltage
Voltage-drop testing determines exactly how much voltage is being lost at a specific point when the system is operating under a full electrical load. In general, the maximum allowable voltage drop within most circuits is 0.5 volts.
But, measuring voltage drops can be tricky because battery voltage can drop at least a half-volt as it circulates through the various lengths of wiring running from the engine compartment to the various components like the PCM, ignition system and light switches. In addition, modern charging systems are extremely sensitive to ambient air temperature. I always had to take into account the change in charging voltage from a high of 14.2 volts during the low ambient temperatures of nighttime operation to a low of 13.8 volts during peak ambient temperatures of daytime operation.
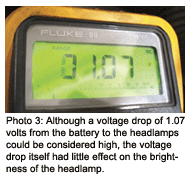
My next step was to measure the voltage drop between the battery and the headlamp itself. The voltage drop from the battery, through the multi-function switch, through the headlamp relay and to the headlamps was about 1.07 volts. See Photo 3.
On one hand, 1.07 volts appears to be an excessive voltage drop to the headlamps. On the other hand, was a 1.07 voltage drop enough to dim the headlamps enough to limit visibility?
A simple test proved this not to be the case because jumping battery current to the headlamps failed to increase their brightness to any degree. Whatever the case, I replaced the headlamp relay to ensure that an intermittent voltage drop wasn’t taking place in that relatively inexpensive piece of hardware. My next step was to verify the underhood grounding points for the exterior lights by again inserting a voltmeter between the grounding points and battery negative. Here again, all grounding points passed muster with a voltage drop of less than 0.5 volts.
But, although the driver’s side ground was in good condition, I did notice that the passenger’s side ground was slightly loose and coated with paint overspray. It was clear that the van had experienced a minor collision, but what would that have to do with the intermittent headlamp dimming condition?
Road Testing the Condition
 The Astro van’s owner insisted that the problem would occur if I drove the van up a nearby mountain pass. With that thought in mind, I returned after hours for a night-time test drive in the Astro van. To gather information, I connected a scan tool to the diagnostic connector under the seat and attached a DVOM to the high-beam connector at the headlamp itself. I set the DVOM on the min/max position to catch high and low voltage fluctuations.
Because it had begun raining, the headlamps reflected off the wet highway and rendered the results of the first road test inconclusive. I did, however, notice that, as the dealership had said, the PCM drastically reduced alternator output as the engine approached 4,300 rpm WOT. The DVOM’s min/max indicated that, after 4,600 rpm, the headlamps still had 12.28 volts available at the connector.
The next day, I asked the owner if the vehicle had been in an accident. “Oh, yes,” she said, “I hit an elk with the van just before I had the alternator problem.” Suddenly, that added detail made the “Big Picture” a little more complete. During the following evening, it rained once again before I could complete a night-time test drive. But I noticed as I drove up to the garage door that the passenger side headlamp was shining markedly low to the ground while the driver’s side headlamp was shining too high.
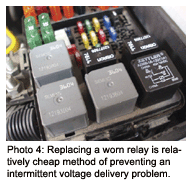 Aiming the headlamps verified that the headlamps were indeed not converging on the road surface at the desired point. In addition, I replaced the headlamp relay located in the underhood fuse box as a relatively inexpensive preventive measure. See Photo 4.
Looking at the Big Picture
As I said at the outset, The Big Picture is a collection of seemingly unrelated details that ultimately became part of the solution itself. It was clear from the beginning that the dealership had accurately validated the condition of the alternator, battery and headlamp wiring circuit. What the dealership had inadvertently missed was that the headlamps were improperly aimed. Considering that this van was spending an extraordinarily long time in passing gear on high mountain passes and that the PCM was reducing the alternator’s charge rate under what it recognized as an emergency operating condition, it was understandable why the dimming condition was alarming the owner. Adding low alternator output at high engine loads to a pair of poorly aimed headlamps creates a perfect formula for poor visibility during night-time driving in bad weather.
When discussing this scenario with the owner, she responded by mentioning that she has a friend with an identical model of van that didn’t have this problem. Of course, I could only speculate whether the alternator in the friend’s van was reducing alternator output at high engine speeds or not.
But, when dealing with computer-controlled components, we must remember that the computer does as it’s programmed to do. In other words, the PCM in my customer’s van is programmed to reduce alternator output at 4,300 rpm. The PCM in her friend’s van may, on the other hand, not be programmed to perform that function.
Software programming, after all, is what drives the operating systems on all modern electronic vehicles. Because something as simple as a routine reprogramming can change the operating strategy of any single component, one can, again, only speculate about how a specific system should respond to various operating conditions experienced on a specific vehicle application.
As for the 1.07 voltage drop, I recommended to the owner that we replace the multi-function or “dimmer” switch as a preventive maintenance at a later date. Given that the Astro commercial van had already accumulated 183,000 miles of primarily night-time driving at the time of the diagnosis, I felt that the voltage drop itself would justify the repair. In fact, a worn dimmer switch may also be a key part of what I call “The Big Picture.”
Silver Bullets Ford: Locating the Main Computer Ground
On all Ford vehicles, the main computer ground is located directly off the negative battery cable in a large pigtail connector. This is very prone to corrosion and should be inspected or replaced, if necessary.
Ford: Poor Performance, No Codes
Before you look for complicated causes for a Ford driveability concern — ones that may not be accompanied by any codes — check the main ground connector located right off the battery ground cable. Ford runs all computer grounds through this connector. The best way to test this ground is by doing a voltage drop across it while in the output state test mode on your scan tool.
Jeep: JTEC No Start After Battery Disconnect
If you happened to have the key in the “on” position with the battery disconnected while working on a Jeep, the vehicle will most likely not re-start due to the antitheft system. Use your factory-based scan tool to re-set this system.
Silver Bullets courtesy of AST TRAINING
www.asttraining.com