The brake fluid level on 1994 Integras may be low in the ABS reservoir, and fluid may appear to be leaking from under the label on the ABS accumulator. The likely cause is that the ABS accumulator internal O-ring is damaged, allowing brake fluid to leak out.
Diagnosis:
Remove the label from the ABS accumulator.
If the hole behind the label is wet with brake fluid, continue to Corrective Action.
If the hole is not wet, clean the accumulator and use powder to locate the leak.
Corrective Action:
Replace the accumulator and O-ring.
Remove the air cleaner housing assembly.
Relieve the system pressure. Refer to service manual page 19-152 for the proper procedure.
Disconnect the 14P and 2P connectors from the modulator.
Remove the six brake lines from the modulator.
Remove the wire harness clip from the modulator bracket.
Remove the three modulator mounting nuts, then remove the modulator from the car.
Remove the two mounting bolts and remove the accumulator from the modulator. See Figure 1.
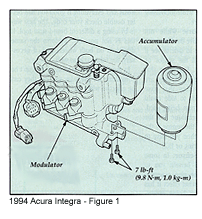 Note: Do not place the modulator in a bench vise. You could damage the fittings.
Do not release the nitrogen from the accumulator at this time. The accumulator should be stored, fully pressurized, for 30 days for warranty parts call-in. If it is not called in after 30 days, the accumulator should then be depressurized and discarded.
Install the O-ring on the new accumulator.
Install the accumulator on the modulator. Tighten the mounting bolts to 9.8 Nm (7 ft.-lbs.).
Install the modulator in the car. Tighten the mounting nuts to 22 Nm (16 ft.-lbs.).
Reconnect the brake lines, wire harness clip and electrical connectors. Tighten the brake lines to 19 Nm (14 ft.-lbs.).
Fill the modulator and brake reservoirs with Genuine Honda brake fluid.
Bleed the brake system. Refer to service manual page 19-6.
Bleed the ABS modulator. Refer to service manual page 19-153.
Modulator Final Bleeding Procedure:
Connect a piece of 3/8 inch O.D. hose to the pressure side of a hand-held vacuum pump.
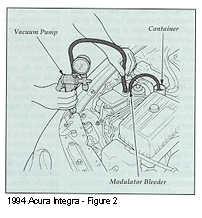
Remove the filler cap from the modulator reservoir. Leave the plastic insert in the modulator opening.
Start the engine. Hold the vacuum pump hose against the modulator opening insert. To pressurize the reservoir, pump the vacuum pump until you feel resistance (1 to 3 strokes). See Figure 2.
While keeping the reservoir pressurized, have an assistant turn off the engine and then slowly open the modulator bleeder.
Close the bleeder when brake fluid stops running into the tube.
Repeat steps 18 through 20 five times to purge the air from the modulator.
Clear any codes in the ABS control unit memory by removing the ABS B2 fuse in the underhood ABS fuse box for three seconds.
Technical service bulletin courtesy of Acura Parts Express
SUBARU: ABS RELAY STICKING
Should you encounter the following condition(s) on a Legacy, Impreza or SVX equipped with ABS brakes, follow the troubleshooting chart shown above.
The ABS hydraulic unit motor continues to run and/or buzz when the ignition key is turned to the off position.
The ABS warning light comes on and DTC 52 for a faulty hydraulic motor and/or motor relay is stored in memory.
Note: It is possible for this condition to occur intermittently. Under these conditions, the symptoms may not always be duplicated.
Troubleshooting Steps:
Check if the ABS hydraulic unit motor is running or if you can duplicate the condition.
If the hydraulic unit motor is running, does it continue to run with the key in the off position?
Confirm the trouble code, if any, and trouble- shoot according to the diagnostic chart in the corresponding service manual.
Replace the ABS hydraulic unit motor relay with a modified one, p/n 26735AA012. The new relay can be identified by a white line under the word “Japan” on the relay case.
Note: Always check the part number supersession for any changes.
If the wiring harness is at fault, repair and/or replace it as necessary.
The new ABS motor relay has been changed in production beginning with the following VINs:
Legacy (SIA built): Sedan: T*206647, S/W: T*308128 and O/B: T*374098;
SVX: T*100004;
Impreza: Sedan: T*510065, S/W: T*810189; and
Coupe: T*410116.
Technical service bulletin courtesy of ALLDATA.

