 MODELS:
2008-2010 E-150, E-250 and E-350
ISSUE:
Some 2008-2010 E-Series 150-350 vehicles built on or before 11/30/2009 may exhibit steering wander or free play.
SERVICE PROCEDURE:
Several factors may contribute to steering wander or free play condition and are addressed below:
• Steering gear mesh load adjustment. Steering free play is normally attributed to low mesh load torque. But in some vehicles, high mesh load torque may result in a condition called sticky on-center feel that may be misinterpreted as wander.
• Front end alignment may be adjusted to improve the wander/free play condition.
• Sticky on-center feel may also be due to ball joint tightness and/or high friction/rubbing of the intermediate shaft boot.
1. Lubricate the intermediate shaft boot seal with silicone spray lubricant.
2. Install grease/zerk fittings (obtain locally) in the lower ball joints and lubricate with Motorcraft Premium Long-Life Grease.
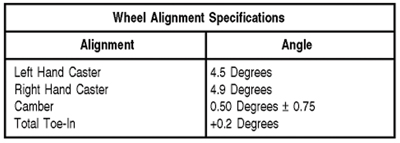
3. Set the alignment to:
Left Caster: 4.5º
Right Caster: 4.9º
Camber: 0.50º
Total Toe-In: +0.2º
4. Adjust the steering gear mesh load per Workshop Manual (WSM), Section 211-00.
a. The steering drag link must be disconnected from the sector shaft arm and the airbag removed to make this adjustment accurately. Do not attempt to set the mesh load torque by feel.
b. Set the on-center torque higher within the WSM specification range by turning the mesh load screw clockwise. Make no more than 1/4 turn per adjustment.
c. The on-center torque must be 2.5 to 7.0 lb-in (0.28 to 0.79 N.m) greater than the peak preload torque without exceeding a total of 19 lb-in (2.15 N.m).
5. Road test the vehicle.
a. If the wander free play has been resolved, the repair is complete.
b. If the wander hasn’t changed or has even increased slightly, the vehicle is exhibiting sticky on-center feel, go to Step 6.
6. Set the on-center torque lower within specification range by turning the mesh load screw counter-clockwise.
a. Make no more than 1/4 turn per adjustment.
b. The on-center torque must be 2.5 to 7.0 lb-in (0.28 to 0.79 N.m) greater than the peak preload torque without exceeding a total of 19 lb-in (2.15 N.m).
Courtesy of Ford.