Automatic hubs are used on many 4×4 trucks to disengage the front wheels when four-wheel drive is not needed. Disconnecting the front wheels reduces friction and may improve fuel economy as much as one mile per gallon depending on the vehicle. A one mpg difference may not sound like much, but with gas costing around $3 a gallon these days every little bit helps.
Some trucks and SUVs that are factory-equipped with automatic locking hubs include Ford F150 and F250 pickups, Broncos, Rangers and Explorers, Chevy and GMC trucks, Dodge trucks, Jeep Cherokee and Wagoneer, and Toyota trucks. Applications date back to the early 1980s for the domestic trucks, and as far back as 1976 for Toyota.
The main advantage of being able to disengage the front wheels on the go is that the driver doesn’t have to stop, get out of his vehicle and twist a dial on the hub to disengage or engage the front wheels. The automatic hub does it automatically on the fly. The locking mechanism inside an automatic hub is sort of like a one-way clutch. When torque is applied by the driveshaft, it forces the hub to slide in and lock. The hub then remains in the locked position as long as the transfer case remains in four-wheel drive. When the driver shifts to two-wheel drive, the clutch mechanism inside the hub slides back out and releases the hub, allowing the wheel to turn independent of its axle shaft.
There are a number of automatic hub designs, though, and not all are capable of engaging while the vehicle is in motion. Some of the older types require the vehicle to stop and back up a short distance to engage the locking mechanism. Some automatic hubs don’t engage in reverse, and others use a vacuum diaphragm to engage the hub (or the axle shaft) when switching between two- and four-wheel drive modes.
There are also aftermarket hub conversions for changing manual locking hubs to automatic hubs, or replacing troublesome OEM automatic hubs with heavy-duty manual locking hubs (which is something most serious off-roaders do to improve traction and durability). On some applications, only one side unlocks when in the 2WD mode. With this setup, the hub on the opposite side remains locked and the axle continues to turn with the wheel. But as long as the transfer case remains in the 2WD mode, the front wheels are not driven. When the transfer case is shifted into 4WD, the unlocked hub automatically slides into position and locks the axle so both front wheels become drive wheels.
Some automatic hubs, like the “Selectro” automatic hubs on Jeeps with six bolt lock-outs, have an “auto” and “lock” position on the dial. This allows the hub to engage as needed or to remain in the locked position all the time.
 If a vehicle has been equipped with a locking front differential (such as a Detroit Locker), some type of manual or automatic locking hub is usually required. A locked differential is great for serious off-roading because it keeps both front wheels turning regardless of traction. But it can make a vehicle difficult to handle or steer when driving on dry or wet pavement, or even in snow, loose dirt or sand. Unlocking one or both hubs allows the front wheels to turn at different rates for easier steering and turning when maximum traction isn’t needed.
HUB PROBLEMS
Automatic hubs can be troublesome. The most common problem is the hub won’t engage. Mud, rust or worn parts inside the hub can prevent the mechanism from sliding in and locking the hub. The driver may not notice anything is wrong until he finds himself stuck axle deep in mud and realizes the front wheels aren’t doing anything. Or, he may hear some grinding noises when he shifts to four-wheel drive and may think something is wrong with the transfer case or front differential.
For the same reasons that prevent the hub from engaging, a hub may also fail to release. Anything that binds the internal mechanism can prevent it from sliding and releasing. The most noticeable symptoms may be an increase in fuel consumption, noise on the highway and/or increased front tire wear.
DIAGNOSIS
Diagnosing an automatic hub problem may require test driving the vehicle, or raising a front wheel to see if the hub is engaging and disengaging properly. Put the transmission in park, set the parking brake and raise the chassis so one of the front wheels is off the ground while the other is still on the ground. When the transfer case is in two-wheel drive, the hubs should be released allowing the wheels to turn freely when spun by hand. If the axle shaft turns when you spin the wheel, it means the hub has not disengaged.
To check engagement, rotate the axle shaft backwards. This should lock the hub. Try turning the wheel by hand again. The axle shaft should now turn with the wheel if the hub is locked. If the hub fails to lock, the hub will have to be disassembled and inspected or replaced.
To check release, hold the axle shaft steady and rotate the wheel backwards. You should hear a click as the locking mechanism slides back out and disengages the hub. Rotate the wheel forward again and it should turn freely.
Another way to check the hubs is to raise the vehicle on a frame contact lift so all four wheels are off the ground. Then start the engine and place the transfer case in four-wheel drive and the transmission in drive. If the front wheels don’t turn, look at the front axle shafts. If both shafts are turning, but one wheel is not, the problem is a bad hub on the wheel that isn’t turning. If the front driveshafts are not turning when the transfer case is in four-wheel drive, the problem is inside the differential (broken side gears) or the transfer case (broken chain, shift linkage, etc.). If the driveshaft between the transfer case and differential is turning, the problem is in the differential. If the driveshaft is not turning, the vehicle is going to need repairs to the transfer case.
 HUB MAINTENANCE
Refer to the vehicle owners manual for recommended hub maintenance. For normal driving, the hubs should be cleaned, inspected and lubricated every two years or 24,000 to 30,000 miles. For off-road use or driving in hub-deep mud or water, more frequent maintenance is usually required to reduce the risk of hub trouble.
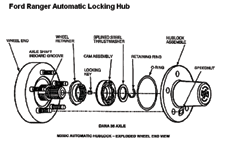
To service the hub, some disassembly is required. The outer hub cover is usually attached to the hub with five or six Torx screws. Once the cover has been removed, you can loosen and remove the rest of the clips and/or fasteners that attach the hub assembly to the wheel hub. Disassembly and reassembly procedures will vary from one hub design to another, so refer to the OEM service information for the particulars. If you don’t have a manual or online service information, disassemble one hub at a time. That way if you can’t remember how the parts came apart, you can always refer to the other hub as a guide.
 TIPS ON FORD LOCKING HUBS
The following information is from Ford service article 95-5-18 and covers the automatic locking hubs on 1983-90 Bronco II, 1983-95 Ford Ranger and 1991-94 Explorer. Ford says that the automatic locking hubs on these vehicles have an O-ring seal between the hublock and wheel hub to prevent contamination. When the hublock is removed, the O-ring seal should be checked for damage. If contamination is found in the wheel end, the source of the contamination may be the hublock seal, the wheel bearing seals or the axle spindle seals.
Hub problems may be indicated if a buzzing noise is heard in two-wheel mode shortly after operating in four-wheel drive. This may occur if one of the hublocks fails to disengage. As the vehicle moves forward, the hub that failed to disengage will rotate its axle shaft through the differential and attempt to rotate the other axle shaft in the opposite direction. This is called differential motoring torque. As one axle shaft attempts to turn the other axle shaft through the differential, that shaft’s hublock will attempt to engage causing a ratcheting or buzzing noise. (Note: this same kind of noise may also occur if the front differential contains the wrong lubricant. Ford specifies 56 oz. of F1TZ-19580-A or equivalent gear oil.) If the hubs are noisy or are failing to disengage, Ford recommends replacing both locking hubs.
If you hear a popping or banging noise while driving in four-wheel drive, one or both hubs may be slipping or broken.
 Ford used Warn Automatic Hublocks Model M350 on Bronco II and Ranger with the Dana 28 Axle from 1983-90 (through build date 10/4/89). Warn Automatic Hublocks Models M350A and M350B were used on the Dana 35 Axle in Bronco II, Explorer and Ranger for 1990-93 (begin build date 10/5/89). Starting with model year 1994, Ford switched to Warn Automatic Hublock Model M350C on Dana 35 Axle in the Explorer and Ranger.
The Model M350 hublocks are black while the Model M350A, M350B and M350C are white/silver in color. The Model M350 can only be replaced by Model M350 service parts. The M350C service kits should be used as replacements for M350A hublocks (released 10/89 as model year 1990 running change), M350B hublocks (released 4/92 as model year 1992 late running change), and M350C hublocks (released 8/93 as model year 1994 Job 1 change).
When automatic hublock servicing is required for any Ranger, Explorer or Bronco II built from 10/89 through model year 1993, it is advised that both hublocks be replaced. Ford also says that if an M350A or M350B hublock requires servicing, all the hublock components must be removed and replaced with service kit F3TZ-3B396-B, which is essentially the same service kit for the M350C hublock. The cam assembly of the M350A or M35OB should not be used with an M350C automatic hublock body, nor should an M350A or M350B hublock body be used with an M350C cam assembly.
 FORD HUBLOCK REPLACEMENT PROCEDURES
Remove old hublock, remove key from bearing retainer nut and then remove nut.
If replacing a manual hublock with an automatic hublock, also remove the three-piece wheel bearing nut assembly.
Remove the new wheel bearing retaining nut from the cam assembly and install on the threaded spindle.
Using Hex Locknut Wrench (T70T-4252-B), torque the wheel bearing retainer nut to 47 N-m (35 lb.ft.) while rotating the wheel assembly. Back nut off 1/4 turn and retighten to 1.8 N-m (16 lb.in.) of torque.
Align the scallop of the wheel bearing retaining nut with the center of the spindle keyway by advancing the nut clockwise.
Install the retaining key into the spindle keyway. With the garter spring inboard, align the key on the cam assembly with the keyway on the spindle.
Firmly press the cam assembly on the wheel bearing retaining nut.
Caution: Do not pack the hub with grease. Too much grease will cause improper hublock operation and may damage the hub assembly.
For Ranger and Bronco II, model years 1983-90 (through build date 10/4/89), using the Dana 28 axle, install the thrust washer set onto the axle:
a. First, the plain steel washer. b. Second, the needle bearing. c. Last, the spline washer.
For model years 1990-94 (begin build date 10/5/89), Dana 35 axle, install the one-piece spline washer. Install the “C” clip into the axle groove. It may be necessary to push the axle outboard from the inboard side of the knuckle.
For 1995 Ranger, install the thrust washer onto the axle:
a. First, the plain steel thrust washer. b. Second, the plastic unsplined thrust washer. c. Last, the steel spline thrust washer. Caution: Make sure the retaining ring or “C” clip is seated properly in the axle groove for steps 8, 9 and 10.
Make sure the O-ring seal on the flange face of the hublock body is not damaged and is properly positioned in its groove.
Install the hublock body assembly into the vehicle hub and rotor assembly. The hub may have to be rotated to line up the three (3) prongs of the cam follower (found internally to the hublock) with the cam assembly.
Install retainer flat nuts on wheel studs.
Note: Do not force the hublock assembly. If the body assembly will not fit, recheck the alignment of all the components.
Install speednuts on wheel lugs to retain the hublock.
Then install the wheel and torque the lug nuts to 136 N-m (100 LB.FT.).